How To Paint Linoleum Flooring
It’s been a while since I’ve shared any progress on my niece’s kitchen makeover, but I’ve finally tackled the one project that I’ve wanted to do the most since we started updating this space – we painted the linoleum flooring!
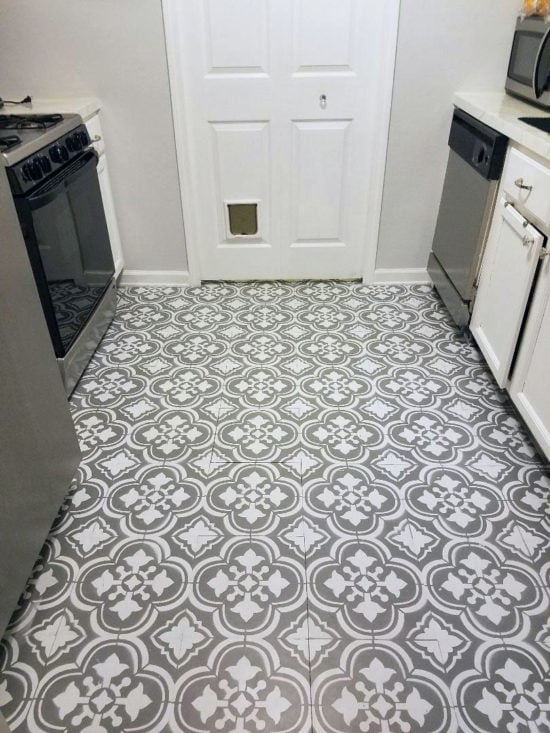
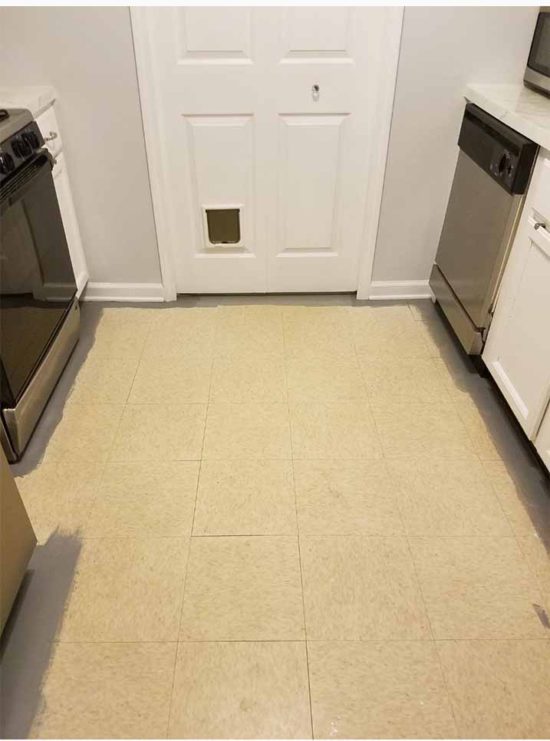
My niece’s dated linoleum kitchen floor always felt out of place, yellowed and worn, yet still functional. Replacing it wasn’t in the budget. Instead, I breathed new life into it with paint and a stencil to mimic trendy cement tiles.
Best part? It cost a fraction of new flooring and transformed the space entirely. If you’re stuck with outdated linoleum, I’ve got you! This guide walks you through every step, with tips to ensure it looks great and lasts
I saved this project for last for 2 reasons. First, because we were painting everything else, I didn’t want to get anything on the floors, and second, it would keep me motivated to finish everything else.
Painting Linoleum flooring – The plan
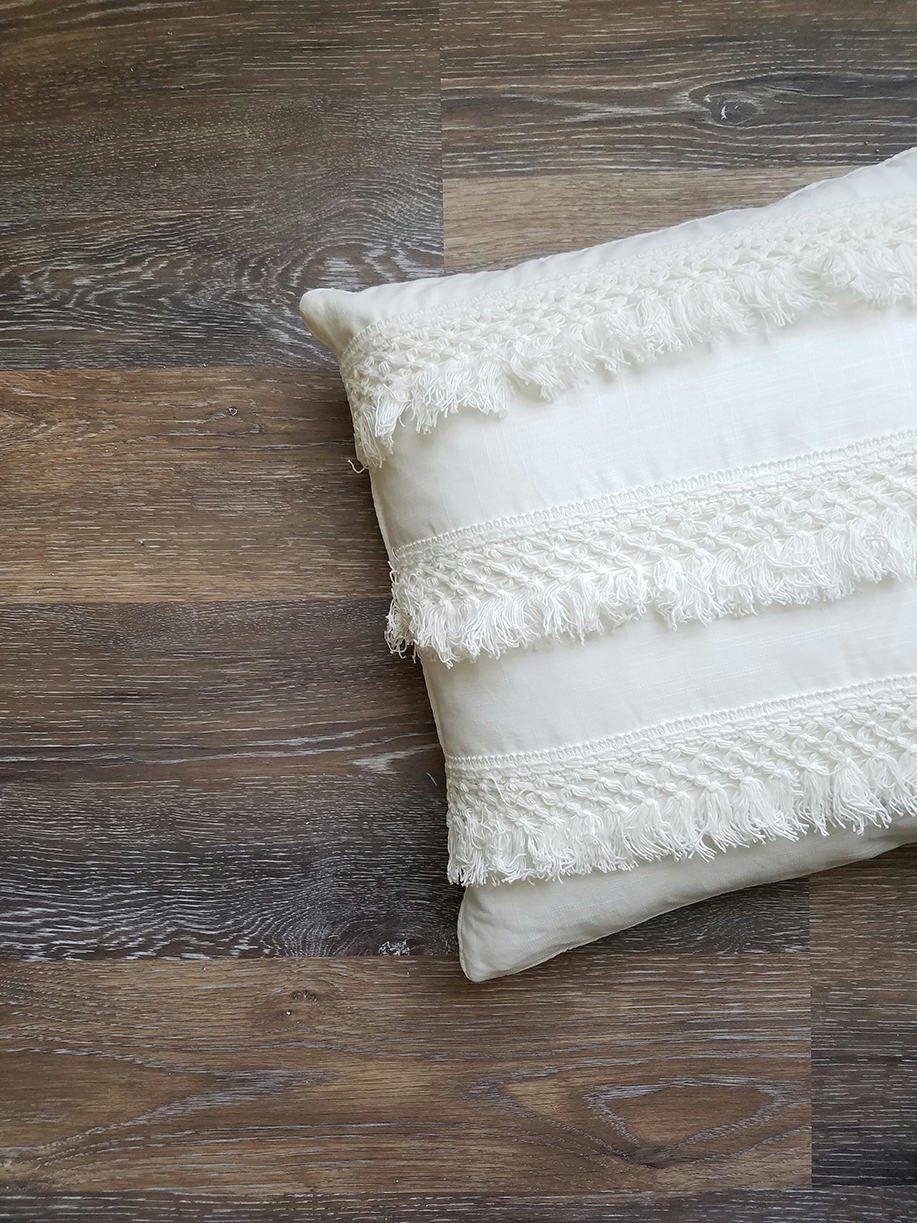
Linoleum flooring has come a long way in recent years. I have some in my bathroom that looks like wood flooring* and I love it. It’s not a bad choice for bathrooms, where you know they will be getting water on them. Tiles are too slippery, and wood flooring wouldn’t hold up to water damage. But in this kitchen, the outdated yellowish-looking linoleum had to go!
I love the patterned cement tile look that is popular right now, especially these tiles from Home Depot. I wanted to recreate this look in my niece’s kitchen.

What You Need to Paint Linoleum Flooring:
Paint Sprayer – works well with stencils!
White Paint – (Plain White Eggshell Enamel Paint)
Slate Gray Porch & Patio Paint – Durable in high traffic areas
Rust-Oleum Polyurethane Floor Sealer – To protect the finish
Extension Paint Roller – Saves your back!
Patterned Stencil – So many options to suit your style
I decided we could recreate the look with paint and a stencil. I picked this stencil that is a similar pattern. The squares on my niece’s linoleum flooring measured 12″ X 12″, and this stencil was available in that size.
Next, I started researching what type of paint to use for the floors. I read in several places that people used porch paint (meant for outside, thus being more durable), and I thought that sounded like a good idea (keep reading to find out why it wasn’t such a good idea). My niece picked up a gallon of gray porch paint by Behr at Home Depot.
Step-by-step tutorial for painting floors
clean and prep floor
First, you’ll want to clear the area and clean and vacuum it well. Be sure it’s free of dust and debris. No sanding required.
Apply base coat of paint to the floor
First I cut in around the perimeter of the room with the gray paint.
I used an extension pole on my roller to apply the paint to the rest of the kitchen floor. Working from the far end to the entrance so as not to have to walk over them while they were still wet.
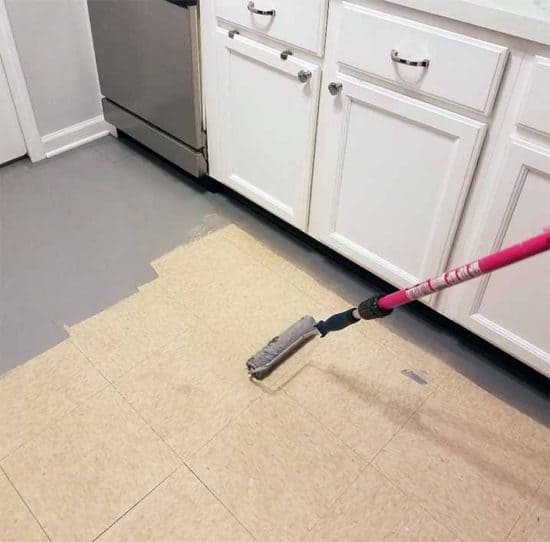
I was really ecstatic at this point to see that old linoleum flooring covered up. After it was all covered, we called it a day to let it dry a good while before stenciling.
important tip
My niece texted me a day or two later and said the paint was getting scratched up. I was shocked when I saw it. The porch paint was not very durable at all! We decided to go ahead with the stenciling anyway and do touch-ups after that. I also realized that now I would have to use a sealer when we were done, which is what I was hoping to avoid by using porch paint.
For this reason, avoid walking on the floor as much as possible until you get them sealed.
applying pattern to floors with a stencil
Next up, it was time to stencil.
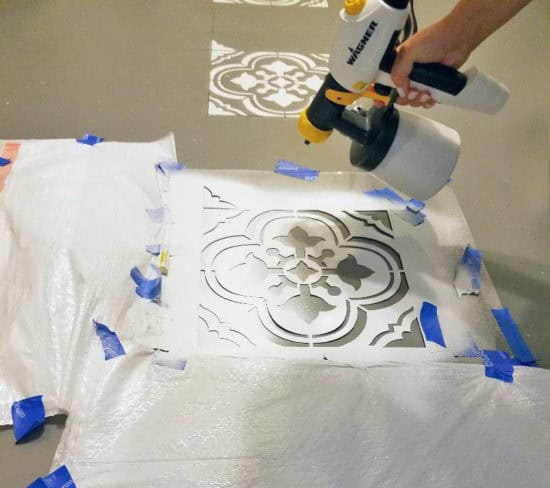
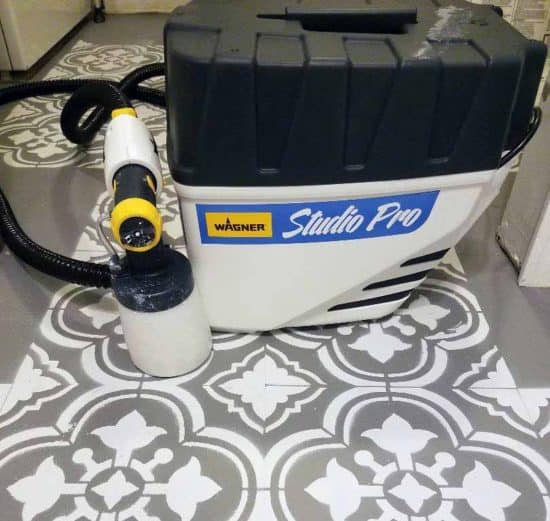
When I attended the Haven conference in Georgia over the summer, I discovered Wagner paint sprayers. There was a man there demonstrating how to use one, and I saw they could be used with stencils. It got me thinking how much quicker this project would go if I used a sprayer as opposed to hand-painting each of these squares.
Once I had my sprayer (I used the Wagner Studio Pro) and was getting ready to begin, I started to think that there was no possible way a paint sprayer is going to give me a crisp line with a stencil. Even though I was having a serious “What was I thinking?” feeling, I decided to give the sprayer a try anyway.
I took an old stencil and attached it to a piece of cardboard, and used the sprayer outside to practice, fully thinking that I’d be hand-stenciling this floor after all. I couldn’t believe it when I lifted the stencil and saw this perfectly crisp pattern underneath! My niece looked as shocked as I felt!
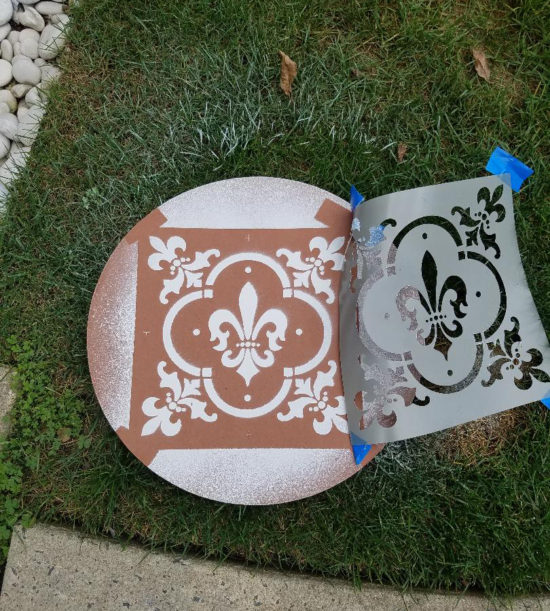
At this point, I was so happy because I knew the project would be much faster and easier with the sprayer. In retrospect, I cannot even imagine hand stenciling a whole floor; it would’ve been tedious to do it that way! I took the time to read the manual and adjusted my settings accordingly.
paint sprayer tip
It may have been a user error, but even with my setting on low, I had a slight bit of overspray. Not terrible, but enough so that I had to put a barrier on the 2 slimmer sides of the stencil. My barrier is garbage bags in this case. Not professional, but that was all I had on hand. When I went back over the second day to finish, I brought cut-up cardboard to use instead, which was much easier to work with.
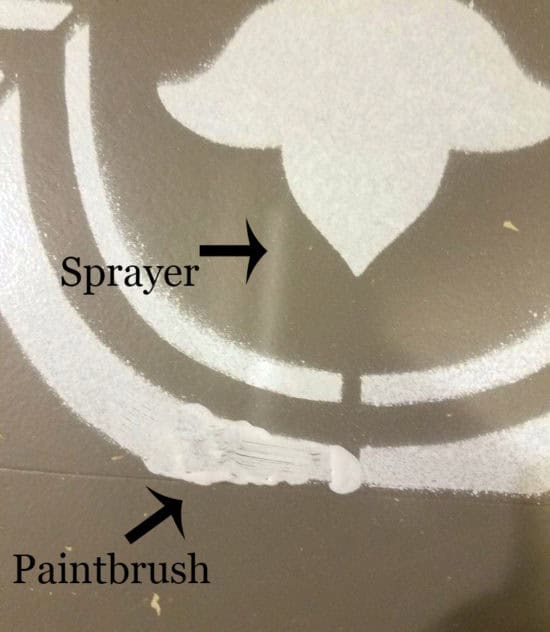
I also want to show you that in one area where I missed a spot with the sprayer,I went back over the stencil with a paintbrush to touch it up. It further convinced me (not that I needed convincing at this point) how much better the sprayer is for stenciling.
stenciling the perimeter of the floors
Stenciling the full squares was much easier than the end and corner sections. For those, it was a pain trying to get the stencil lined upright. You have to bend it for the end tiles, which is why I did those last.
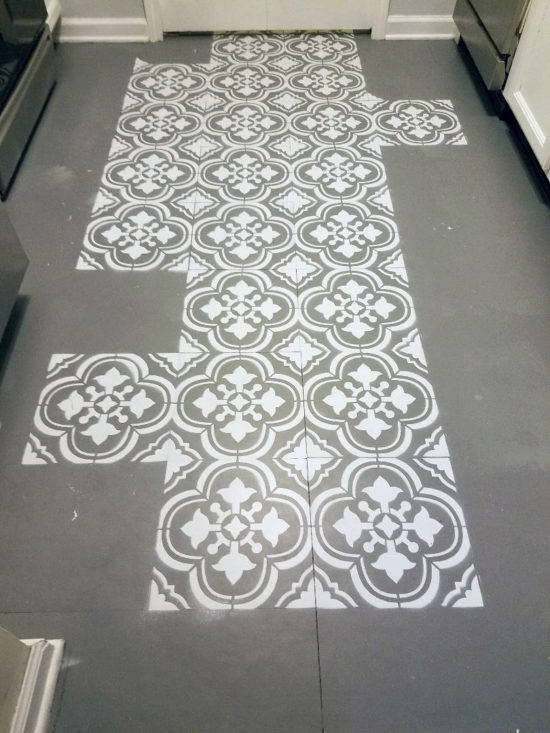
In all, it took me 3 trips to my niece’s house to paint and stencil the floor.
how to seal your painted floors
I went back this weekend and applied the sealer. We used Rust-Oleum Polyurethane Floor Sealer, which went on smoothly, has a nice matte finish, and is clear with no yellow tones. On the negative side, it smells bad and you can’t walk on the floor for about 24 hours after.
UPDATE Jan. 2019: After about a year, we have noticed slight yellowing in some spots. I believe this is due to the polyurethane sealer we used, and I’d recommend going with a polyacrylic sealer instead.
I still plan to accessorize this kitchen, and then I will share a full before and after post on everything we did in here at that time. In the meantime, you can catch up below.
How to paint your appliances to look like stainless steel
Installing a subway tile backsplash
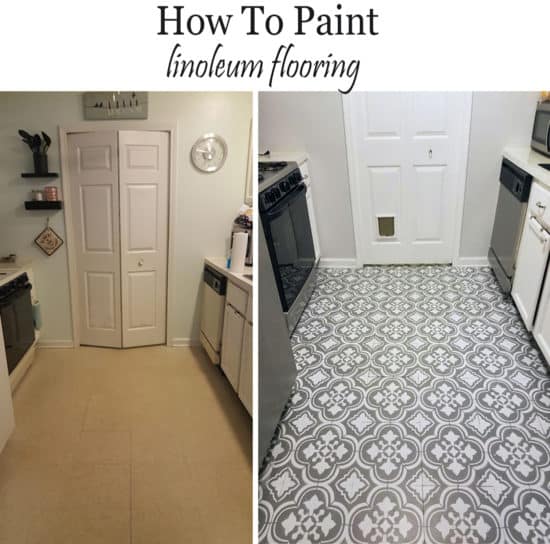
painted linoleum: before and after
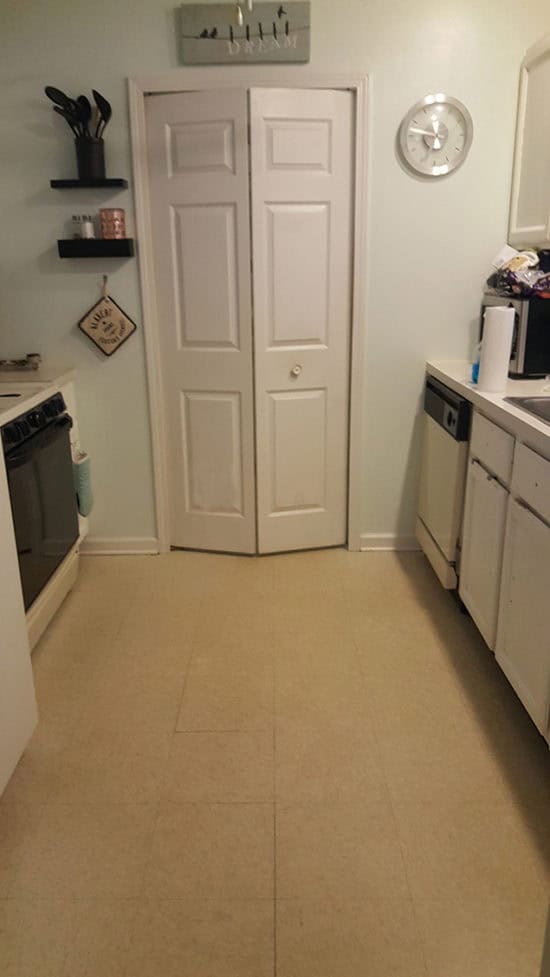
Before: dull, yellowish floor that aged the whole kitchen. After: crisp stenciled pattern that echoes cement tiles, making the space feel brighter and modern. The DIY update tied in beautifully with the rest of the décor
As a reminder, here is a look at the kitchen before.
And here is where we are now!
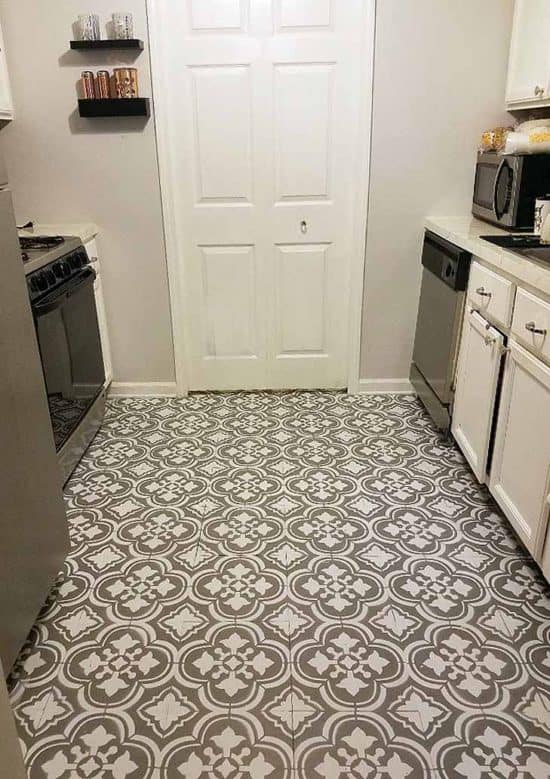
The floors made the biggest difference of all.
I’m thrilled with how this painted linoleum floor turned out! It gave the kitchen a fresh, fun look without breaking the bank. If you try it, please share a photo or tag me on social; your project might inspire someone else dealing with outdated floors!
Now comes the fun part, accessorizing the space! Stay tuned!
Update: If you’d like to get this same look without painting and in half the time, check out this post on tile floor stickers.
faq’s on painting linoleum flooring
If you’re looking for more flooring ideas, read how to install vinyl plank flooring.
You may also be interested in how I completely transformed our cement porch floor with paint and more budget flooring ideas here!

YOU MAY ALSO LIKE:


I have been wanting a Wagner Sprayer since I saw it at Haven too. Now it’s definitely on my list of things to get. Love your floors! Super fantastic job!
Thank you Cindy!
Did you ever say what the right paint to use on linoleum is?
The floor came out beautiful. It looks even better in person.
Thank you!
Beautiful job; I LOVE painted floors! I also stencilled my floors over 10 years ago but it was on sheet vinyl. I used a waterbased varnish instead – no smell and doesn’t yellow; it looks as good as the day I did it! I used a foam roller and found it very precise (the trick is to make sure it’s not too wet), but I’d love to get a paint sprayer and give it a try for other projects!
I’d love to see a picture and a list of exactly what paint you used
WOW! Who knew the sprayer would be so reliable! I just stenciled my front patio with the same stencil and when the roller did not work I had to stick with a stencil brush. SO TIME-CONSUMING! Never thought the results would look so nice with a sprayer.
Oh my goodness. That is beautiful! I had no idea you could paint linoleum and that is gorgeous. You are a special Aunt.
Wow. I went back to look at the posts and everything looks fabulous! Your niece is very lucky!
Thank you Peggy!
Oh my gosh Roxanne. These floors are gorgeous. My laundry room still has the original ugly linoleum faux brick pattern. I would love to paint it. Thanks for the inspiration!
It turned out beautiful! I love the pattern colors and would have never thought to use a sprayer. Awesome! Behr porch paint does scratch easily. It works best over a primer, but HD paint sales people tend to forget to mention that.
It looks great! I’m curious to hear how it does hold up with heavy kitchen traffic… I wonder if a good bonding primer first would help it hold on better?
Wow !! Love the floor , and thanks for the photo step by step instructions and tips …I’ve been wanting a paint sprayer for awhile now …
Thank you Linda! I’m kind of addicted to this paint sprayer now, nothing is safe!
Are there any special preparations you need to do to the linoleum prior to painting over it. Our home was built in the 40’s and I swear the linoleum must be original. It is nasty. Want to replace it, but LOVE this look. Afraid there may be too much build up for the paint to stick well though. Any thoughts?
Hi there, the kitchen is amazing! I’m in a bit of a pickle. We want to put our house on the market next year, we need floors and countertops. The floors were professionally concrete stained but weren’t done well. So there are stains and lighter spots on them, the countertops are wooden edged, laminate. I have a big kitchen. We also paid a contractor when we bought the house to paint the cabinets, he never finished and never came back. The tile in the kitchen is beige with rust and blue colors running through it. The c okobcrete floors were supposed to look like wood…there are perfect lines and nail heads painted but there is no grain and a significant height difference between the concrete and the kitchen floors. I don’t want to put in floors and countertops but we do want to sell and make a good profit. Any and all suggestions are welcome.
Szeretném megkérdezni, hogy mivel lehet tisztítani ezt a festett linoleumot? Csak vizzel vagy tisztitószerrel is? köszönöm