Installing Vinyl Floors – A Do It Yourself Guide
It’s week 5 of the One Room Challenge! Yikes, did these last few weeks fly by? This week was all about installing vinyl floors. I have been wanting to replace the old carpeting in our home for a very long time, so when the day finally came to rip that out and get these beauties installed, I was beyond thrilled!
My husband is usually the one who installs flooring around here, but this time, we did it together. I wanted to learn for myself how to install vinyl plank flooring, and I was surprised to find that installing vinyl floors was much less complicated than I expected.
If I can do it, you definitely can too!
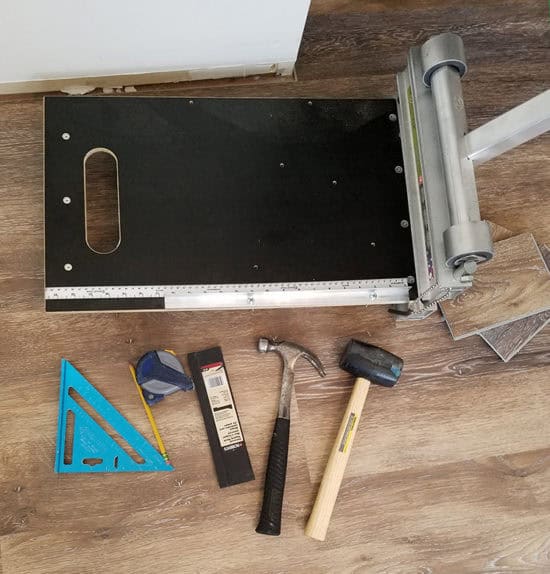
Tools Needed For Installing Vinyl Floors:
Lifeproof Luxury Vinyl Plank Flooring -available in a range of wood look colors, this wood tone is similar to ours.
Pencil
Floor Cutter (highly recommended!)
Jigsaw or Shears for irregular cuts (not pictured)
Spacers (not pictured)
My husband really liked the finish on the Lifeproof Multi-Width Walton Oak Luxury Vinyl Plank Flooring, so that is what we chose. I liked the varied wood tones of the wood and the different-sized planks.
That option is no longer available, but there is no shortage of colors to choose from. You can also check out my friend Tara’s choice of Lifeproof floors in the Seasoned Wood finish.
Step 1: planning
Most importantly, you will want to do your research and pick the right floors. A blogger friend recommended Lifeproof Luxury Plank Flooring (previously referred to as Allure ISOCORE, they are currently undergoing a name change) to me.
The first thing I asked about the LifeProof vinyl plank flooring was installing the underlayment. I was shocked when she told me that these floors had the underlayment built right in, eliminating that whole step! Honestly, I thought it was too good to be true and I questioned the company about it, and they assured me that it is true! That alone makes these floors stand out, saving you time, money, and labor.

Step 2: preparing sub floor
By subfloor, I mean whatever was under your existing floor before. When we pulled up the carpets, we found staples attached to the wood boards underneath. All of these must be removed prior to installing. It has to be a clean, smooth surface. This was the worst part of installing the new floors. You can read about how to remove carpeting here.
Step 3: Fix squeaky floors
This is the time to fix those annoying squeaky floorboards. To fix a squeaky spot, simply drill a drywall screw in the subfloor next to the nail in that area. It’s easy, and it works!
Step 4: Installing vinyl floors
When installing, there are several patterns you can make with the multiplanks, so you will need to plan ahead before you begin, so that you have an idea of your layout. None of the patterns are complicated to do.
We broke this down into easy-to-follow, simple steps. It’s a good idea to check the installation instructions included with the flooring you choose before you begin your flooring project.
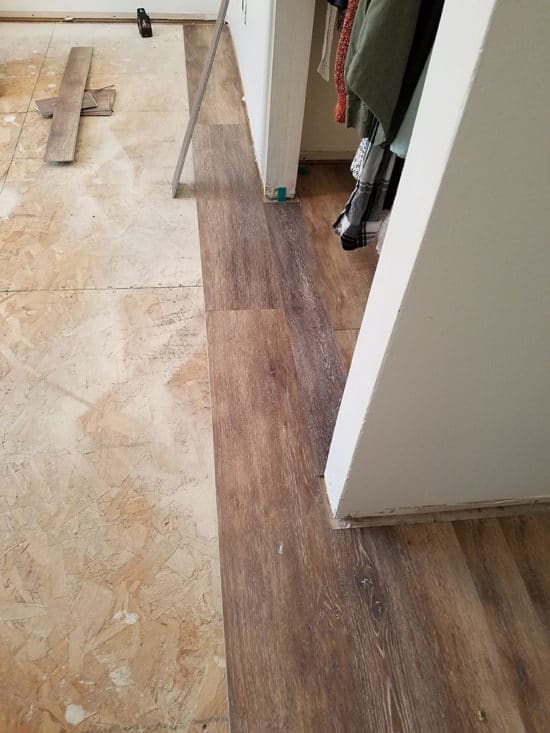
Laying The First Vinyl Flooring Planks
We followed the easy directions from the back of the box, which recommends beginning the first plank in a corner and proceeding out from there. This also helps you keep it in a straight line as opposed to beginning in the center of the room.
It is also recommended to leave a 1/4-inch gap around the room to allow for natural expansion gaps and contraction. You will cover the gaps with baseboards or quarter-round molding at the end.
Each piece of flooring has a tongue and groove on two sides; this is important to pay attention to. You want the tongue facing the wall on the first row. Use the spacers between these first planks and the wall; the space will be covered by the molding later. We began ours in the closet and the alcove of the entry door.
Click-Lock Installation
Once we got past that section, it was a straightforward process. The floors snap together with the tongue and grooves. Be sure to stagger the seams so they don’t line up. This sort of happens naturally. When you get to the last piece in the row, you’ll have to cut the vinyl plank to fit. Use the leftover piece to begin the second row and so on. By doing that, the seams will naturally be staggered.
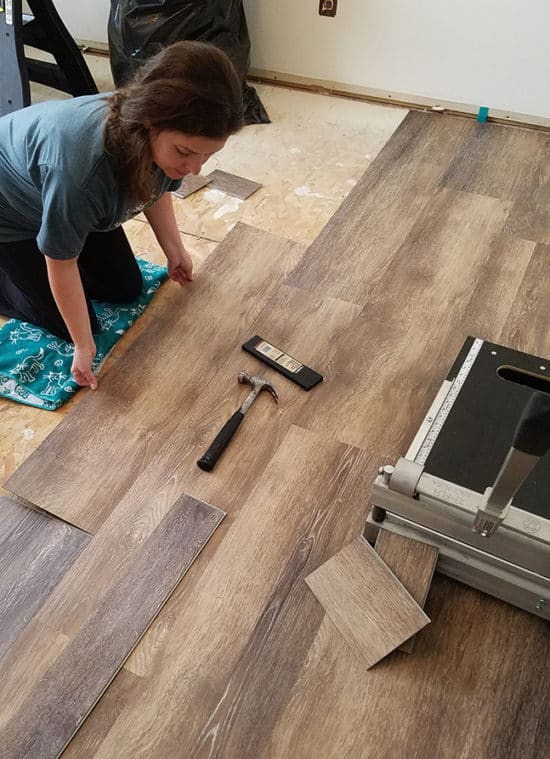
As you lay the planks in place, you use the tapping block and a hammer to make sure it’s flush with the neighboring plank. A hammer with a smaller head helps make this part a little easier.
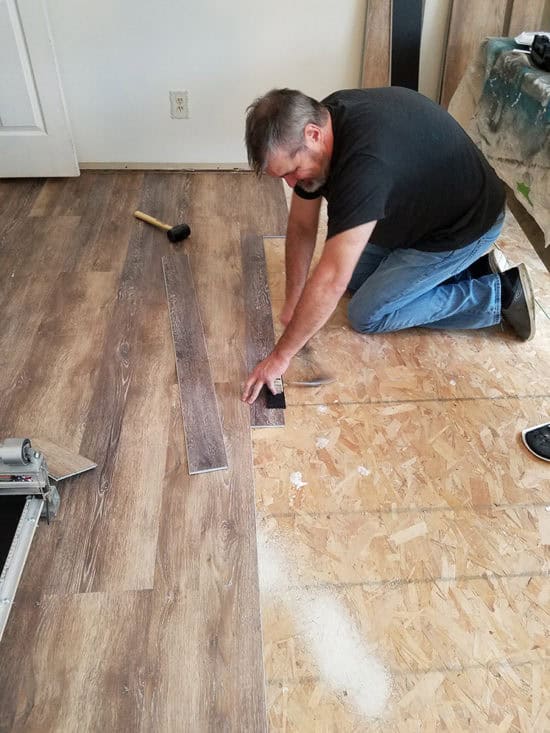
When you are tapping it into place, be careful that the entire floor doesn’t shift. We found that if one of us stood on the neighboring plank while the other one was tapping, it would keep things in place. If you’re installing it alone, positioning yourself on the new flooring rather than the subfloor will keep it in place.
If you choose extra-wide planks, you may also want to use a glue-down method. However, that is usually not necessary.
Vinyl Floor Cutter
To cut down planks at the end of each row in perfectly straight cuts, we used a floor cutter. My contractor told us about this, and he let us borrow his for the installation. It made cutting them so easy!
We used a straight edge and a pencil to mark where the plank needed to be cut, and then popped it into the floor cutter, which works just like a paper-cutter.
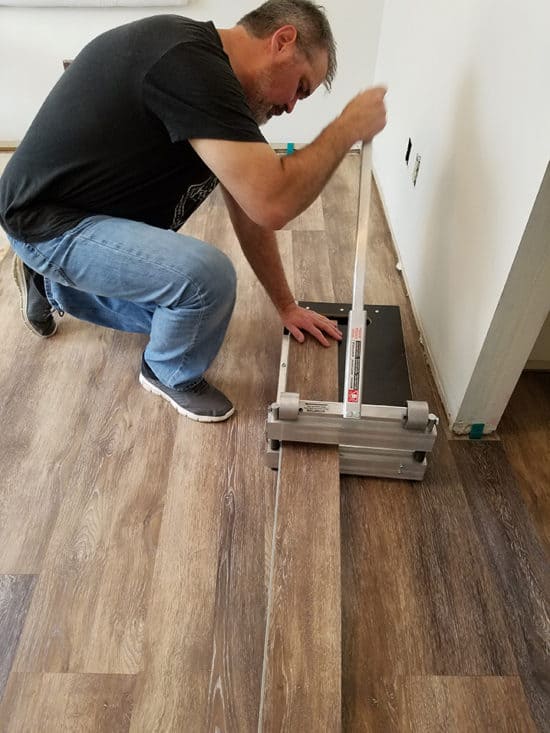
Be sure you are cutting the correct side of the planks so that they line up with the neighboring plank. We only cut one plank wrong this day (and it wasn’t me!), but we were able to reuse it elsewhere. To cut around floor vents, we marked the plank with the straight edge and a pencil and then cut it out with a jigsaw. You could also use shears for this if you don’t have a jigsaw or a multi-max type tool.

That’s really all there is to installing vinyl floors! We used nine boxes to cover this room, which is approximately 12′ X 14′. It says right on the box that these are the easiest floors ever, and I would agree with that. You really don’t need any power tools to install these, and anyone can do it themselves.
Cost Of Installing Vinyl Floors
The cost of installing vinyl flooring varies based on factors like the type of vinyl, room size, and whether you’re doing it yourself or hiring a professional.
The average cost for the click-lock planks is $2 to $6 per square foot. Luxury vinyl flooring options can go up to $7 per square foot. If you hire a professional, labor typically costs $2 to $5 per square foot, bringing the total cost to anywhere from $3 to $12 per square foot
On average, you can expect to spend about 360 – $1,080 for an entire room that measures 12’x12′ if you do the installation yourself.

Cleaning And Maintaining Vinyl Floors
Keeping vinyl plank flooring clean is easy. I use a regular vacuum or broom on them for dust and crumbs. For mopping, I alternate between a steam mop and a wet swiffer. Both work well.
With proper care, these floors will hold up for many years. Maybe even as long as real hardwood flooring.
Update: It’s been several years since we installed our vinyl plank flooring, and they have held up well and are easy to maintain – easier than hardwood flooring! We liked them so much that we’ve since installed them in our living room and kitchen as well. This resilient flooring is an excellent choice for high-traffic areas.
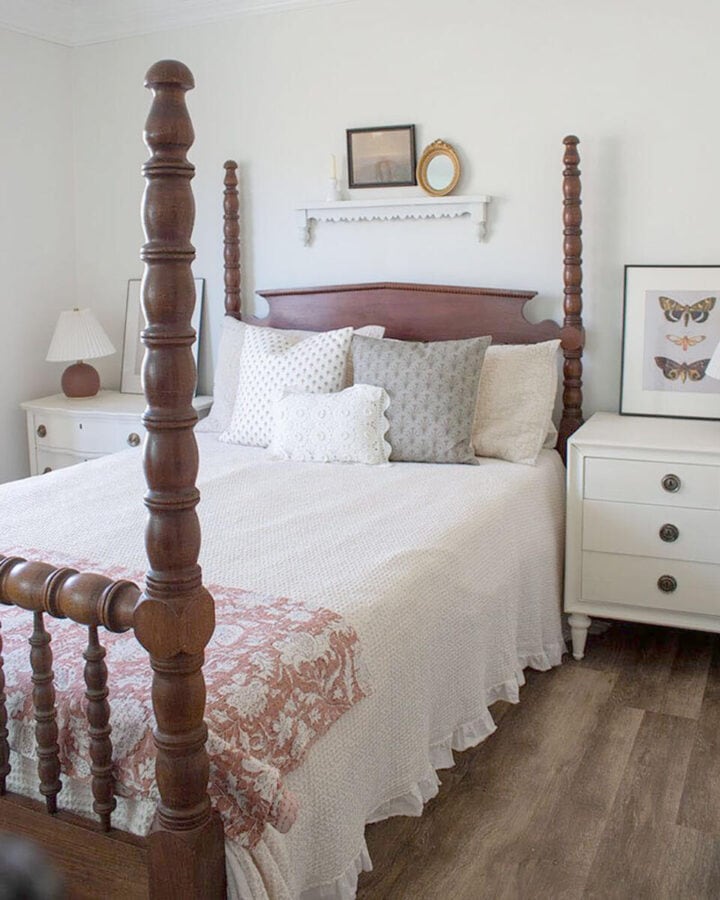
I love the variation of the wood tones on the Walton Oak, and the multi-width planks give it added interest. These vinyl plank floors really make the whole room. Without them, the rest of my design would have fallen flat. I would definitely use this flooring again in other rooms of my house. A huge thank you to The Home Depot for sponsoring the floors for my One Room Challenge bedroom makeover!
Final Thoughts On The Installation Process
Luxury vinyl flooring is a popular choice for good reason.
Installing new vinyl flooring is a relatively easy installation project for most people, and it doesn’t require many power tools if you use the type of floor cutter that we did. It will save you a lot of money on professional installers.
For this post, I wanted to keep the how-to as uncomplicated as possible for anyone looking to try this themselves. You can also check out this slightly more comprehensive guide.
I hope this step-by-step guide has helped you. Let us know in the comments!
If you’ve missed the previous weeks of my bedroom makeover, you can catch up below.
1 – Bedroom Makeover Before
3 – Wall Art
4 – Installing Layered Crown Molding
Next week is the big reveal, and I still have lots to do! Wish me luck. And send wine!
UPDATE: You can see the finished bedroom makeover here and watch the video below!
Update: You can see the finished room by clicking above next to week 6, or see a quick video tour I shared on a Facebook Live below!

FREQUENTLY ASKED QUESTIONS ABOUT INSTALLING VINYL FLOORING:
MORE DIY FLOORING IDEAS:

Another DIY floor idea: DIY Wood Floor Refinishing and White Washing.

More budget floor ideas you may find useful: How to update floors on a budget.
The flooring looks great Roxanne! I love the rich color your chose. I can’t wait to see the finished room!
Thank you Amanda!
If the floor is beneath a king size bed how do you manage expansion? If I need a quarter inch around the perimeter of the room, can the floor still expand without buckling beneath the weight of the bed? If so, can the floor continue into the bathroom and go underneath to toilet?
If I’m installing in a kitchen, can it go beneath the refrigerator and stove?
I installed almost the same, if you let it ACCLIMATE for 24 hrs before you install you will be fine, i did my entire kitchen in stony oak, it turned out gorgeous! Water proof, dog proof, mud comes right off! I moved out the stove, fridge, and dishwasher, i talled and pushed them bAck in without even a scratch! I love this flooring!!
WHat do you dO about exterior doors? What do you put betWeen the flooring and door threshOld?
That flooring is amazing!!
Thank you Deborah, it really is!
I love your flooring and can’t wait to see everything come together in the final reveal for next week!
Thank you Carol, I’ll be looking out for yours as well!
The new flooring looks great! I can’t wait to see the full room next week!
Thank you Sam!
We are installing Allure vinyl floors in our basement too and I love the result! Once you get the hang of snapping the pieces in, it is definitely not too hard to do !
Amanda, I’ll have to check out your basement to see which finish you chose! I loved them all!
We LOVE our vinyl plank flooring – it is so durable! Yours looks great!
Thanks Amanda, glad to hear they’re durable too!
I installed floors like this last fall and I LOVE THEM!!! I am going to be using this same flooring when I redo my kitchen hopefully this fall. Seriously is the easiest floor to install and they wear so nice.
Thanks Kati, I really love them too. I plan to use them in my living room next.
What color did they use I love it
Yay! Love the finish you chose! Easy right?
Yes, shockingly easy!
I love the floors you chose! The patina on them is beautiful. I will definitely be considering this type of flooring when we update our family room!
Thanks Maureen, the finish on the floors really is beautiful!
I love the color of the flooring. It looks amazing! I can’t wait to see how the bedroom turns out.
Thanks Tricia!
This makes me want to rip out the carpet in our entire house immediately. You make it look so easy! I can’t wait to see your reveal next week.
Thanks Betsy, it really was easy!
I’m so amazed how beautiful and real vinyl floors are looking these days! I’ve never installed my own, so it’s so good to know how easy they were to install. Thanks for the tips!
These floors are beautiful, Roxanne, and you’re right – the process doesn’t seem as complicated as I would’ve expected!
Can this flooring be installed over a vinyl flooring? I would rather not take up what is already there.
Margaret, while I’m sure that is not the recommended way to do it, it doesn’t mean it can’t be done. Keep in mind any doors that open into the room, as adding it on top of your existing floors will raise them slightly.
I’m not familiar with the term Vinyl flooring. Is this similar or the same as laminate flooring??
Hi Carol, yes it is.
I have carpeting and under that is concrete. Can I lay this in the concrete?
The vinyl plank flooring is similar to laminate but is not the same. This brand of vinyl plank flooring is basically waterproof, stands up to daily use, cleans easily, and is reasonably priced. The subfloor you lay it on MUST be level and smooth. The planks must be acclimated to the room environment for at least 3 days before installation. We have had ours in the laundry, bathroom, mudroom, and kitchen for over 2 years, we have 4 dogs, a cat, and 5 adults in this house and the floors look like new.
Thank you SO MUCH for your tip about standing on the preceding planks–my husband spent about half a day absolutely frustrated that the planks weren’t staying flush in place before I came across this. Love the Walton Oak; we almost got that finish ourselves (went with Trail Oak ultimately).
Hi Roxanne, how are the floors holding up (scratches, etc.)? I’m in the process of choosing what type of flooring to install in my whole house (getting rid of yucky carpet!), and yours are gorgeous! If they are pretty scratch resistant, I’m going to go for it. I don’t expect perfection, but I’d like to know that I can scoot under the table in my dining room without leaving marks every time. I hope yours are wearing well!
Thanks!
Vicky
really like the flooring motifs, its beautifull also i think flooring make the room looking more comfortble. thanks for sharing
Are these planks rigid or are they the flexible vinyl planks? They look great!
I have read that positioning heavy pieces of furniture on plank vinyl leaves indentation marks if the furniture is moved. Can you comment on this please?
Thanks for tips. I will try your tips on my home flooring. Yes, graphic tiles are one of the hottest trends. A few days ago I redesigned my house and it looks awesome with the metallic floor application.
Hi Roxanne !
We chose Walton Oak for our kitchen remodel after seeing your blog. We have a mix of hardwood floors and a few carpeted rooms ( hardwood was damaged in these rooms) in our 1945 Cape. We are now faced with refinishing the hardwood and recarpeting or putting the Walton Oak throughout the rest of the house. Refinishing the wood floors is so much work, all the furniture and us have to leave for two days, but I am having a hard time committing to all vinyl in a New England Cape. Any words of wisdom ? Thanks for your inspiration !
Hi Cheryl, thanks for your question! If I already had hardwood floors, I would have them refinished! It would be shame to remove them! However, if they are damaged and need to be covered then I would remove them and go with the vinyl. Keeping the flooring consistent in rooms that open up to one another is ideal. I hope that helps!
Hi Roxanne,
We are working on finishing our basement. Love the thought of the low maintenance of these floors! I know they already have a built in underlay, but what are your thoughts on putting them on concrete? I can send a pic of the area if that helpful.
Alicia ????
Hi Alicia, I would think with the built in underlayment that the answer would be yes, but you could always contact the manufacturer first to be sure!
First, I’d like to say the flooring looks amazing! But I have a question. Is there any waiting time after install before you could furnish the room? We are getting new flooring installed this weekend through out the upstairs and could only empty two rooms at a time and need to know if I could start moving the furniture back in as soon as the are done installing one room.
Thanks Sandra! There is no wait time at all with these floors, you can walk on them immediately!
Hello!
You have done a wonderful job! I’m looking at the LifeProof Trail Oak vinyl as my house recently flooded… How have your floors held up? We have kids and pets.
Any advice or comment back would really be appreciated!!
They help up wonderful in my daughter’s room, we recently just installed them downstairs as well. I did add new chair pads to the legs of my kitchen chairs to protect them from scratching. Having them downstairs will be a real test of their durability. So far, so good!
Hi! I have been eyeing up the Walton Oak flooring for months! Could you tell me which pattern you selected for laying it in your room? I love the way your pattern lays and would like to replicate it for my own.
Thanks!
Thanks so much for sharing! Do you have a favorite type of flooring? I can’t decide between vinyl and engineered hardwood. Thanks!
I’m really happy with these particular floors. We liked them so much we installed them downstairs in our house as well!
One of the great things about vinyl sheet flooring is that it can be installed anywhere. Vinyl sheet and tiles, in most cases, can be installed over the existing floor. This will save you money on installation fees that can add up. Any repairs to level a sub-floor and the cost of tearing out your existing floor would no longer come into play.
If you have crown molding, is the quarter round necessary? We were hoping to just slide it under the crown molding but I’m not sure it is enough gap.
Hi! How has the vinyl held up downstairs?
Thanks!
Very well!!
Love the floor – we are doing ours in Trail Oak, but have run into a small problem as we want continuity down the hallway. The problem is that the planks are 8.7″ wide we our hallway isn’t a multiple of that. I noticed in your pictures that some of the planks looked narrower that the others (length we can deal with). Did you locate some that are narrower than other or did you have to cut each one length-ways?
Hi Lori, we did have to cut a few length-ways to make them fit! Good luck with your floors!
I am interested in learning how you made the lengthwise cuts to the planks! Jug saw, skill saw?
Hi Marianne, my husband used a jigsaw for the long cuts. I hope that helps!
Should i install a dricore subfloor first,as its on concrete?
I love the color your hubby liked thays exactly the color in my house. He has good taste!
My subfloor appears to be concrete. Do I need another material on top of the concrete?