How To Seal Chipping Paint – Fixer Upper Style
Last November a friend invited my husband and me to meet him at a flea market. It was one I’d never heard of, but I never say no to a flea market. It was a chilly day so we bundled up and headed out. When I got there, I found it was a really small flea market in a section of the park. I didn’t expect to find much other than a fun day out.
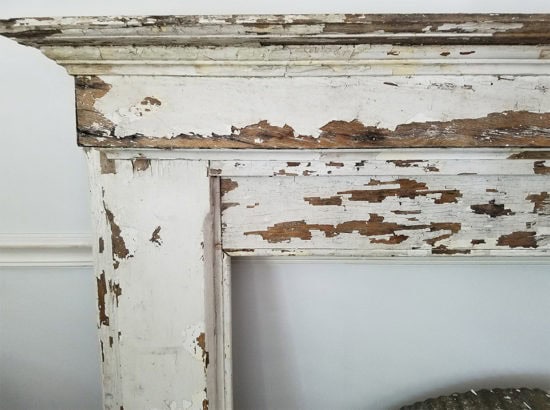
Strolling along one of the aisles, I completely stopped in my tracks when I saw a vintage mantel that was naturally chipped to perfection. The owner was asking for more money than I had on me, so I had to do some serious bargaining. I’m pretty shy, but I wanted this piece badly and wasn’t leaving without it.
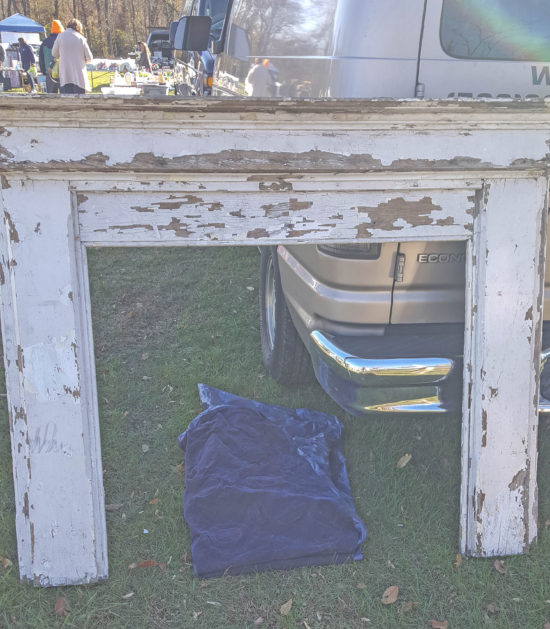
See it there in the background? I think I was trying to be discreet when taking this photo for fear other shoppers would be alerted to the awesomeness of this find. Our friend kept asking what I would do with it and saying that I would have to sand all of that old paint off. I was horrified and explained the chipping paint was exactly why I loved it. I also told him that he needed to start watching Fixer Upper. The seller, upon hearing that said that I was a girl after his own heart and agreed to a price I could afford – $90. Total score! Once the money had exchanged hands, I took another picture close up.
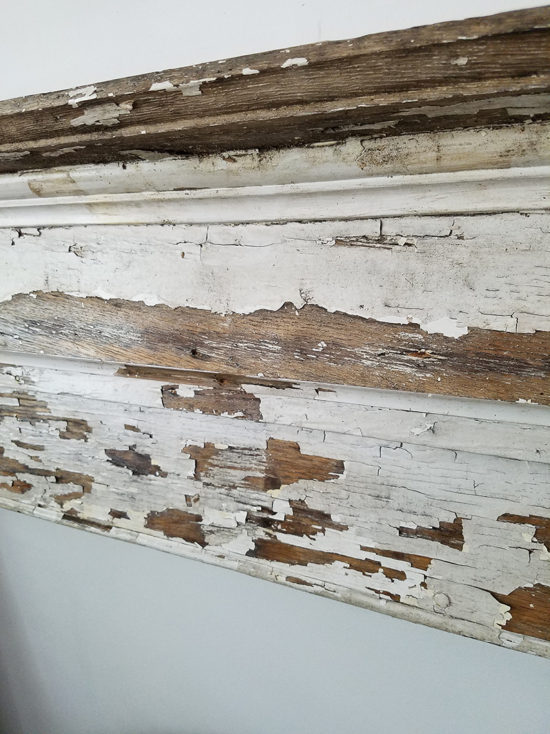
Isn’t it gorgeous? It’s really nearly impossible to replicate this type of weathered charm. One thing that didn’t occur to me until my sister in law stopped by is the fact that this could be lead paint (wahhhhhh). I was horrified at the thought and I didn’t like her for mentioning it! I ordered a lead tester kit* and thankfully, it was negative.
Fast forward to a few weeks ago. This mantel has been sitting in my living room propped against the wall since I bought it last year. My living room is in need of a makeover, which is happening now so the mantel just moved up to the top of the priority list. My husband is going to build a frame for the back of it so it stands up straight. But before he does that, I wanted to seal it to prevent further chipping. I did a bit of research on what to use. I didn’t want it to come out with a yellow tint and I wanted it to be matte. I found the perfect product for the job, Fusion Tough Coat.
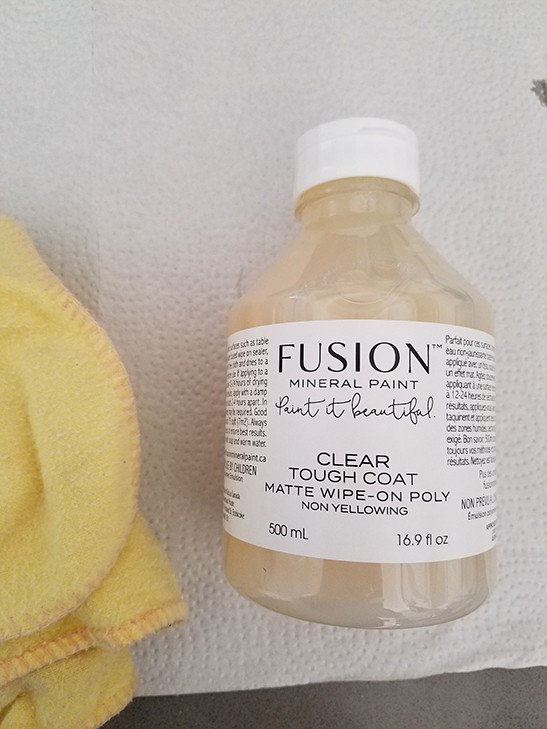
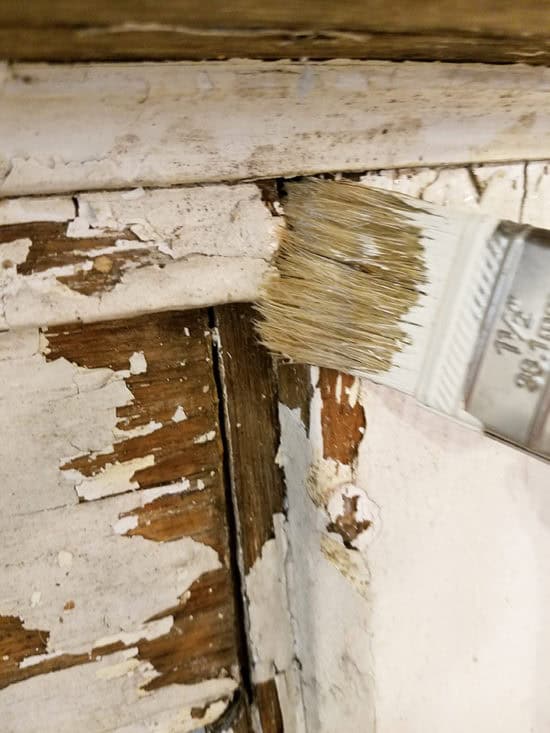
Not only did this work perfectly, it was super simple to apply. The directions say to use a damp, lint-free cloth to wipe the product on, so that is exactly what I did. I used a cloth I found in my laundry room that I think my husband bought for washing or waxing the car. I waited 3 hours, as per the directions and applied a second coat. I did have a good bit more chipping during the application process (which you can see below), but that is to be expected on such an old piece.

After another 2 hours passed, I decided to do a third coat using a paintbrush this time to get into all of the corners.
The fusion top coat absolutely has no yellowing and does not leave a shiny finish. It looks a bit shiny while it’s wet, but dries matte. I couldn’t tell which of my photos were the before and which were the after, which is exactly the result I was hoping for.
That is how to seal chipping paint, it really couldn’t be any easier, you just need the right product for the job. I have been working on fixing up my living room with this mantel as the main focal point and will be sharing more on that very soon! UPDATE: You can see the finished mantel here!
Thanks to Fusion Mineral Paint for supplying the Tough Coat for this project. *This post may contain affiliate links, you can read my full disclosure here.
I am about to do a very old door that is very chippy and i love the look. After reading you article i bought fusion. My question before i start is what do you Think of spraying on a adhesive to help keep the chipping in place before i apply the fusion. Do you think the spray adhesive will cause yellowing or affect the fusion from ADHERING.
Thanks for the help and for telling me about the product to use.
Tracey. .
Did you spray on adhesive before you sealed? I have a chair I had outside a month & the chippy paint lifted a bit so I don’t want to rub or brush off when I apply the matte sealer
Has it held up? Are you seeing any flaking on your floor? Thanks.
It’s held up very well, no flaking at all.
Can an item be painted on with acrylics after applying the fusion.
I bought an old wooden door with wood on the bottom and glass on top half. The condition of the white paint looks very much like your mantle. And like you, I LOVE it! I want to preserve the peeling white paint, so I will definitely try this product. Thank you!
I also have used this product, which I bought for a pair of antique shutters. I wanted to test it on something else first so I used it on an chipping wood pumpkin that had been in my mother’s shed for years. Instead of a cloth I used a paint brush and the only caution I would warn about is that if you use this on anything other than white paint, be sure to wipe it after brushing it on because if there are any drips they will dry white and not clear. This didn’t look so great on an orange pumpkin but now I know how to do this correctly on my shutters.
Thanks for the tip! I have a window I want to make into a picture collage family photo frame ! Can’t wait to try it and maintain the partially chipped look .