How To Build A Sliding Barn Door For Less
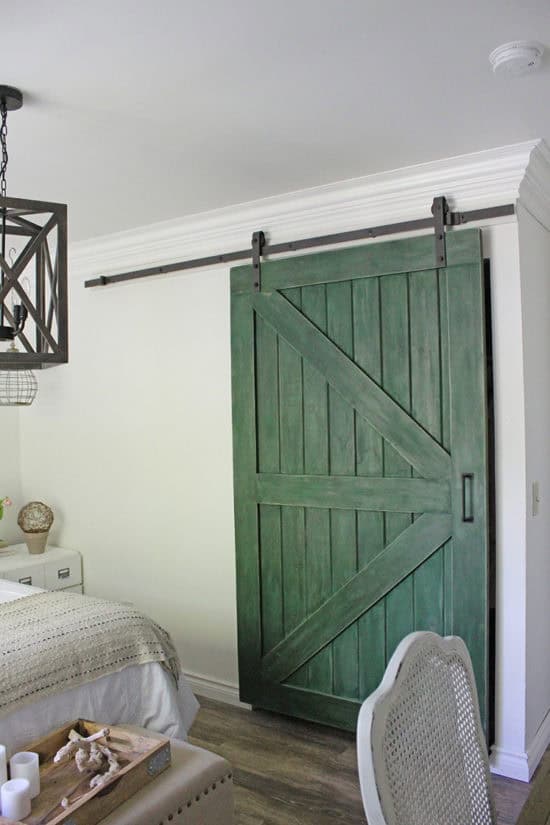
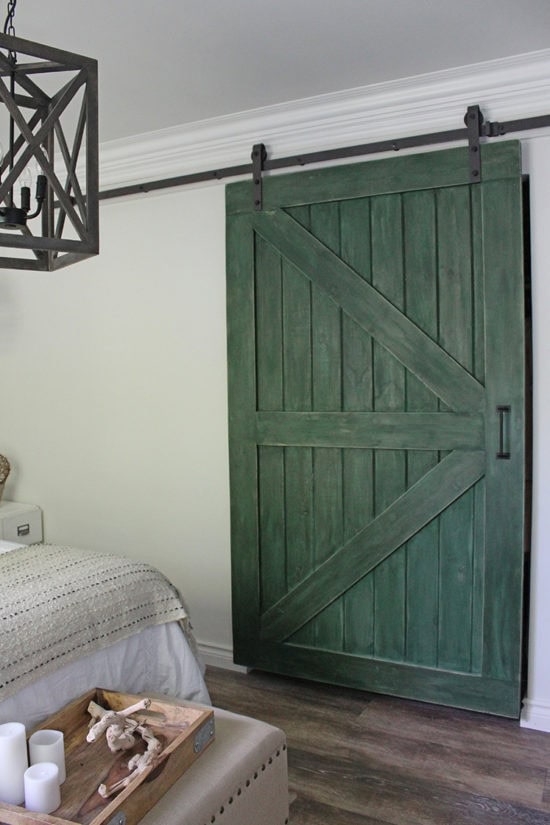
Thank you all for the positive feedback on my recent bedroom makeover. You all really loved the green sliding barn door so much I wanted to share how we built it in case anyone is interested in making one for yourselves.
DIY barn doors are a great way to update ugly closet doors.
You can find pre-made sliding barn doors at the home improvement stores but you’ll pay between $400-$500 for one. The total cost of materials for our DIY barn door, including the hardware, was under $200.
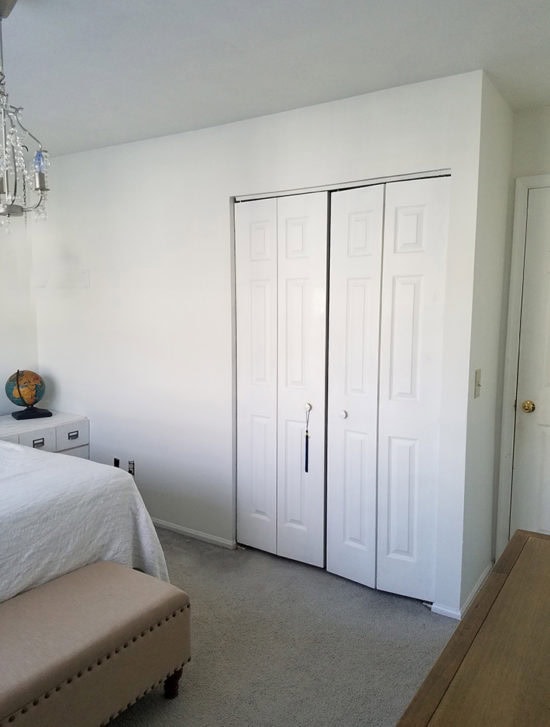
We wanted our door to cover the closet so we could get rid of the existing bi-fold doors like we did in our older daughter’s bedroom. First, you’ll need to measure the width of your door. The width of our closet is 4′ so we constructed our sliding barn door to be 4′ wide and 7′ tall.
Tools Needed for DIY Sliding Barn Door:
- Chop Saw
- Framing Square
- Circular Saw
- Router
- Wood Clamps
- Tape Measure
Materials Needed:
- 1″ X 6″ X 8′ Tongue and Groove Shiplap
- 1″ X 6″ X 8′ Pine
- 1″ X 4″ X 8′ Oak for Guide Rail Support
- Barn Door Hardware
- Coarse Drywall Screws 1″
- Countersink Bit
How To Build A Sliding Barn Door (Step-By-Step Tutorial)
The first thing you’ll have to do is measure the size of your door opening. Determine the width and height you want your door to be.
Our door opening is 4′ wide, so we built ours to be 4′ wide and 7′ tall. If you want your door to slightly overlap the door frame when shut, and you have space to go a little wider, add an inch or two to your width.
The tongue and groove shiplap is the base of our door so we trimmed each of those planks to 7′ tall. We also had to alter one of ours vertically to get it to our desired width of four feet.
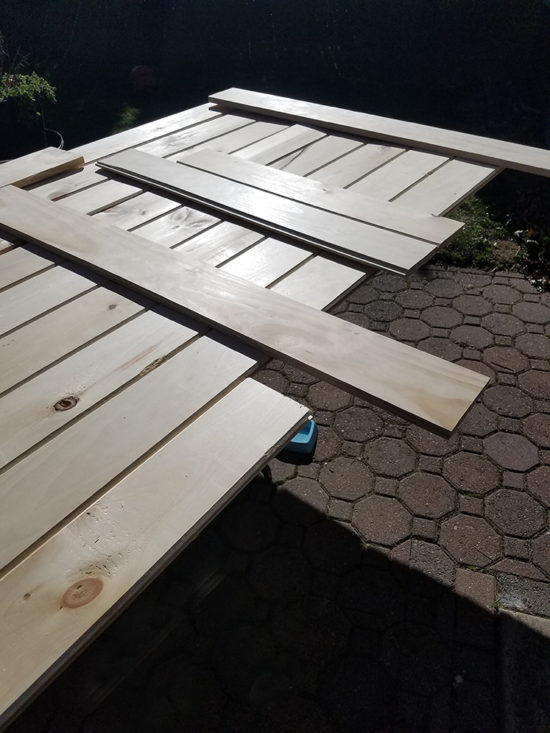
Lay the shiplap planks on a flat surface & attach them together with the tongue & grooves. Be sure all pieces are in place. Remeasure, and then use the 1X6 wood pieces on top of the shiplap as your trim pieces to frame out your door.
Once it all lines up correctly, add a little wood glue to the back of the trim pieces and put them back in place.

Use wood clamps to hold the pine in place at this point and add your diagonal pieces. We used a circular saw to cut our wood, but a table saw would also work.
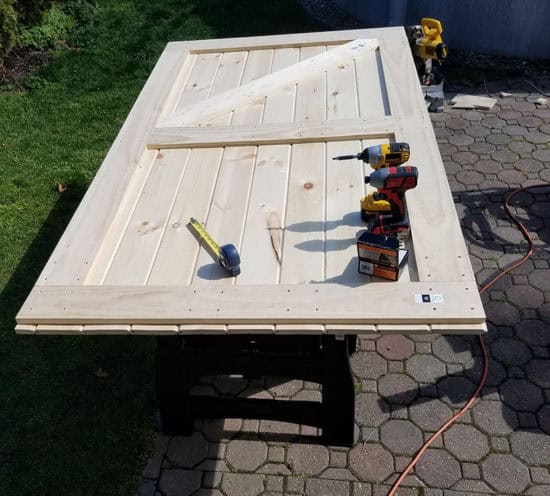
We used a drill with screws to attach our frame pieces, but you could also use a nail gun.
Mark holes for the countersink bit evenly to ensure the 1 X 6 pine will be secured to the shiplap. Drill holes with the countersink bit, be sure to only drill down enough to flush the head of the screw into the 1 X 6 frame. We used a 4-hole pattern distributed evenly around the frame of the door. If you want a really rustic look you can leave the nail holes exposed, we filled ours in with wood filler as you can see below.

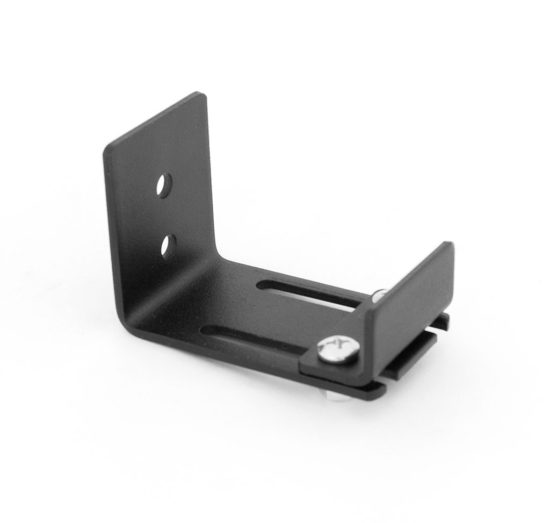
barn door hardware
Lay your door hardware on the frame (as shown above), measure, and mark where you will need to drill holes for the door guides. Do the same for the door handle. We drilled the holes but didn’t attach the hardware at this point because I wanted to paint the door first.

We bought our hardware kit from eBay because it was far cheaper than anywhere else that I looked. They had 6′ and 8′ hardware kits available. We, of course, bought the 8′ but if you are doing a standard size doorway, you will likely need the six-foot. Our kit included everything we needed (except the handle)- including the floor guide.

When using the floor guide you need to route the bottom of the door to create a track for the guide. We routed a 3/8 channel across the bottom of the door. ( you will need clamps and a piece of wood to clamp the router guide as shown above).
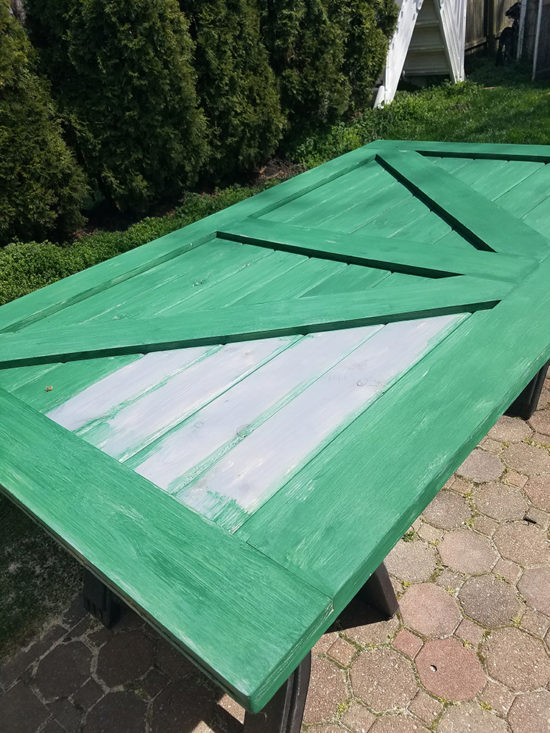
At this point, I was ready to paint the sliding barn door. Always use a coat of primer first to avoid wood knot spots from bleeding through later.
Next, I used Rust-oleum weathered gray stain, followed by chalk paint in green. I used a paint brush because I was using chalk paint. Otherwise, I would’ve used my paint sprayer for best results. Don’t forget to paint the top of the door and the sides of the door.

I lightly sanded and distressed the door with a sanding sponge once the coats of paint were dry. Lastly, I finished with a coat of dark wax for chalk paint. I considered giving it a DIY weathered wood finish but opted for green in this room instead.
How To Hang The Door
To hang the door, we first hung the piece of oak on the wall above the door frame to attach the track to for added support. This is also known as a header board.
Find where the studs are and mark with a pencil above and below each stud the length of the support piece. Find your center point and use a level to be sure the header board is in a straight line.
Drill holes for the hardware to attach to the oak piece to the wall. We painted our oak the same color as the walls so it would blend in. Attach lag bolts to oak pieces and secure with a cordless ratchet driver.

Once the piece is secured to the wall, you can lay out the support rail onto the oak piece. Mark the rail support holes to the oak piece. Drill pilot holes with a drill bit for attaching the rail hardware to the oak. Attach top rail hardware and make sure it’s level and secure. Hang the barn door onto the top rail guide and check that it’s sliding properly.
Hardware Guides for the Bottom of The Door
Next, install a bottom guide to the floor or molding. Our hardware kit came with the floor guide, but once we had installed new flooring in this room I really didn’t want to drill into it. So we ended up ordering this wall guide that attaches to the baseboard molding instead. We have yet to install that.
Our new custom barn door is a major improvement from the bi-fold closet door that was here before.
I wouldn’t say this was an easy project. However, if you know your way around a saw, it is an attainable DIY project.
You can see the full bedroom makeover here.
A sliding door is a great solution for interior doors in tight spaces where you don’t have much room for doors to swing out.
Update 2024: After a few years we got tired of the green DIY barn door and painted it to a pretty neutral color. Here is how it looks now.

If you decide to make your own doors, please come back and share it in the comments, we love to see your projects!
If you’d like to see how we upgraded the bifold closet doors in our other bedroom, check out our DIY custom mirrored closet doors here!
For more sliding door ideas, see barn door ideas.
YOU MAY ALSO LIKE:


I loved this door from day 1 and now so thrilled to see the amazing tutorial. In a few days, I’ll post my DIY favs for the ORC and am so pleased to include your fabulous door. Your entire bedroom is awesome. May you enjoy it to the moon and back. Susie from The Chelsea Project
Susie, thank you so much for your kind feedback!
The door opening we want to make our barn door for us 47 inches. We were afraid the ship lap would not be a strong enough wood for such a large door, but yours is a perfect comparison. Has it held up fine? Have they warped at all? And did you glue anything together, or was it only the pine supports on the front that keeps it all connected? Thank you.
Same question: I want to do a slightly larger door. Is wood glue required?
I LOVE the way this door came out, especially love the finish. Could you please tell me what brand and color you used for chalk paint? Thank you.
Hi Cathy, I know it was Annie Sloan chalk paint. I forget the exact color I used, but if I find it I’ll pop back in here and let you know!
Thank you so much for getting back to me! I’ve been looking through your projects and assumed it was Annie Sloan but I can’t determine the color for the life of me. The closest match seems to be Antibes green, but it is so very bright. Does the gray stain under it really make that big of a difference? Or did you have a special technique for applying the wax that subdued the green so much?
I did the gray stain underneath so that when I sanded down bits of the green, you would see the stained wood underneath for a more rustic look. I do think the green was called Amsterdam green!
Amsterdam! Is it Amsterdam??
Hi, is the shiplap sturdy for a door? Our only confern with the shiplap over straight boards is that there are several pieces that may need extra securing. How has it been for you?
Yes, it’s very sturdy!
What did you Cover the nails with ? When you use the counter sink bit you use 1 inch nails in those holes ?
Very nice and helpful
Very nice! We are going to build 24 x 80 double barn doors. Did you frame (with oak pieces) the backside of the door as well, or just the front?
Looks great! I’m curious about the backside of the door as well! Pictures?
What does the back of the door look like do you have pictures
Very nice! We are going to build 36 x 80 double barn doors. Did you frame (with oak pieces) the backside of the door as well, or just the front?
We have closet over our staircase and I’m making a small bypassing barn doors out of 1×4, 1×6. On the outer door, the hardware is made for lot thicker door. How can I make the hardware look nice?
The wood you used is not shiplap. It is tongue and groove. Shiplap has only one lip on each side and doesn’t provide any support like the tongue and groove does. Very nice door!
Thanks for clarifying!