bifold door diy Upgrade
IF YOU HAVE UGLY SHUTTERED DOORS THAT NEED TO BE VENTED, THIS BIFOLD DOOR DIY UPGRADE IS EASY TO DO AND LOOKS MUCH BETTER!
You guys, this bifold door DIY makeover has been a long time coming! I’ve not liked the builder grade louvered doors on my kitchen closet since we moved into this house.
Unfortunately, this closet needs to be vented because it contains a hot water heater and a furnace.
Why someone thought that was a good idea to have bi-fold closet doors in the kitchen I’ll never understand. Usually, this is something placed in a laundry room, not a kitchen.
Because of the need for ventilation, there weren’t many options when it came to new doors.
updating standard bifold doors
The idea I came up with to update our ugly bifold doors while still keeping the closet vented was to drill holes in a decorative pattern. The best part of this idea is that you don’t need any power tools to do it except for a drill!
Which makes this a great project for beginners.
There were two options for pulling this off. Replace the panels in my existing doors or buy new solid bifold doors. I chose the latter.
Replacing the existing panels would’ve required much more work. You’d need to invest in a brad nailer, or nail gun and more wood pieces for the panels.
Using new doors was the easier route. And in the end, the cost was probably about the same either way.
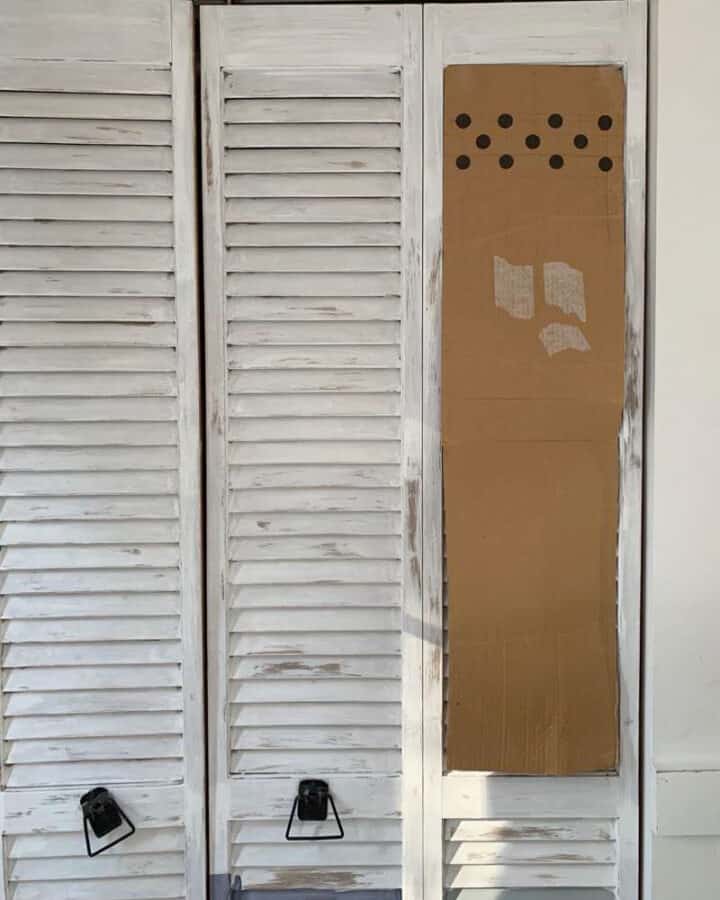
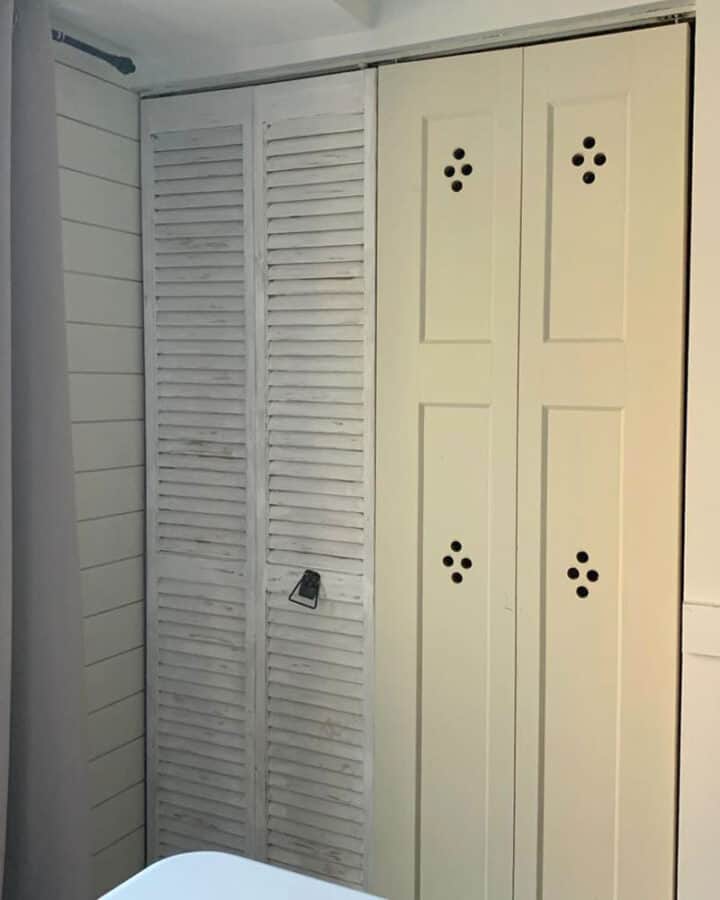
DIY Bifold Door: The Before
Here’s the before (which I am cringing to actually post on the internet!). Not only ugly but I had given them a faux farmhouse finish during the Fixer Upper craze which clearly wasn’t working here anymore, lol.
I could have just painted them and that would’ve been an improvement, but I wanted the shuttered look gone.

Bifold closet Doors – The Inspiration
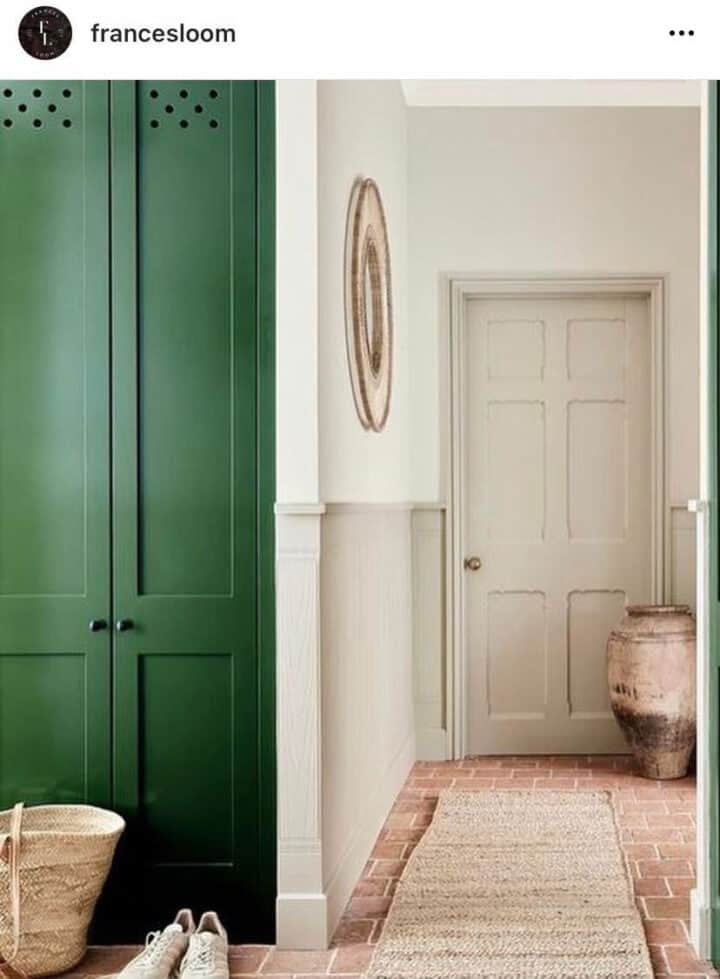
Finally, last year I had an idea to improve these. I saw photos of decorative cupboards and closets that had holes drilled into them forming a decorative pattern. It’s an idea from the past when cupboards would be vented for baked goods.
Here’s an example of what I had in mind. This was my inspiration photo for the initial design. I thought this would be a great way to get a custom look.
My thought was to cut out each louvered door panel with the wood slats and add a new piece of solid wood. I made a template to fit the existing doors.
I had wanted to hire someone to do this for me. However, after a year of getting ghosted by three different contractors, I decided to do it myself.
I figured the easiest way to do it myself would be to buy new solid core doors and drill the holes in them.
Supplies Needed:
- 2 Sets of Craftsman Style Doors
- Hole Punch
- 7/8 Hole Saw Drill Bit & Drill
- Round Metal File
- Template For Pattern (we made our own)
The first thing I did before shopping for new doors was to measure the door opening. I didn’t want to have to cut the overall doors to size. Luckily, ours were standard size so they were easy to match.
While shopping for new doors at Lowe’s I noticed the wooden bifold doors had raised panels that I didn’t like. Those are shown below on the left.
The New Bifold Doors

The doors on the right were masonite but they had the look I wanted. More of a shaker-style design with the inset recessed. The inset panels of the masonite doors were much more narrow than my existing doors. For that reason, I had to remake the design.
Bifold doors come in different sizes so be sure you measure before buying. We bought the 24″ X 80″ hollow core doors. There is one small downside to using the hollow doors which I’ll show you later. This was the look I wanted so I was willing to sacrifice perfection.
Making The Template
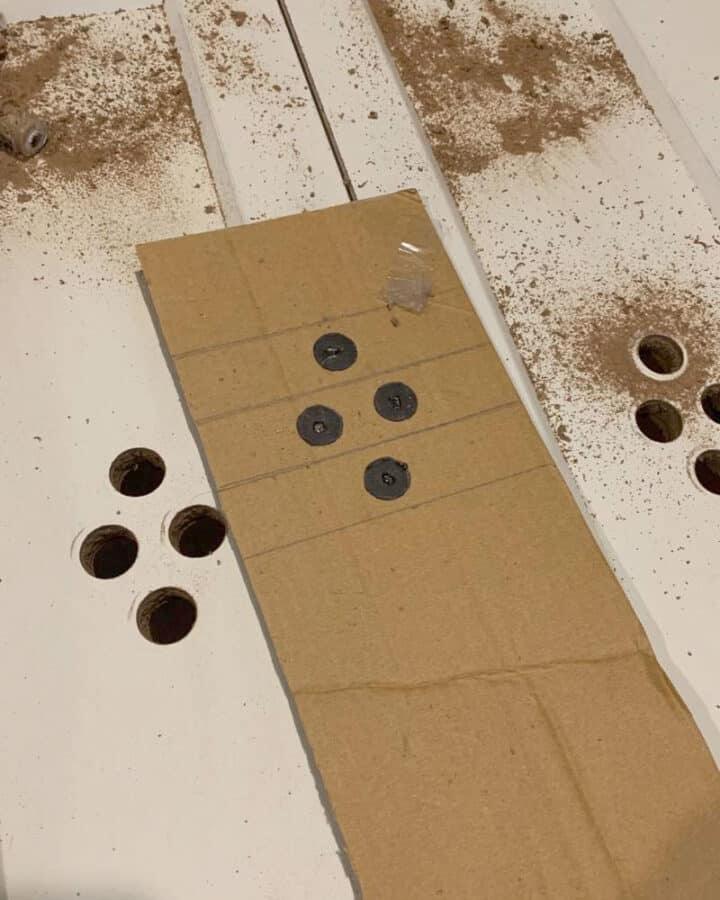
The first thing was to remake my template to fit the narrow opening. Here is a look at my very professional template. (See this post for a few more ideas regarding vent hole designs).
I literally just used a little ruler with circles in it my husband had to make each respective hold the same size.
Is this 100% perfect? Probably not but it’s close enough for me.

Drilling Holes for venting Doors
I placed the template on top of the panel where I wanted the holes. Next, I used a hole punch to make marks on the doors. They look like small nail holes, these are your guide for drilling.

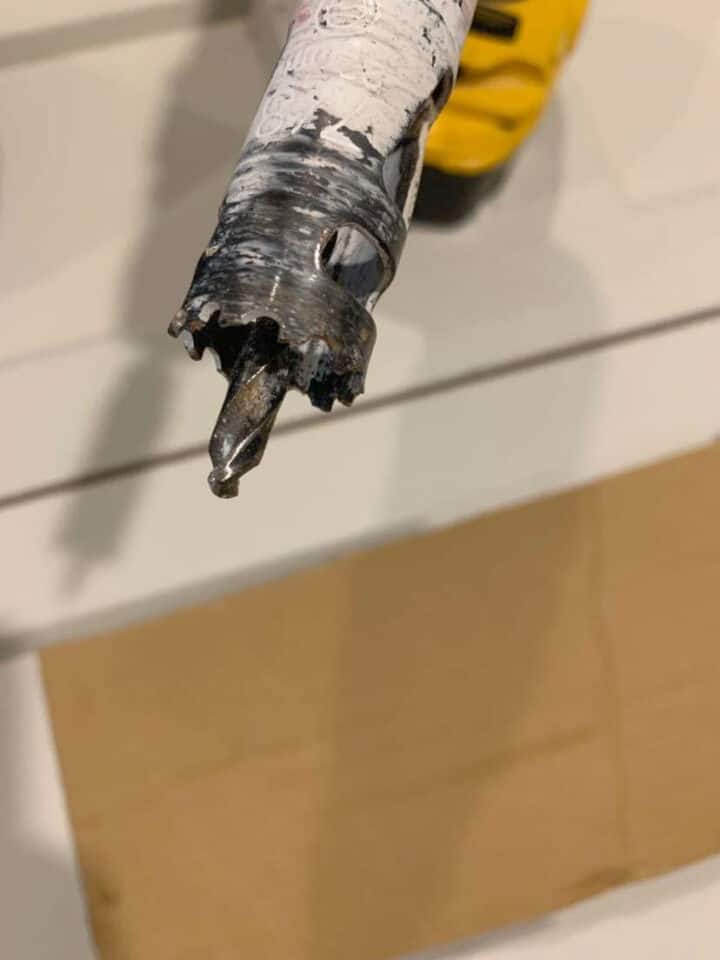
My husband had a 7/8 wood hole saw drill bit (similar to this one) that I used. That bit matched the size of my template. If we went too big or too small it would look really off.
Then I just drilled the holes where I made the hole punches. It’s that simple!
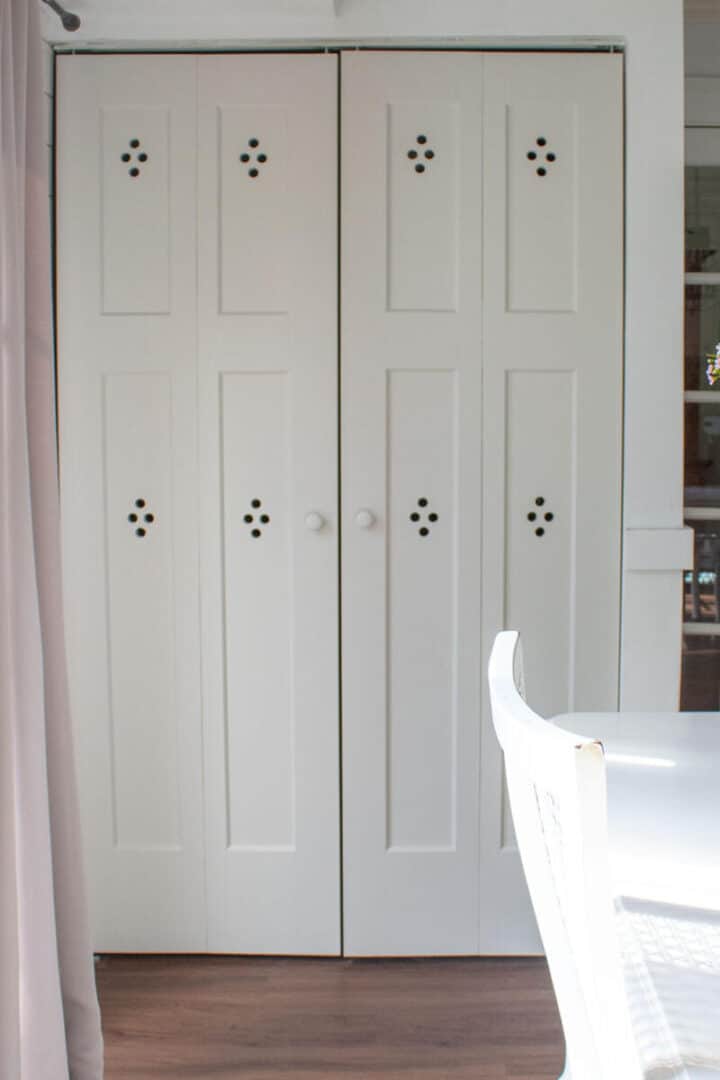
After I had the first half of the bi-fold doors done, I hung it up to get a look. It was easy to hang because the track hardware was already in the door frame from the original doors.
Look at the difference this made! Unbelievable.
BIfold DOor DIY – The Paint
After I hung the doors, it was time for a fresh coat of paint. I was planning to go with a darker blue/gray on them but ended up using a more muted gray/green. The sample looked greener than it looked on the doors. I would’ve preferred the deeper green but I like this as well.
The color is Benjamin Moore Bruton White. It is a great neutral and does change in different lighting. It can look tan, gray, or green depending on the time of day.
Normally, I would use my paint sprayer for a smooth finish but once I got them hung in the door opening, I didn’t want to take them back down.
I put painter’s tape around the edge of the door frame and used a paintbrush and a small paint roller.
Full disclosure, I did not paint the back of the door for the same reason. No one will ever see that anyway.
What was the worst view in the house is now one of my favorites.
As I mentioned before, there is one small downside to the masonite hollow core doors. When you drill into them, the hole inside will be rough. I sanded it with a round metal file tool but due to the material, it’s impossible to get smooth, as you can see below.
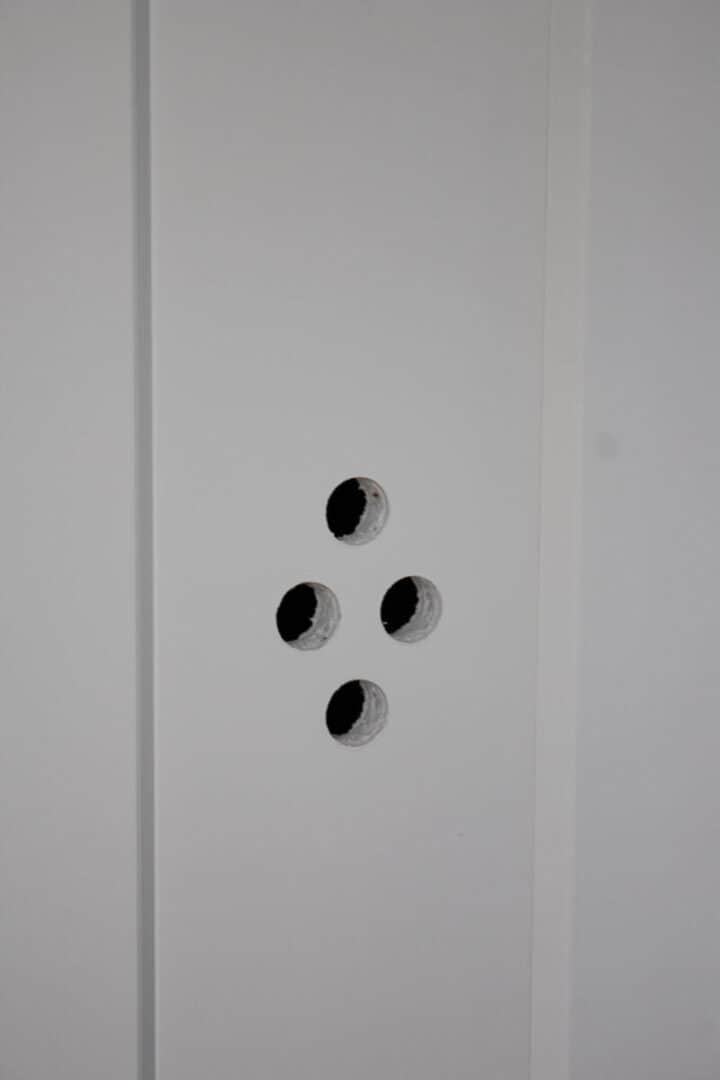
It’s really not noticeable at all unless you’re up close and looking. But I wanted to mention it so that if anyone plans to do this, you’ll know in advance.
Another option would be to add a little wood filler in the circles and smooth it with a piece of sandpaper for a smooth finish.
Finishing Touches
I would still like to add some kind of trim pieces around the door opening. However, with a soffit directly above only half of this closet, there really isn’t enough space for trim work.
I’m sure if I think long enough I will come up with a solution. I’m a very visual person but the answer isn’t always instant.
Another thing I really want to do here is to get new kitchen chairs. I’d also like to swap out my sliding glass doors for a pretty set of French doors. In the meantime, I did give my sliding glass doors a DIY upgrade as well.
Lastly, I will also give the walls a few new coats of paint.

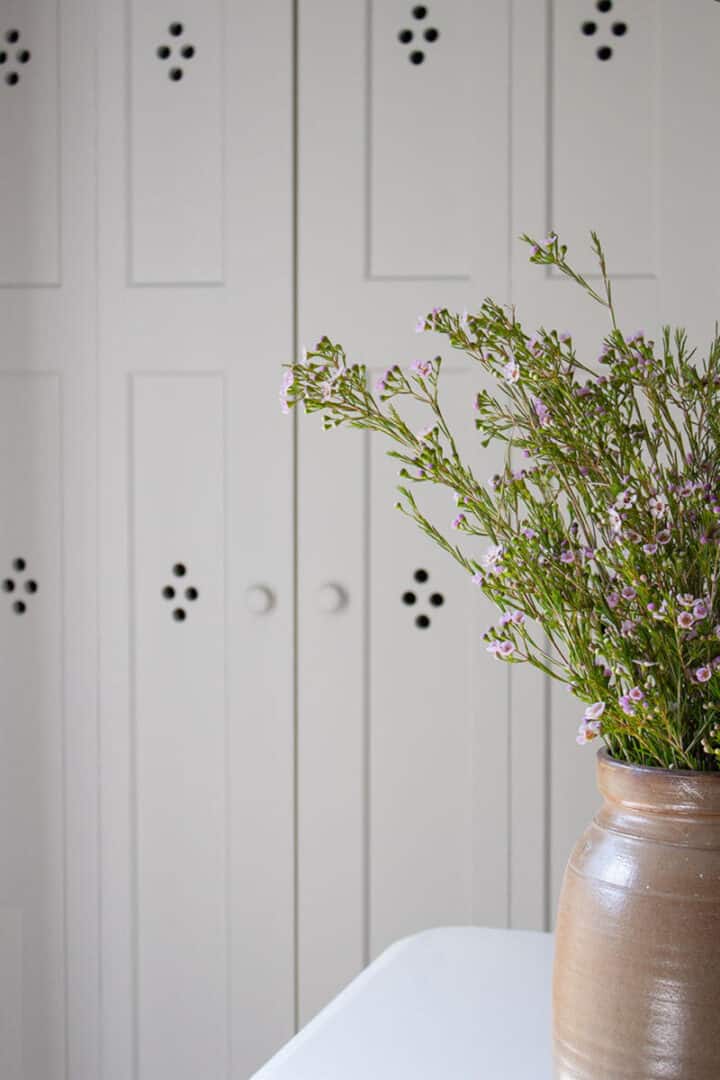
Right now I’m so happy I finally found a solution that would look pretty as well as let the closet be vented. It has elevated the design of the entire room.
For the first time since we’ve lived here, I actually like this view of my kitchen.

One more thing I should mention is that I did ask an inspector who was at our house last year if this would be okay to do from a professional and safety standpoint. I showed him the inspirational photo and he said yes, that would be enough venting.
You definitely should check with a professional before you do this in your own house.
This bifold door DIY upgrade was so worth the effort! Rather than looking at a standard bifold door in my kitchen, I now have the look of completely custom doors!

Beautiful! And a somewhat easy fix for a DIYer. Thanks for sharing!!
The doors look wonderful, great work! I like the mismatched chairs and hit of blue, but looking forward to what the next look will be.
That makes such a difference, love it.
The doors look great. Well done!
That is a great look. Would it be possible to fill the inside edges of the holes with a thin coat of wood filler and sand to smooth them out? It could be done easily though it is a lot of holes to do!