How to paint paneling walls
IF YOU HAVE UGLY DARK PANELED WALLS, LEARN HOW TO PAINT PANELING WALLS TODAY FOR A DRASTIC IMPROVEMENT!

In case you missed it, this is the third post in a series of 6 for the One Room Challenge I’m participating in that was created by Calling It Home. You can catch up with week 1 here.
For this challenge, I am redecorating a living room in my daughter’s off-campus house. Because it’s a rental, we are limited in what we can accomplish, but I have ideas that will drastically help improve this room. We will also be working with a very small budget!
Should You Paint old wood paneling?
Painting wall paneling and original woodwork can be controversial. Some people say you shouldn’t. I never understood that. I think you should do what makes you feel good when it comes to decorating!
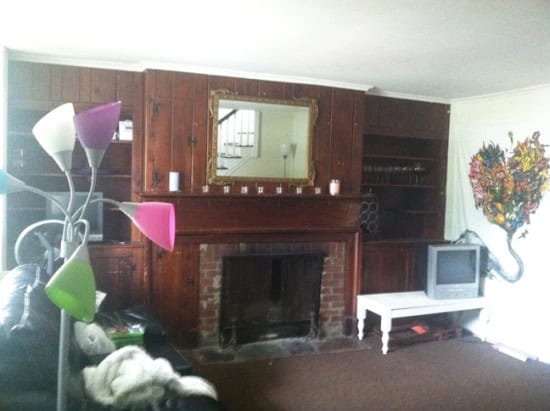
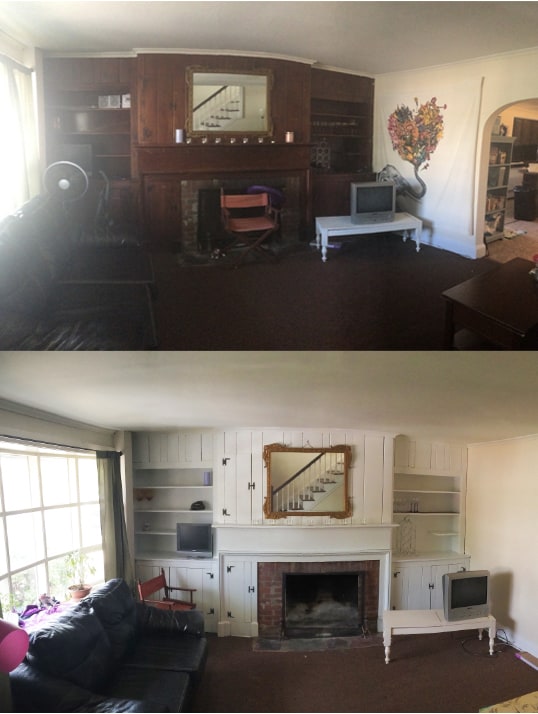
The dark wood really made this room feel dreary. A fresh coat of paint in a light color was exactly what this room needed!
As a reminder, here is the room I started with.
prepping to paint paneling
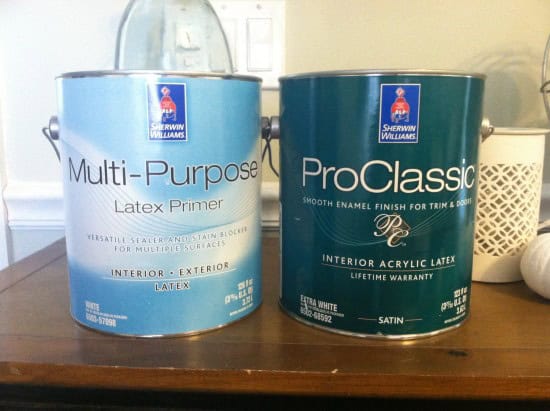
selecting the right paint
Selecting the correct kind of paint is important for any painting project. I wanted to be sure I did this correctly the first time around, so I contacted Sherwin-Williams for advice on the right primer and best paint to use.
Not only were they incredibly helpful, but they also ended up sponsoring this post for me by donating the paint for this project. Although I received paint as compensation for this post, all opinions expressed are my own as always.
Using a primer first on this wood is a necessary step to ensure a smooth finish, full coverage, and better paint adhesion of your top coat.
Which primer to use depends on the types of wood paneling. If the wood has a shiny finish to it and is smooth to the touch, you can use a latex primer. If it’s more of a rough finish, you need to use an oil-based primer.
When using oil-based paint, you will need ventilation in the room, and you should wait a full 24 hours before applying your wall paint over it.
Luckily for me, the wood in this room had a smooth, kind of shiny finish to it, so I was able to use the multi-purpose latex primer.
For my top coat, I chose Sherwin Williams ProClassic paint color in Extra White with a satin finish. The ProClassic line provides a durable, non-yellowing finish that can withstand tough wear and tear, according to Sherwin-Williams.
cleaning the paneling
For best results, the first thing I needed to do was clean the wood paneling. I scrubbed the entire wall with 409 cleaner. Then I went back over it with a damp cloth to be sure there wasn’t any residue left.
filling the nail holes
You should begin by filling any nail holes or small cracks in the wood with a patching paste or wood filler. Once that dries, sand it smooth before beginning to paint. Be sure to wipe away any excess dust.
Next, you’ll have to address any intricate details. This fireplace wall had black antique hinges that I didn’t want to cover. So I started by outlining around those with a small, angled brush.

how to paint paneling walls
Then my daughter and I began to paint.
We cut in the edges with our brushes and used a paint roller to fill in the rest. A paint sprayer would have made this even quicker, but I only use those outdoors.
After letting the first coat of primer dry for about an hour or two, we went ahead and added a second coat. One coat wasn’t enough to fully cover the real wood paneling.
Because this is a small area, it didn’t take us very long.
Once the primer dried, we added the first coat of paint in the Extra White ProClassic. Because we applied two coats of the primer, we only needed two thin coats of the paint.
painted paneling after
It’s amazing how a simple paint job can change the entire look of a room! The room feels not only brighter, but bigger too!
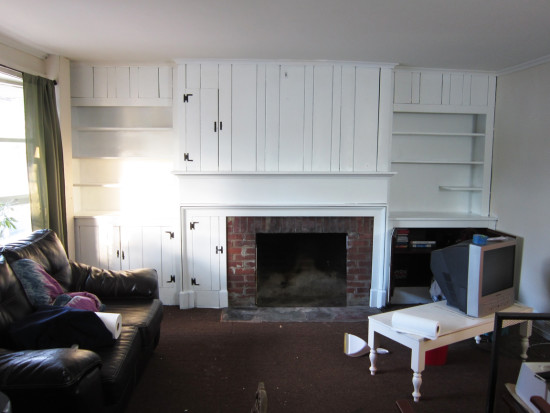
I love the contrast with the black hinges now. You wouldn’t have even known they were there before. We also rehung the existing gold mirror, which now looks perfect with the white background.

finishing up this living room makeover
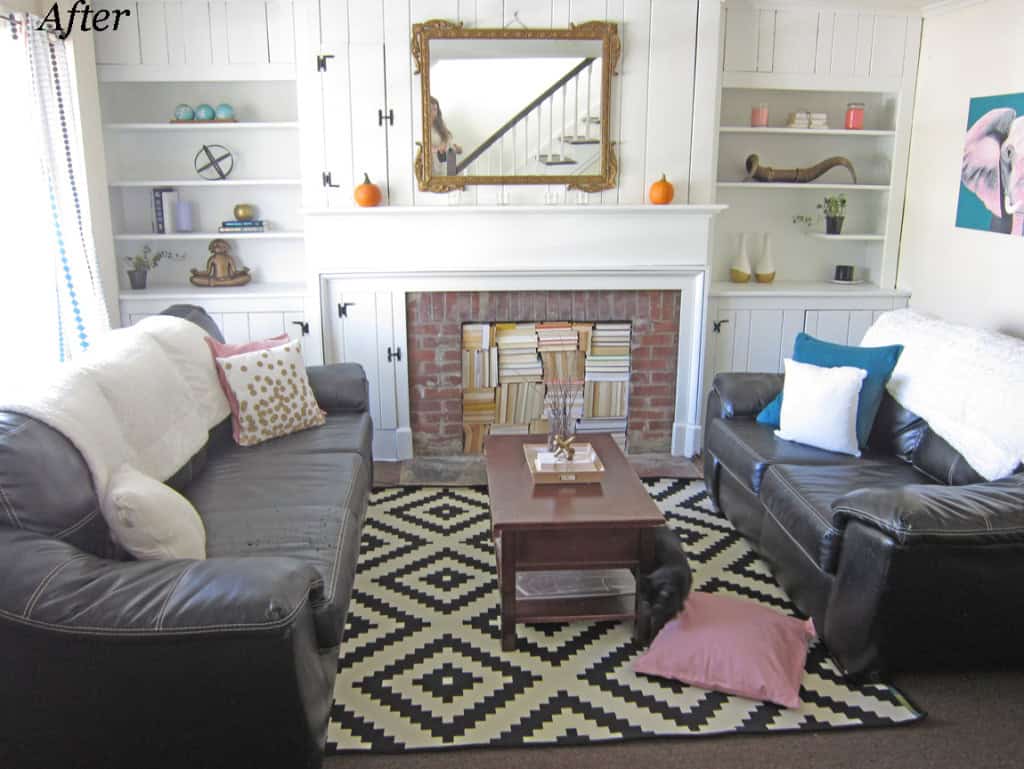
I plan to get back over there this weekend to fill the fireplace with books like I mentioned in my design plan last week. After that, I will rearrange the furniture into a more functional layout. Last, I will bring in an area rug, new window treatments, and accessories.
(UPDATE: SEE THE FINAL ROOM MAKEOVER HERE! AND A SNEAK PEEK BELOW!)
A big thank you to Sherwin-Williams for not only sponsoring this post but for guiding me to the correct paint & primer choice. Be sure to check out their ProClassic line of paint – it’s of great quality!
Why painting paneled walls is worth it
Painting dark paneled walls might seem intimidating at first, but as you can see, it’s one of the most impactful updates you can make in a living room makeover, especially when you’re working with a budget.
The transformation is immediate: what once felt heavy, dated, and even a little dreary can become light, airy, and inviting with just a few coats of the right paint. Best of all, this project doesn’t require expensive materials or professional labor. With a little prep work and patience, you can create a fresh backdrop that makes the rest of your décor shine.
If you’re tackling a full budget-friendly living room makeover, freshly painted walls give you a solid foundation to build upon. Once the paneling is updated, you may find that your existing furniture, rugs, and accessories suddenly look completely different in the new light.
Even something as simple as swapping out throw pillows, rearranging furniture, or hanging artwork can feel like a brand-new design once the dark backdrop is gone. Painting gives you that flexibility; it’s an affordable change with maximum impact.
room makeovers on a budget
Remember, budget makeovers are all about being resourceful and creative! You don’t have to do everything at once to love your space.
Start with the biggest visual change (like painting those paneled walls) and then layer in affordable updates over time. Shop your own home for decor, try DIY projects like refinishing a thrifted coffee table, or add cozy textures with blankets and curtains. Each small step builds on the last, and before long, your living room will feel completely refreshed without breaking the bank.
So if you’ve been staring at those dark paneled walls and wishing for a brighter, more modern space, this is your sign to pick up a paintbrush. It’s proof that you don’t need a huge budget to create a living room you love; you just need a little paint, some determination, and a vision for what your home can become.
Never underestimate the power of paint to transform a space!
faq’s on painting wood paneled walls
“How to paint paneling walls” was part of our One Room Challenge living room makeover. See the makeover progress week by week:
Week 2 – The Design Plan
Week 3 – Painting Original Wood Work
Week 5- Sneak Peek
Wow! The paint makes such a difference! Definitely the right move to do it. That nook is so charming now. I love it.
what a huge difference the white paint made. So much brighter. Looking forward to seeing the finished room.
I literally gasped when I saw that first picture. What. A. Difference. The white paint has completely transformed the room!!! It looks amazing! Great job!
I love how it turned out! The wood was pretty before but so dark. This makes it feel so light and bright now. I am excited to see more of this room!
The white paint looks great! And yes, I agree…always o with what makes you happy =)
What a difference Roxanne…I love an all white room and with the paneling it looks amazing, can’t wait to see the reveal!
I LOVE it!! I love painting wood white, we had wood paneling in our last house and painted it and it made all the difference in the world. It looks so great!
Wow what a difference! The white sure brightens up the room! One of the homes we’re looking at buying has wood wall across a long wall in the basement. Thanks for the tips; now I know how to change them.
It doesn’t even look like the same room–it’s so much brighter in there! The mirror really stands out now and I’m looking forward to seeing the books in the fireplace.
Wow what a difference paint makes, it looks great. The room is much brighter. Excited to see the reveal.
Roxanne this looks great! I love how it has really lightened up your room! Can’t wait to see what you have prepared for this week!
The room looks so much brighter Roxanne 🙂
The white paint makes your room look so much larger! Can’t wait to see what your progress is this week!
Just wondering — DID you get the owner’s permission before painting the wood? 😂😳