Halloween Origami Printable For Easy Paper Pumpkins
THIS PAPER PUMPKIN CRAFT IS NOT ONLY EASY BUT ALSO INEXPENSIVE TO MAKE! FREE HALLOWEEN ORIGAMI PRINTABLE INCLUDED.
While I was brainstorming ideas for inexpensive Fall and Halloween decorations, I kept coming back to paper crafts. I didn’t realize there was a name for this, origami.
What is origami?
I’d heard of origami before but I didn’t really know what it was. After some research, I discovered it’s the art of folding paper to create two or three-dimensional crafts.
There are a few different ways to do it. As it turns out, they’re all super easy as you’ll see with my step-by-step instructions.
Today, I show you how to make this easy Halloween origami project featuring paper pumpkins. I will include the free printable pumpkin templates to make your own Halloween origami.
They’re fun and easy to make and you don’t need much more than a piece of paper to do it!
Supplies Needed For Halloween Origami Pumpkins:
- Paper of choice
- Cardstock
- Scissors
- Pencil
- Pumpkin Template for Tracing
- Glue
- Sticks for pumpkin “stems”

Which Type of Paper Do You Need For Origami?
When it comes to the paper for this project, almost any kind will do! You don’t necessarily need origami paper. I used scrapbook paper I already had. You could even use construction paper for these.
If you don’t have either, try wrapping paper, leftover wallpaper, or any other pretty or colored paper you have around the house.
I did notice this pretty fall-themed scrapbook paper that would be ideal for these little pumpkins.
Halloween origami printable – Free Digital Files
The first thing you’ll need to make this easy pumpkin origami is a pumpkin template to trace. I printed out several pumpkins in different sizes to experiment with.
To print these for yourself, simply right-click the images below and save them to your computer. (Note: for your personal use only.).

I used the largest pumpkin shown above and the larger one shown in the center below.

So they’d be durable for tracing, I printed mine out on a piece of cardstock. I keep a pack of cardstock in the house and I’m always surprised how often I actually use it, it comes in handy.
You won’t need the stem on the printable so you can cut that off.
Once I had those printed and cut out, I was ready to make the paper pumpkins. I had scrapbook paper in several different patterns so I was able to make a mix of color and pattern with mine.
How to fold the paper for origami

Because I already had scrapbook paper, that is what I used. This was my first time making origami but it’s super easy.
To start, I folded my paper in half, then I folded it in half again. Next, you want to trace your pattern. It’s important to make sure you are tracing on the folded edge!
Additionally, you only need to trace half the pumpkin pattern because after you cut on the folded edge it will open up to a full pumpkin.
The picture above shows the step-by-step illustrations. As you can see it’s very easy!
Now simply cut out your pumpkins. They should look like this when you unfold them.

Once I had these cut-out, I continued folding the leftover paper and tracing more pumpkins until I didn’t have enough left to make any more.
If you don’t have enough paper, you can make your pumpkins smaller. More is better for a full look. I’d suggest at least ten cutouts per pumpkin. I did less than that amount on some and they looked too sparse.
Folding Origami Paper

The important thing to note here first is to make sure you are gluing on the wrong side of your paper.
Turn your pumpkin upside down and apply glue to only half of it. I used Modge Podge because that’s all I had but any glue will work.
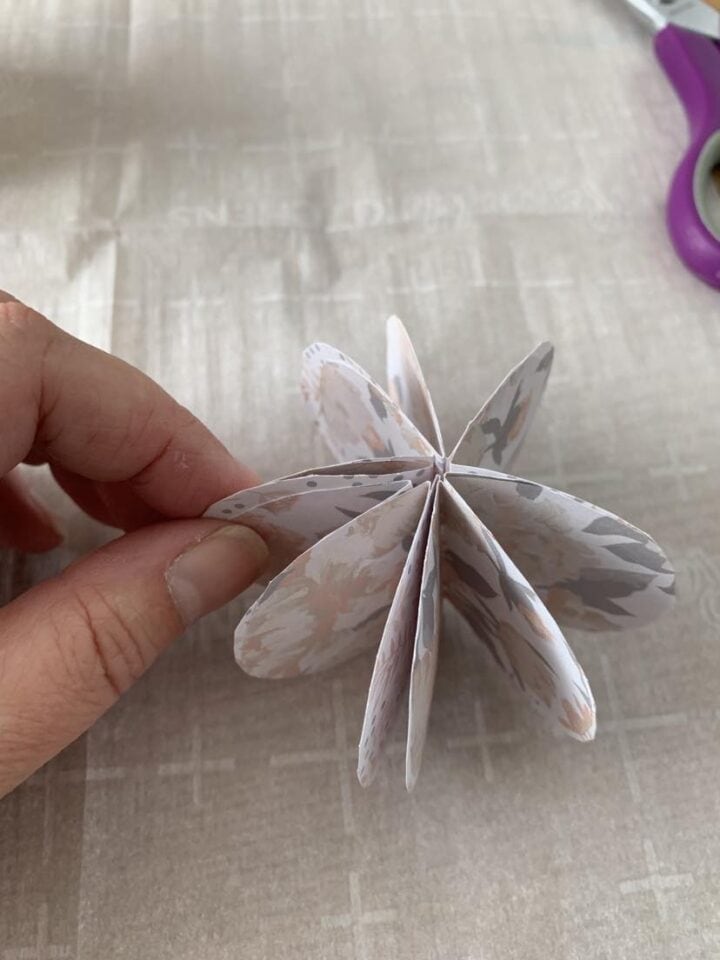
Next, stick another folded pumpkin on top of where you applied the glue. I found it helpful to fold all the pumpkins inside out before starting this so I remembered to keep gluing the wrong side together.
Keep repeating that and stacking the pumpkins until you have enough for a full look.
When you get to the last one, glue the last two together. See the bottom right picture above, you glue those two white sides together.
Now stand it up and open up the folds.

If your pumpkin sits a little unlevel, you can fold it back up and trim the bottom to make it sit straighter.
Adding The Stem

For my stems, I used sticks from my yard. They’re actually dead growth from my hydrangea plants. But you could use pipe cleaners, toothpicks, or anything else lightweight.
I preferred the sticks because they look more organic.
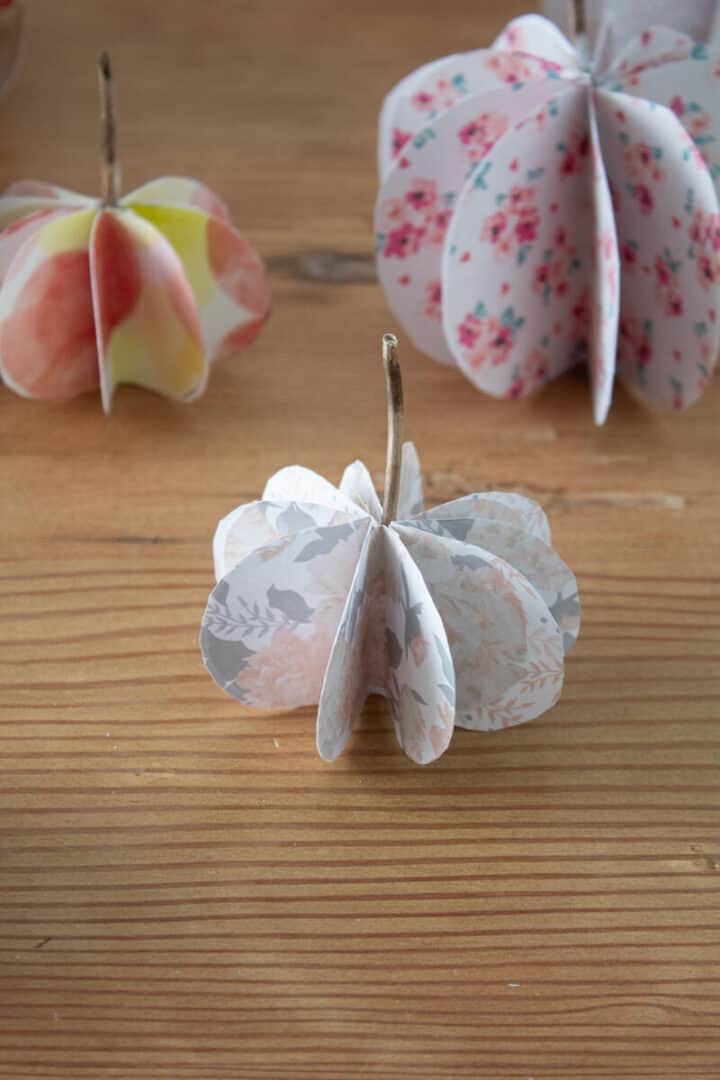
You’ll notice when your pumpkins are upright there will be a little space in the center. I applied glue to my stick and inserted it into that center area.
Some centers were more narrow than others which wasn’t an issue. For the more narrow openings, I used smaller sticks.

The longer and curvier my sticks were, the more I liked the look of the finished pumpkins.

Aren’t they cute? Who knew paper crafts could be this much fun?
pumpkin origami tips
As easy as this little Halloween craft is, keeping these tips in mind will help your project come out perfect.
- The kind of paper you use doesn’t matter much but double-sided paper is better. It will keep there from being any white showing. But if you do get any white showing, simply trim with scissors.
- More is better when it comes to your cutouts. I’d suggest at least ten cutouts per pumpkin but more will give you an even fuller look.
- Remember to glue the back sides of the paper together. Even after making that mistake once or twice, I did it again. Prefold your cutouts so they’re inside out.
- If you’re short on paper, make your pumpkins smaller, this way you’ll get more layers.
- If they don’t stand level simply trim the bottom.
- Gather sticks in different sizes and shapes for the stems.
- Using longer, curvier sticks will give you a more organic look.

If you’re looking for easy crafts for your kids to do, this one is definitely it! It’s a great way to help young children with their hand-eye coordination.
It’s also a great way to keep them busy at a Halloween party.
But they’re not just for kids! These little paper pumpkins are an inexpensive way to get into the Fall and Halloween spirit. Another bonus is these can be folded flat and easily stored until next year without taking up any storage space.

Clearly, I’m a fan of florals but if that’s not your thing, you could use colored paper or even black paper. Whatever speaks to you!
Sometimes simple crafts are really the best crafts! You can save this post for later so that as Halloween approaches you can refer back to it!
If you’re looking for more Halloween crafts or Halloween origami ideas check out how to make an origami bat and this cute little friendly ghost. There are so many great ideas!
IF YOU LIKED THIS HALLOWEEN ORIGAMI PRINTABLE YOU MAY ALSO LIKE:
HAPPY HALLOWEEN


Such a cute, easy project for affordable Halloween decorations.
Thanks!
I love the idea, but adding more that a drop of glue or a small piece of tape can make the difference between “origami” and a “paper craft”. I thought this was going to be an origami, not a paper craft. Maybe consider switching the word “origami” to “craft”? The title is very misleading, but I would appreciate if you did so. Thank you, and have a great day!