fabric lamp shades diy how to
THIS FABRIC LAMP SHADES DIY IDEA INCLUDES HOW TO COVER A LAMPSHADE WITH FABRIC AND HOW TO MAKE IT PLEATED – NO SEWING MACHINE REQUIRED!
Fabric-covered lamp shades have been trending in the last year and with good reason. Covering a plain lampshade with a patterned fabric adds character and coziness.
You can find fabric lampshades online to purchase but I’ve found them to be very expensive.
Here is one example of a fabric lamp shade that I thought was beautiful.
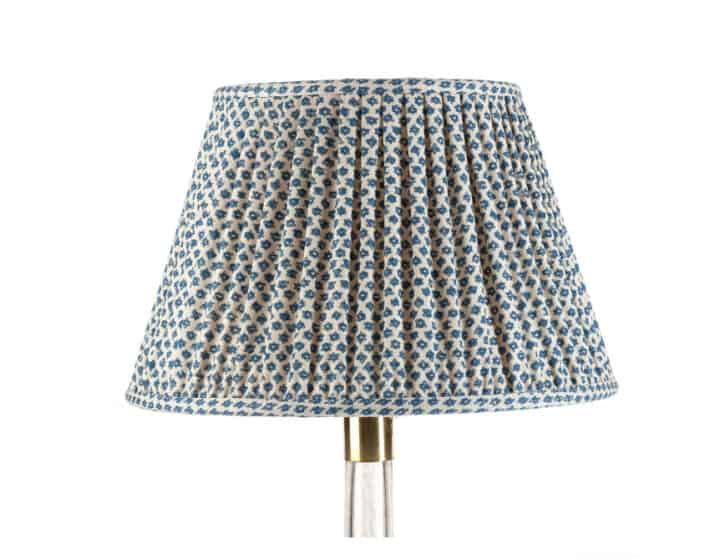
However, when I looked into buying it I was completely sticker-shocked! This lampshade is not cheap, it costs $161! That is just for the shade, no lamp with it.
I’ve seen several others for sale since then but none less than $100 for just the shade.
The good news is these are very easy to make yourself and you don’t need any sewing skills to do it!
After a little Google searching, I realized it would be easy to make one myself. Then I remembered I had a pretty floral print fabric from the flea market that I got for $1.
I’m not sure if one kind of fabric would be better than another. My fabric is a very thin material and it worked very well for this fabric lamp shade diy.
It went so well I wanted to share my fabric lamp shades DIY here with you.
Start with a small shade
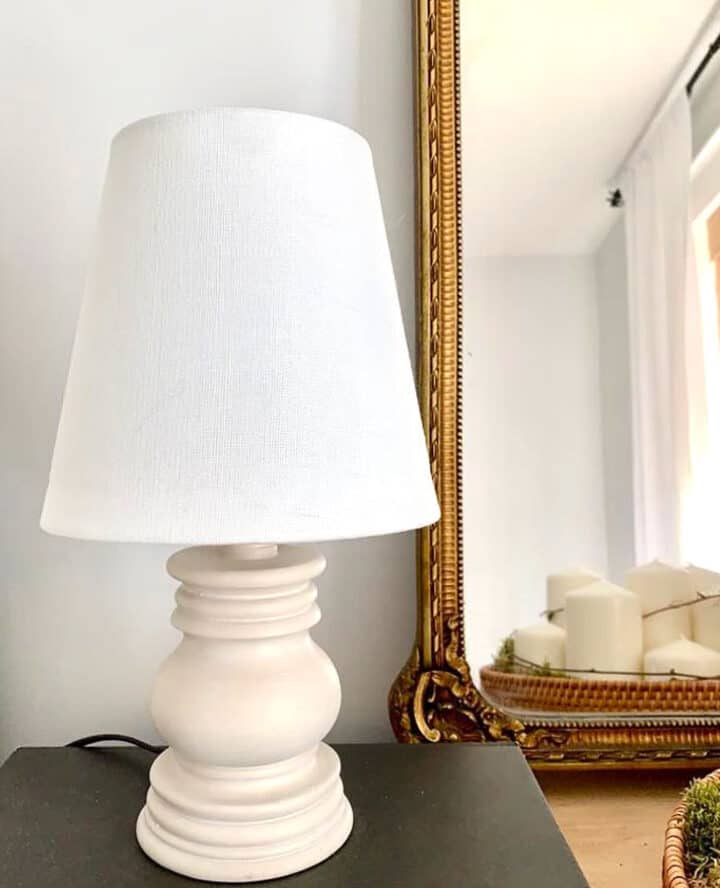
I have a small, inexpensive lamp from the Christmas Tree Shops that was perfect to experiment with. I would recommend using a similarly inexpensive lamp for your first time.
If you don’t have an old lamp, check out a local thrift store for an old lampshade to practice on. With a small lampshade like this one, you won’t need much fabric.
Eventually, I want to make this type of shade for two new wall sconces. But I wanted to practice first on this one to get the hang of it.
To get started, I based my initial plan on this tutorial from Sincerely Marie Designs but made a few adjustments.
Supplies Needed FOR fabric lamp shades diy
- Fabric
- Fabric Glue and hot glue gun
- Scissors
- Ruler
- Pencil
Step 1: Determine fabric size
The first step is to determine the size of your lampshade so you can cut your fabric to size. You can wrap it around your shade to be sure you have enough fabric but keep in mind to make it pleated, you’ll need about double to triple that amount.
The height of my shade is just over six inches tall. I cut my fabric to 6″ to leave a little space at the top and the bottom of the lampshade. Fabric banding will be added to the top and bottom of the rim at the end.
step 2 – Cutting the fabric
Once you have your measurements, lay your fabric out on a flat surface. I marked the fabric at the 6″ mark and used a ruler to draw a line so I could make a straight cut accross.

After cutting a large 6″ strip of fabric, I measured 3″ sections from there. The inspiration tutorial used 1.5″ strips but I found those to be too small to work with.
Let the size of your shade determine the width of the fabric.
Keep cutting strips of fabric until you have a bunch. You can move on to the next steps and come back to this one if you find you need more fabric.
Hold on to any excess fabric because you can use that for the banding at the end.

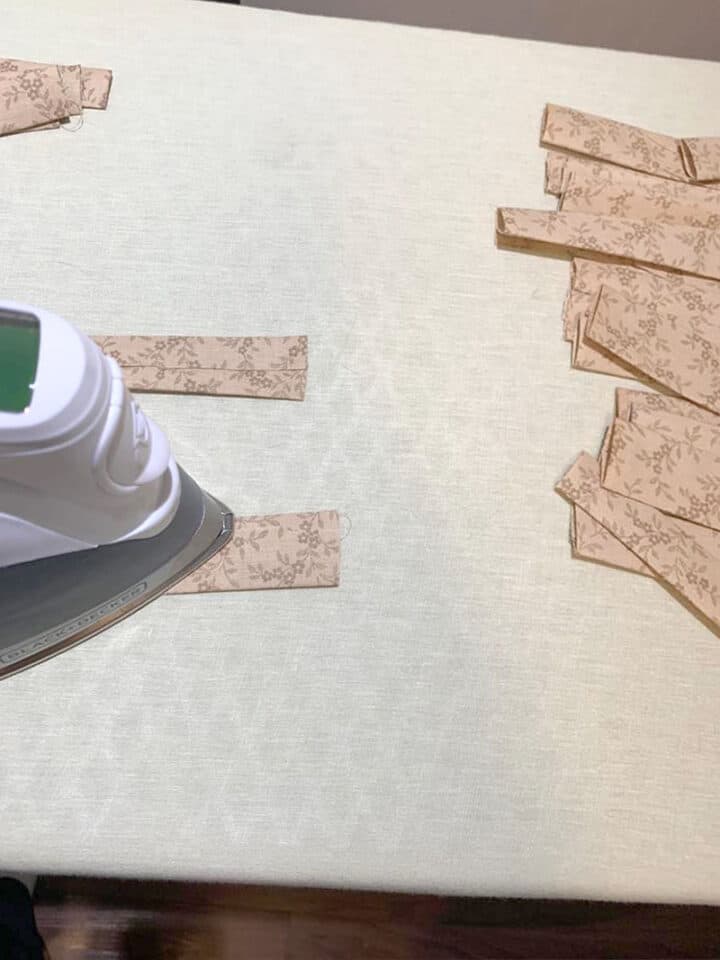
step 3- fold and iron
Next, take the 3″ strips of cut fabric and fold them in. Folding each fabric piece into thirds worked well for me. I slightly angled them while folding so the top was a little more narrow than the bottom to accommodate the angle of the lampshade.
If you aren’t using a tapered lampshade this won’t be an issue so you can fold them all evenly.
After you have enough strips of fabric to wrap around the lamp, press them with an iron. This will help keep your folds in place.
step 4 – attach the fabric to your shade
Rather than using hot glue, I used fabric glue. Hot glue gets annoying with the strings so if I can use something other than that on projects, I will.
Fortunately, the fabric glue worked like a dream. It stuck right away while still giving you a few seconds to position the fabric strip correctly.
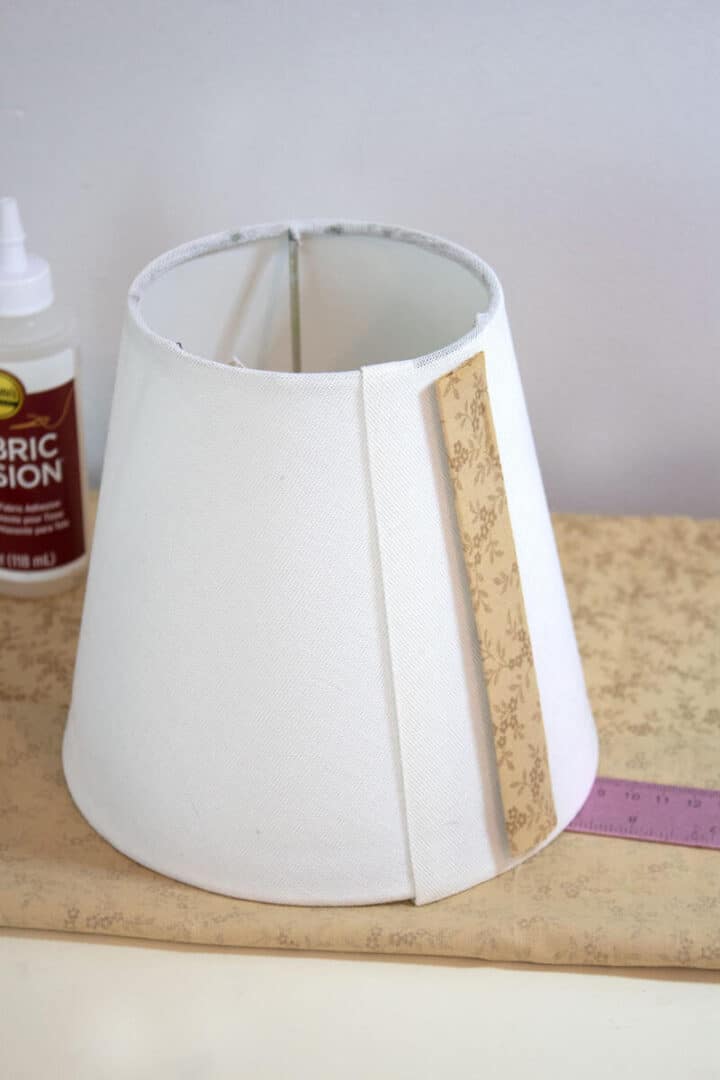
Important: When gluing the first piece, only glue down the right side of the strip. Leave the left half unglued because this is where you will tuck in the last strip when you get there.
This will give you a seamless finish, but its always a good idea to start on the back of the shade anyway.
As mentioned, rather than apply the fabric to the top and bottom of the lampshade, leave the banding uncovered for now.
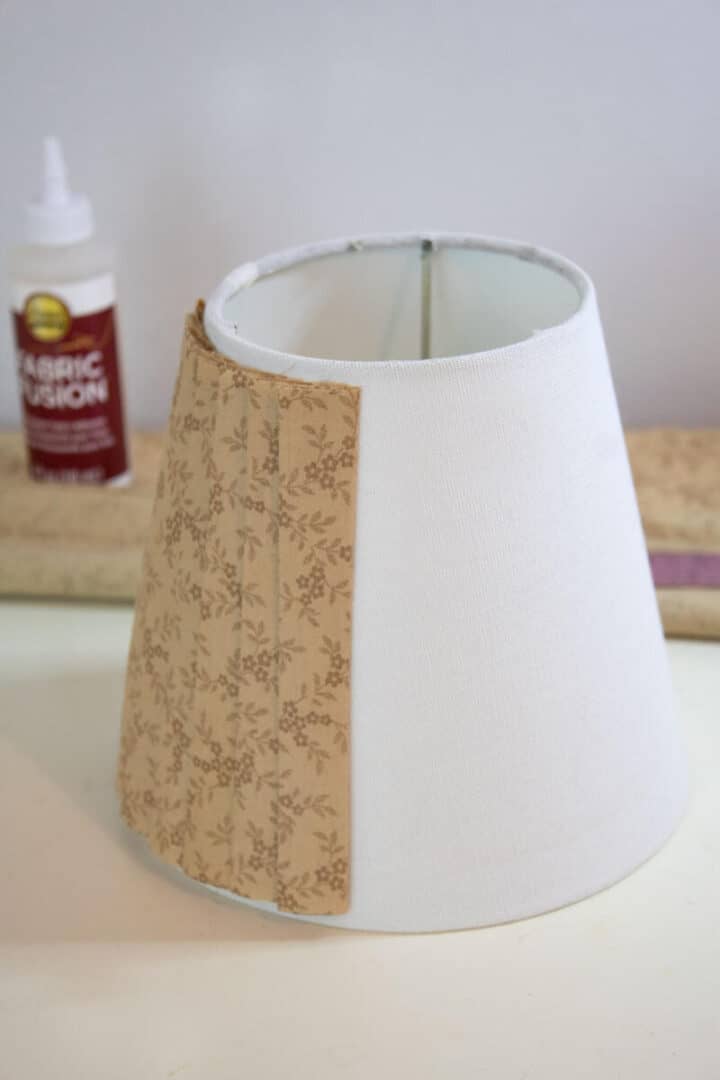
I applied a line of glue down in a zig-zag pattern to the back of each fabric strip. The fabric glue dries quickly enough that you can move on to the next piece rather quickly.
Continue adding your fabric strips around the lamp. I expected this process to be long and tedious but it went quickly & easily.
Once you get to that last piece, add glue to the back and tuck it right under that first piece you left half unglued.

step 5 – finish trim for the top and bottom of the shade
For the top and bottom rim, you’ll need to add a fabric band. You can easily cut another long strip of fabric for these sections so that it matches the rest.
If you go that route, you can fold it and iron it the same way as above.
I happened to have a jute ribbon that was just about the right size so I opted to do that for the trim pieces instead for a slight contrast.
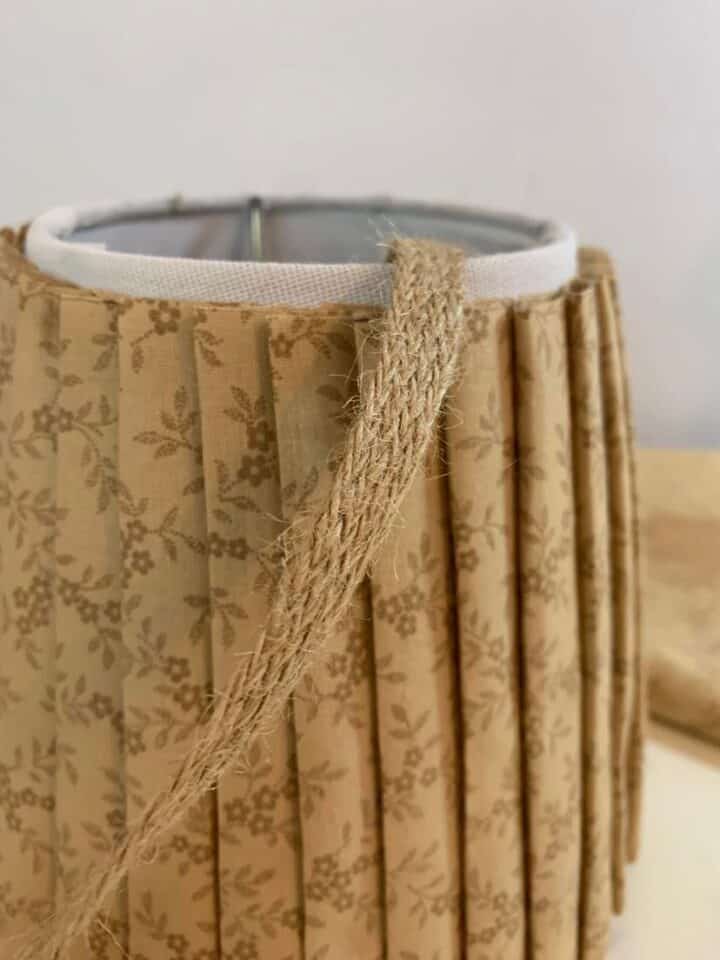
For some reason, the fabric glue did not work with the jute so I did have to use hot glue on that part.
I measured out two pieces of trim, one for the top edge and one for the bottom. I added a little glue across the back of each strip and applied it to the shade.
This last step will give you a neat, clean edge.
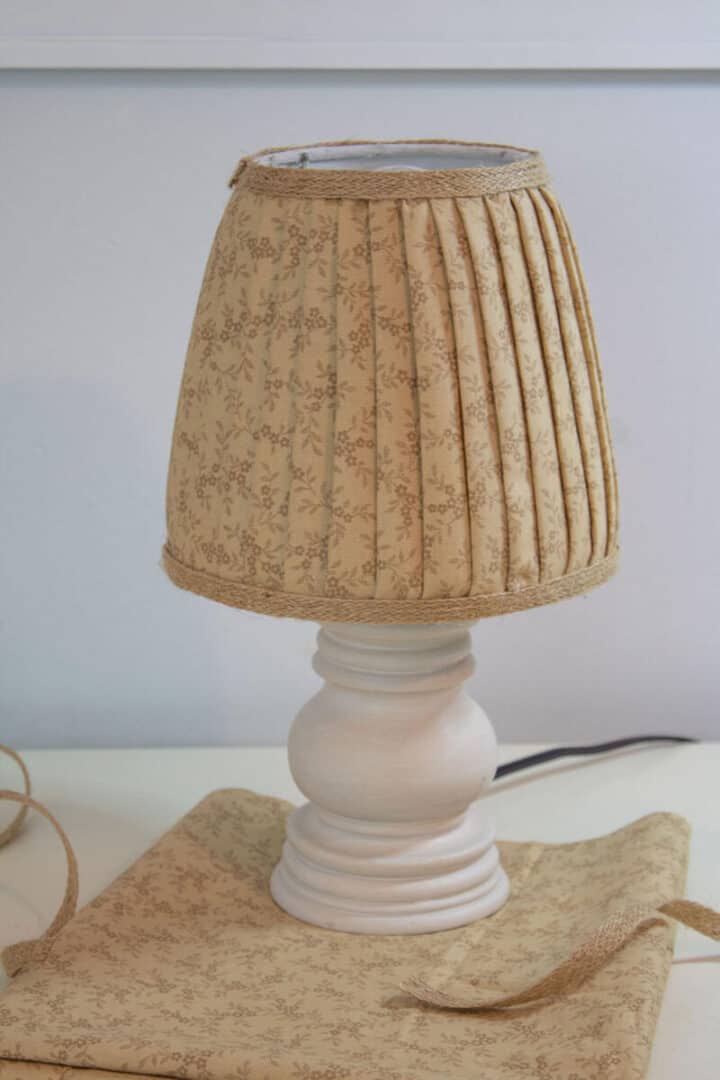
And that’s it! Isn’t that cute? From a plain white shade to a custom shade without spending much money! It’s a great way to go because you can choose a fabric design of your choice that matches your decor.
I love how this fabric lamp shades DIY came out. I will be doing this to the wall sconce I have in my living room next.

If you’re interested in buying a fabric lampshade rather than covering the lampshade with fabric yourself, here are several really pretty options I spotted!

I sometimes find craft projects to be tedious but this one was so much fun. If you’ve tried it, share your experience in the comments!
YOU MAY ALSO LIKE:

What a beautiful lamp shade, it was definitely easy to make. Glad you did.
That looks awesome. Surprised it was so easy to do.
Clever!
Beautiful! Also love the lamp. Where is it from?
Thanks, I believe I bought the lamp at The Christmas Tree Shop.