Restoration Hardware Chandelier Hack
 This is my second Restoration Hardware chandelier hack! I’ve mentioned several times before that my friend has recently moved into a new home. She’s been working like crazy making her little fixer upper pretty. I’ve been over there every chance I can to help. There’s no end to the DIY projects there!
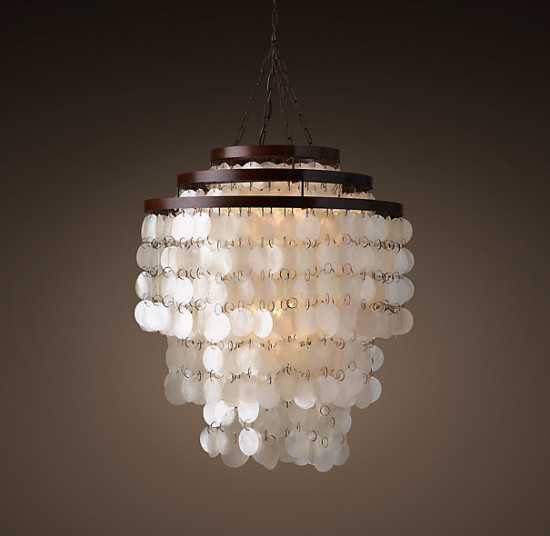
Her dining room is my favorite space in the home. We did it completely with DIY projects and reclaimed furniture. Sorry, no pictures yet it’s still a work in progress! I showed my friend all the chandeliers at Restoration Hardware and asked her which was her favorite. She picked the Capiz Chandelier. The cost for that chandelier, shown below, is $695 for the smaller size.
Of course, I decided I could make that for a small fraction of the price. I started looking up capiz shells on Ebay and Amazon. They came in a variety of sizes. I went with larger sized shells, mine are 2″ in diameter. They also came with the option of having the holes punched in them or without. Purchasing them with the holes was more expensive, but I went with those anyway because I figured I’d end up breaking them if I tried doing that myself. To get these shells with the two holes already punched in them, and in the larger size isn’t cheap, but I finally found an affordable option on Ebay* (the original seller I purchased from is no longer offering these, but I found another that I linked to although the price is slightly higher at $8 per bag). I was able to get a bag of 50 shells for around $7. That was by far the cheapest I could find, and they were located in Indonesia. I ordered 4 bags, hoping that would be enough. I then found this chandelier frame for only $15.
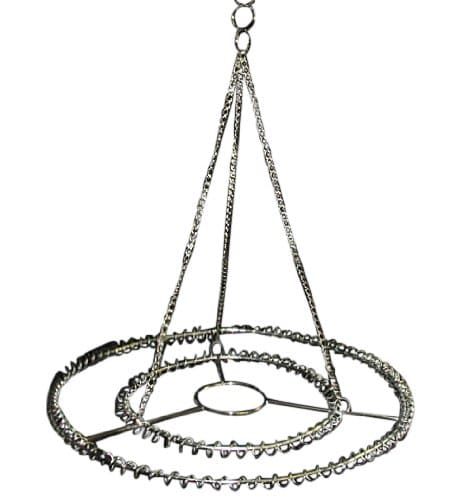
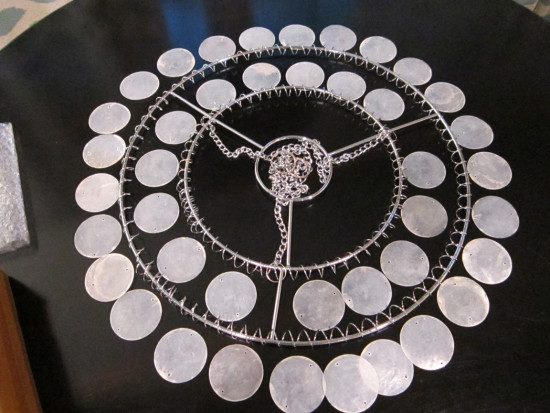
For this project, I kept the color of the frame as is to better coordinate with my friends decor, but you could spray paint it in oil rubbed bronze to better match the RH version. Once I had everything, I laid the frame on a table to get an idea of how many shells I would need for the diameter.

I wanted to do at least two rows for depth.
Once I had that figured out, I began assembling the shells together. I had O rings (used for jewelry making) already on hand (these look similar) that I was able to use for this. If you can’t find those, you could also use fishing line to string these together.
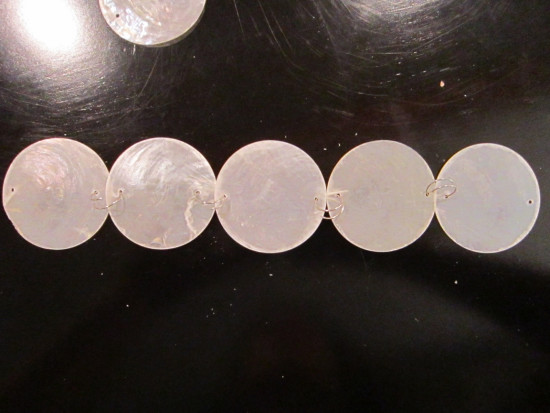
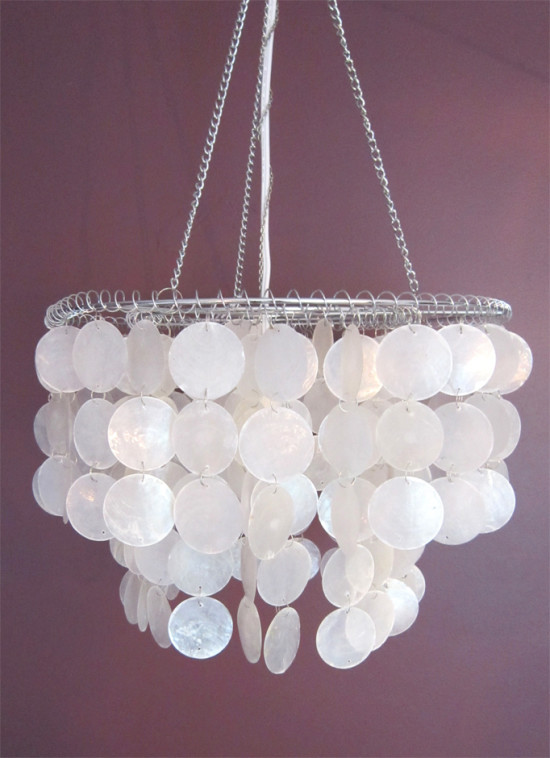
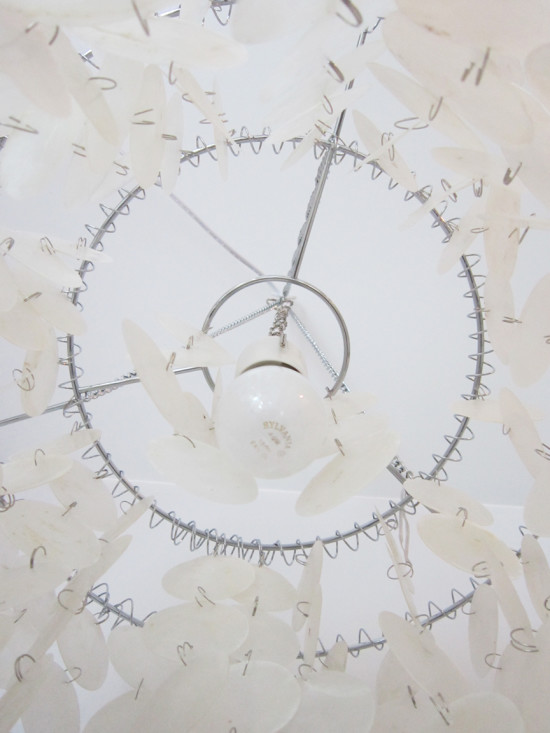
For each inner row of shells, I made a row of 5. For the outer sections, I made them in rows of 3. This way I would have the inner part of the chandelier hang lower than the outer, like the RH version. This was time consuming & I did it over a stretch of about a week, a little each night. I had a total of 200 shells, and this just about used them all. If you want yours longer, like the RH version, or more layered, you will need alot more shells. I took the frame outside & hung it from a plant hook in order to assemble it. I attached the rows of shells to the chandelier frame with the same O rings I used to attach the shells together. Once the 2 rows were complete I had a handful of shells leftover. I used these to make a few additional rows, and hung them from the innermost circle of the frame to better hide the light bulb.
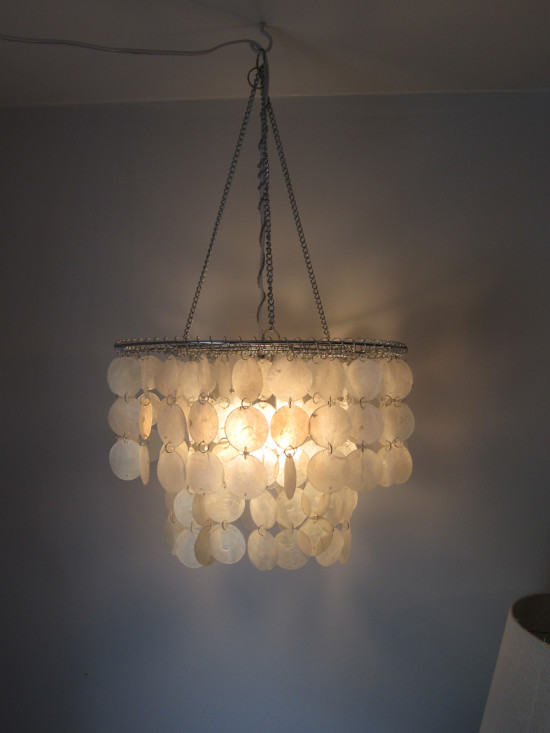
To get a light inside, I ordered this 15′ bulb pendant kit for $12, and just dropped it through the center. We plan to swag the chandelier over the table, so this was a good solution for this chandelier. No electricians required.
And here it is hanging in my house, it hasn’t gotten to it’s permanent home yet.
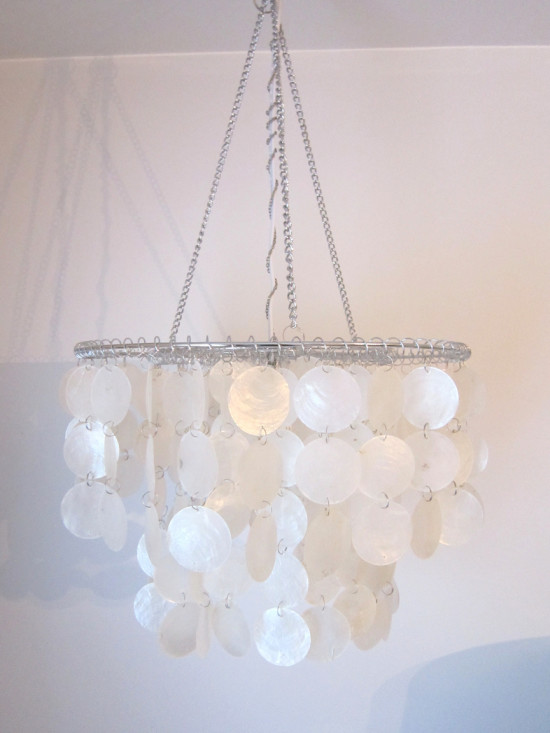
I couldn’t beat my first Restoration Hardware Chandelier Hack cost of $27, but I still came in far under the RH price of $695 with a total spent of around $55.

If you love this Restoration Hardware chandelier hack, you can see the orb chandelier I made for only $27 here!
*This post contains affiliate links, you can read my full disclosure here.
This is a fantastic hack! I will pin it.
Also, a heads up.
I came from a link party and our site was blocked as malicious. Even has a report about the alleged threats it has. I chose to “visit anyway” and I think I know why you were redflagged.
I think it is because of the first sentence of your post. I am not sure, just giving you a heads up.
Have a friend confirm and maybe you can simply edit the post with a different intro. I think that internet security thingy is overly jealous in its job. 😀
Have a great day and I enjoyed your post. 🙂
Thanks so much for letting me know that, I appreciate it! I removed the first sentence just in case.
It looks great! I’ve always wanted to a make a capiz shell light! What a great way to make it!
WOW! This looks beautiful! And you make it look so easy! I can’t wait to see the big reveal of your friend’s dining room!
Um..this is amazing! And who knew you could find a chandelier frame on Amazon for $12..so many ideas!
Looks great Roxanne! Pinning!
OMG I love this!! And I love the tutorial you make it seem so easy! I will definitely be trying this in our new home!!
This would be so cute in my daughter’s room!! Great hack!!
This is a fantastic project- I love restoration hardware but I can never justify the price. Thank you for sharing this!
I stopped by from The Scoop.
This is so pretty!! I like yours better than the Restoration one, and the price is wayyyy better too!
How clever bloggers are, it is so heartening for me to keep finding more and more talented people that find ways to save money making something pretty. And your project was so unselfish, making that capiz shell chandelier for your friends new dining room. How wonderful to have a friend like you. You might be feeling pretty good at what you did for her.
Why in world would anybody want to pay that much for some thing can be made by their own ingenuity? Happy rest of week.
I really love the look of this chandelier. Does the frame come in different colors? If not, could you spray paint it a different color? This is a great project and the price is much more affordable. Looking forward to the reveal! Have a great day!
Benita, this frame was not available in any other colors, but yes you could definitely spray paint it!
I bet this took a long time to create? Assembly like that is rarely fast or easy. Looks lovely and for a fraction of the price!
Oh my gosh, I love this! I was just thinking about doing this for my daughter’s bedroom, but I wasn’t sure where to begin. Thanks so much!
This looks so amazing! Pinned and tweeted! Thanks for being a part of our party. I hope to see you, Monday at 7 pm. Lou Lou Girls
This is so creative and turned out beautifully! I love the idea of a smaller version of this in a nursery or little girls bedroom. So cute!
This is just lovely, what a great way to get something so high end at an affordable price.
I LOVE what you did with this Chandelier!! What a great hack and what HUGE savings!! Looks lovely 🙂
I can’t believe you made this yourself – amazing! And the amount of money you saved! I bet your friend is so happy with her new RH knock off (I would be)!
Absolutely pretty!!!! Love every part of it… Looks awesome! Pinning!
XOXO
This is absolutely stunning! Your friend is so lucky to have you there saving her all that $$$! XO
Now I just need a beach house for this! 🙂 I love the project and am featuring it tomorrow when our Pretty Preppy Party features go live – thanks for the inspiration! xx, b
This is gorgeous! Thank you so much for linking up to our Pretty Preppy Party. I plan to feature you tomorrow 🙂
I love this chandelier!! Do you remember by any chance where did you get the capiz shells from?
Hugs,
Pili
Thanks Pili, I found the shells on EBay.
Roxanne,
Would you please share your ebay source? I want to do something similar. Thanks dear! It looks amazing!!