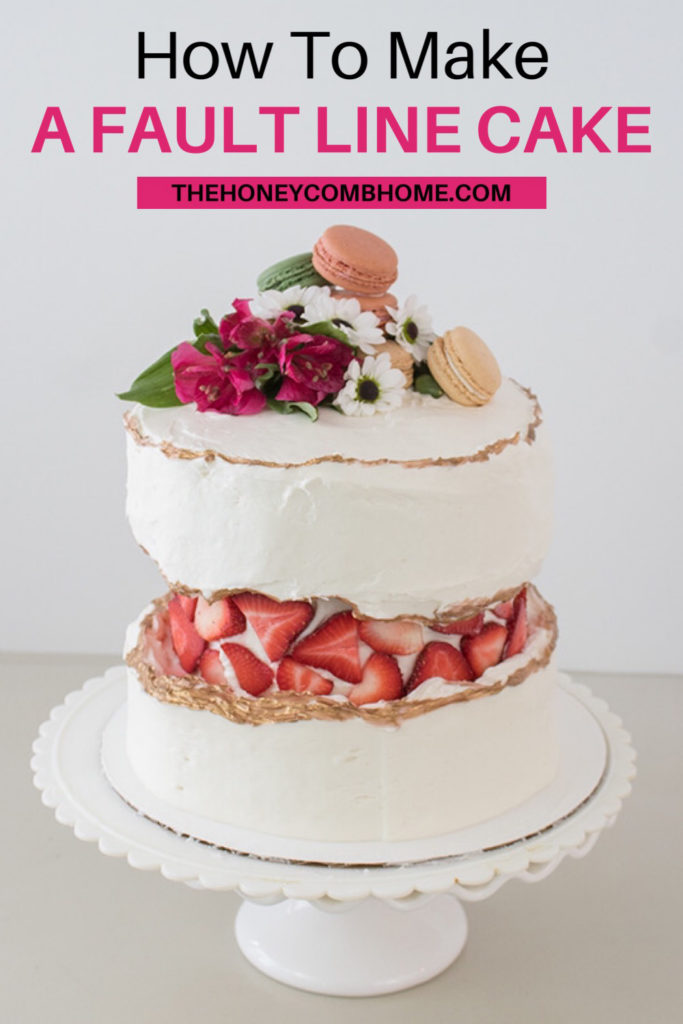
How To Make A Fault Line Cake
A fault line cake is easier to make than it looks and can be customized for any occasion!
Back before my home decorating days, I did a lot of cake decorating. Not professionally, just for fun.
My daughters never had a store-made birthday cake before their high school years. Every year I went all out making some kind of fun-themed cake based on what they were into that year.
At one point, I even talked my mother into taking Wilton cake decorating classes with me at Michaels. I learned so much from that class!
Once the girls got older, I moved onto home decorating but I’ve really missed baking and cake decorating. And after seeing a fault line cake at a bakery while we were on vacation last year, I knew I wanted to try making one. I finally got around to it last week and it came out so good, I thought I’d share with you guys how to do it.
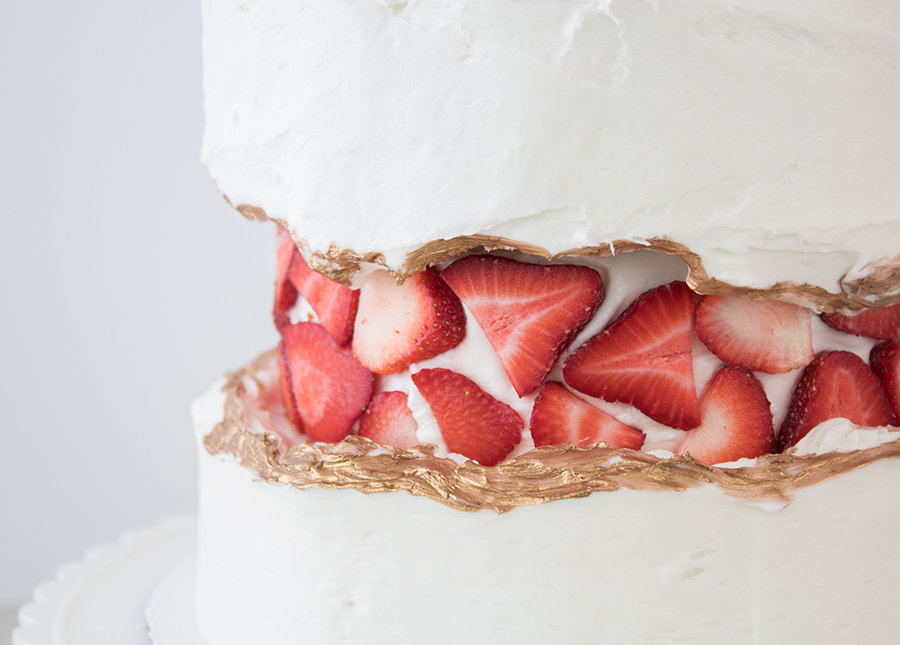
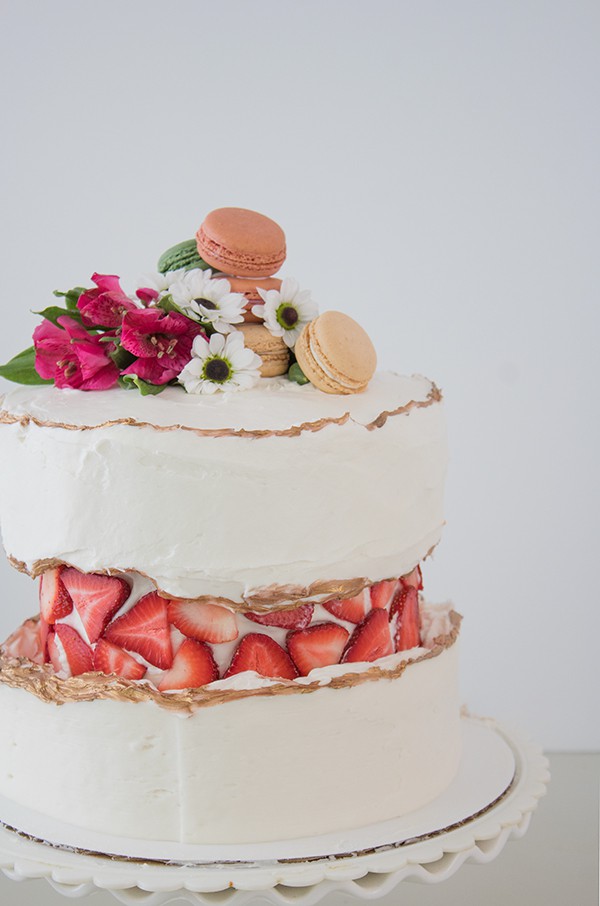
For the fault line filler, you can use fresh fruit, sprinkles, or piped icing. Basically, anything edible goes. I wanted to use strawberries for mine.
Supplies Needed for Fault Line Cake
- Wilton Cake Pan (8-in round, 3″ deep)
- Bake Even Cake Strips
- Round 6-inch Cake Cutter
- Cake Decorating Paint Brushes
- Edible Cake Paint
- Cake Boards And Dowels (dowels recommended)
- Cake Spatulas (straight and angled)
- Extra Tall Cake Scraper
- Cake Turntable (this one comes with both spatulas mentioned above)
- Three Boxes of Cake Mix
- Six Cans of Icing
- Strawberries (or fruit of choice)
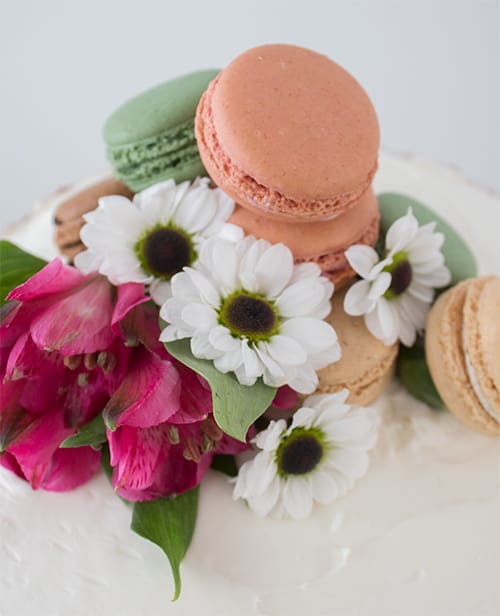
- Macaroons (or topper of choice)
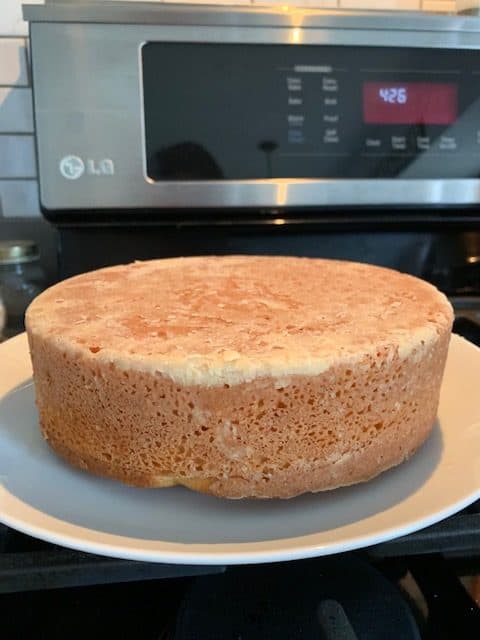
To begin, I baked three cakes (one at a time) in my 8-inch cake pan. For this particular pan, I wrap it with bake even cake strips soaked in water before baking. These help the cake to come out level. I also have a cake leveler to trim any areas where it doesn’t come out level. You could also just use a large kitchen knife for that purpose.
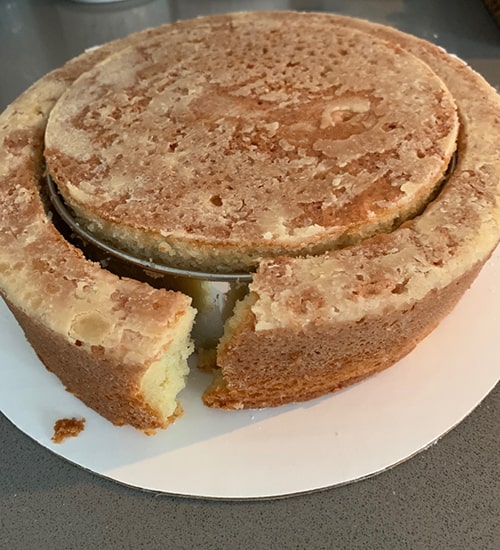
When they had cooled, I used a 6-inch round cake cutter to cut down ONE of the cakes. This will be your center layer on the cake.
Next, I coated them all with one layer of white icing, for the crumb coat. A crumb coat is a base layer of icing where crumbs will be visible. After this step, I put them in the fridge overnight. You don’t need to leave them in that long, just long enough so that the icing firms up.
When I took them out the next day, the crumb coat was firm and I was able to add my next layers of icing without the crumbs getting into it.
Because this was my first attempt at making this cake, I used a boxed cake mix and canned icing. It will require a lot of icing, so if you’re going with canned, stock up. I think I used 5 or 6 cans. In the future, I’ll make my own basic buttercream icing instead. I’ll add that recipe to the end of this post for anyone that’s interested.
I really wasn’t able to stop and take photos while assembling the cake and adding the strawberries and icing, so I made a short video to better show you how I did that.
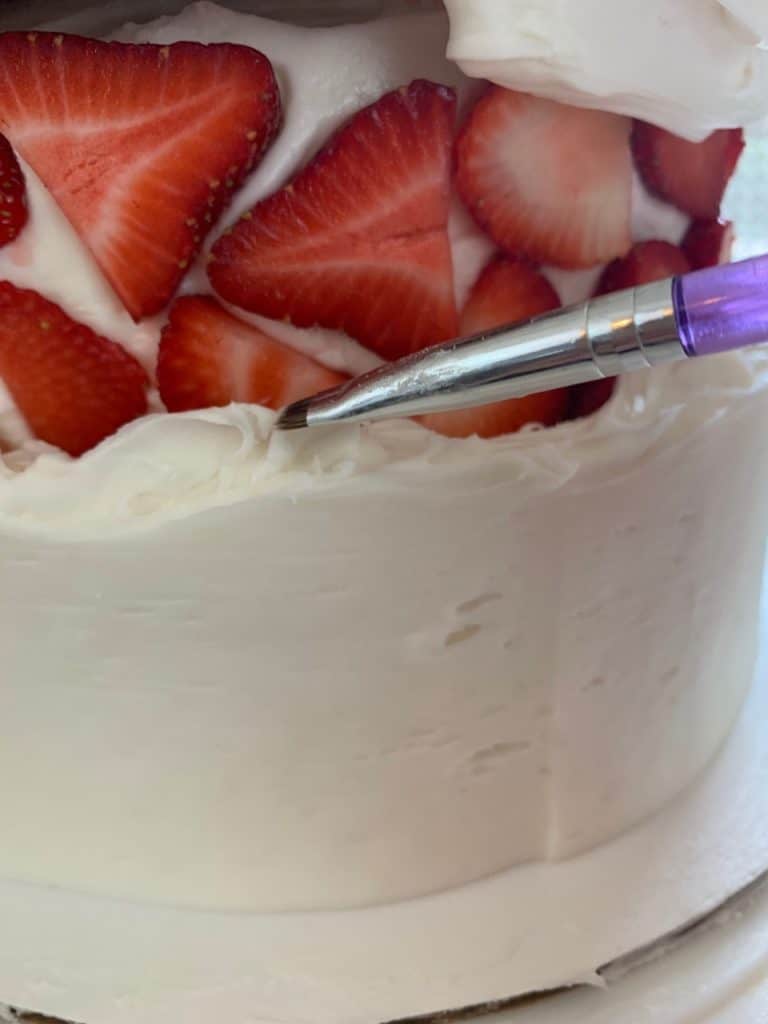
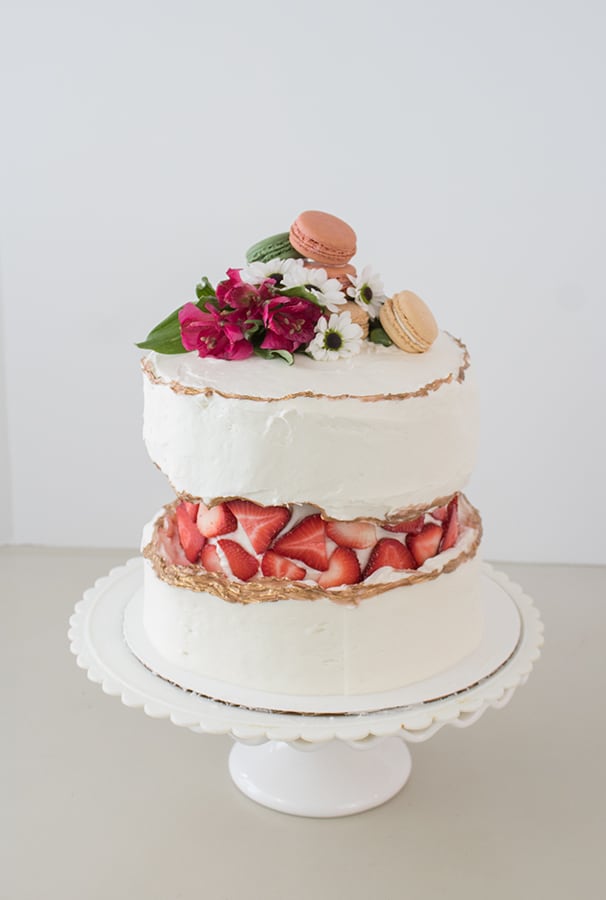
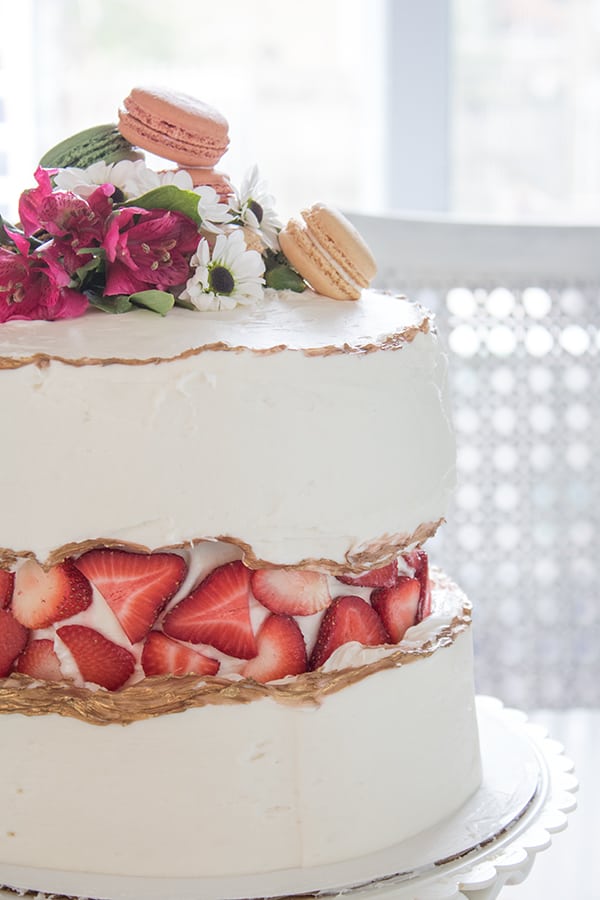
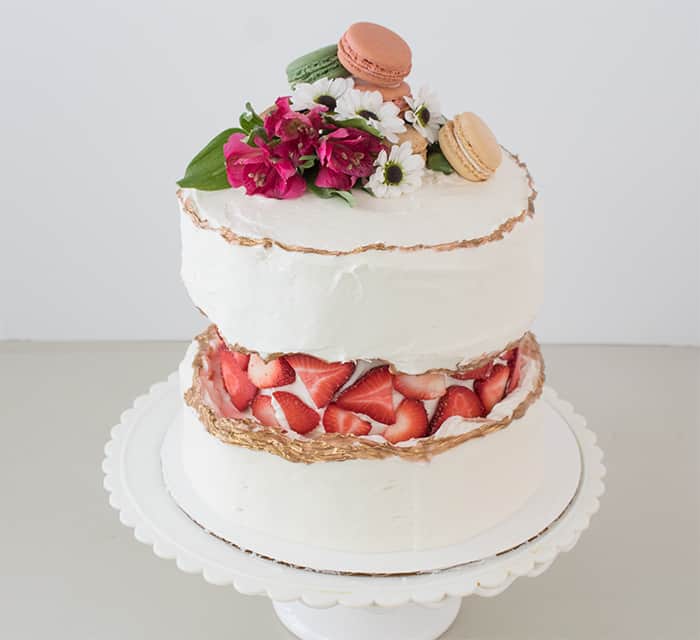
So as you can see, I added fresh icing to the middle section and stuck the strawberries into that. Then I applied more layers of icing and spread it to somewhat cover areas of the center, or fault line.
One thing to note here is that I had placed strawberries in the freezer to keep them fresh until I was ready to make this cake. After I took them out and they started defrosting, they got really mushy. I’m not sure why because I never freeze fruit. Luckily I had fresh strawberries in the fridge so I was able to use them. I would not recommend using frozen.
After the icing and strawberries were assembled, I used gold cake paint to add detail to the “fault line”.

It’s easy to apply with a cake decorating paintbrush. I have a whole set from my cake decorating days.
I went around the edges of the fault line and also around the top edge. It’s oddly satisfying to actually paint on a cake.
For the last step, I embellished the top of the cake with macaroons and flowers. I piped icing onto the cookies with a piping bag to stack them.
The fault line cake isn’t perfect, but I have to say it did come out more amazing than I had hoped it would!
I mean seriously!
There are a few things to be aware of before starting this.
One, the top layer will be heavy! Be careful to not make it too heavy with icing or in may fall off. Putting it in the fridge when completed will help to avoid this.
Two, with a cake this tall you probably should use some kind of wooden dowels down the center to keep it all in place. Otherwise, you run the risk the top layer sliding right off.
Lastly, if you’re using any type of fresh berries you can place the fruit in a bowl of water with vinegar before using. This will help kill any bacteria on the fruit and it will last longer.
There is another way to make this cake where you don’t need the center part to be cut. How that works is you add your fault line decorations first and then just load up with icing all around it.
I may try that next time for comparison. I’ll try it with sprinkles as my decoration. With strawberries or fruit, I figured you would have to add an excessive amount of icing to make it thick enough to get this fault line look. I’m also not sure that method would have as much as a wow factor as this one does.
Here is a simple recipe for buttercream frosting. Note that this recipe only yields 1/3 cup, you will need much more icing than that for a cake like this one.
Ingredients
Method
- Melt the butter.
- Combine the butter with all other ingredients. Beat until smooth.
Notes
Pin For Later:
This post may contain affiliate links, you can read my full disclosure here.
Beautiful cake!!!
Thank you!
beautiful
Thank you!