The Best Way To Organize Photos and Save Space
For months I’ve been thinking about the best way to organize photos and free up some much-needed storage space. My first thought was to convert them to digital.
Have you ever looked into one of those services that will convert photos to digital for you? If you have, you may have been as shocked as I was at how much it costs!
This is a project that’s been on my to-do list forever, but I wasn’t sure how to go about it. I have more photos than I have room to store them. They’re packed away in an oversized chest and are completely unorganized.
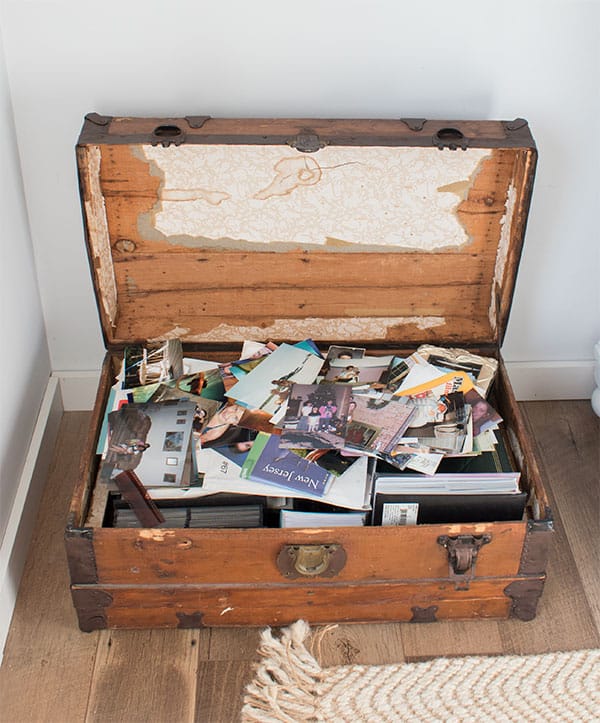
Fortunately, while my daughter was home for the holidays she showed me how she converts her vast amount of school notes to digital. This process just happens to be perfect for converting photos to digital as well! I wanted to share the how-to with you in case this is something you’d like to get organized this year as well. It’ll save so much money doing it yourself and free up tons of storage space.
And let me just say, that at a glance this may look like a lot of steps or hard to do, but it’s not. After you do it a few times it’s actually quick and easy!
What You’ll Need to Convert Photos to Digital
Those three things are all you need!
But before you start, you’ll also need to download an app to your cell phone called Cam Scanner. It’s free and easy to use.
You’ll also need the Google Drive app downloaded to your phone as well. This is where we’ll send the photos before putting them onto a flash drive.
Uploading Your Photos to Google Drive
I created a folder in my Google Drive before starting to upload the pictures so it was there already. I believe you can create it as you go if you prefer to do it that way. And if you don’t know how to create a folder in Google drive, I put together this screenshot to show you how. It’s pretty self-explanatory.
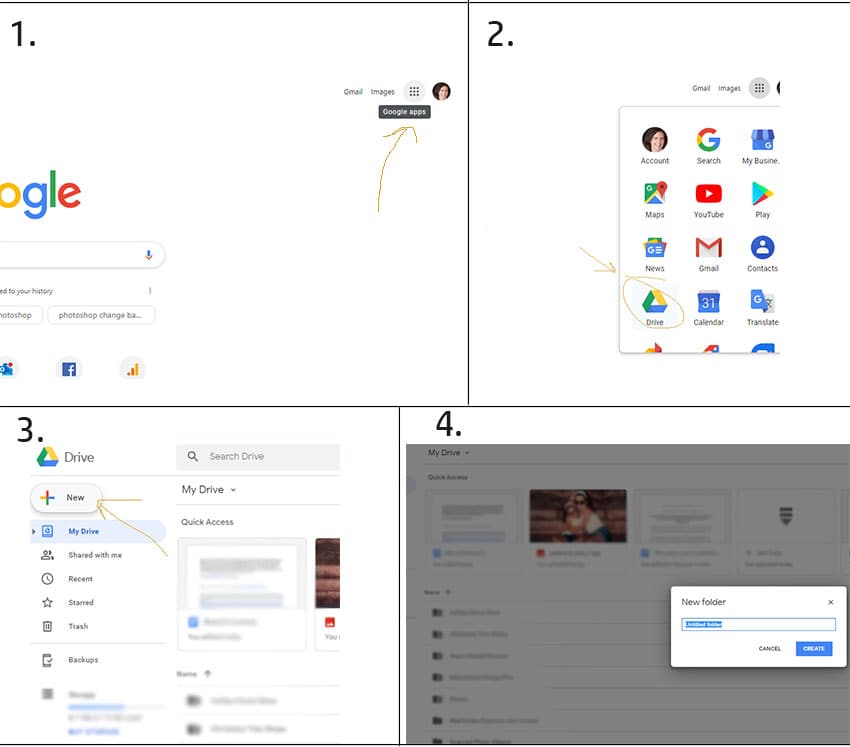
Now you’re ready to get out your photos and start scanning them via the app.
Open the Cam Scanner app on your phone. I use an iPhone, I’m not sure if it works the same on Samsung. The app will automatically choose the “single photo” option, which is what I used. You can upload them in batches if you prefer, but when you do they’ll be stored on the computer in batches as opposed to single photos. The batch option works better for things such as documents and notes.
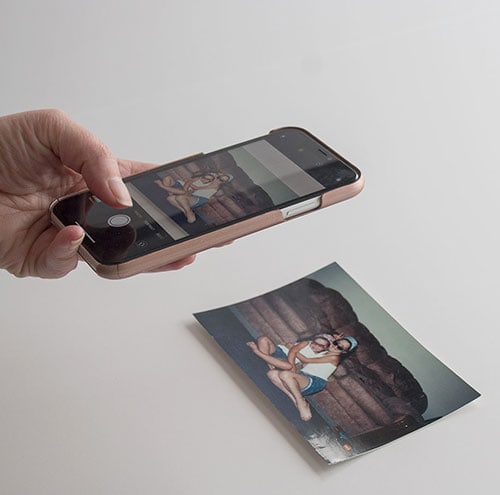
Open the app and take a picture of your photo. I used white poster board for a background. I placed the board next to a window and kept my curtains closed to keep out sunspots. It helps that my curtains are white so light filters through. However, I had taken pictures of other photos at night in bad lighting and it really didn’t matter all that much.
Once you take the photo, an edit screen will automatically pop up. Here you can rotate, crop, etc. When you finish editing, click “next step” in the lower right corner and then save. To add your next photo, click the plus icon in the lower-left corner and follow the same process until you’ve added all of your photos.
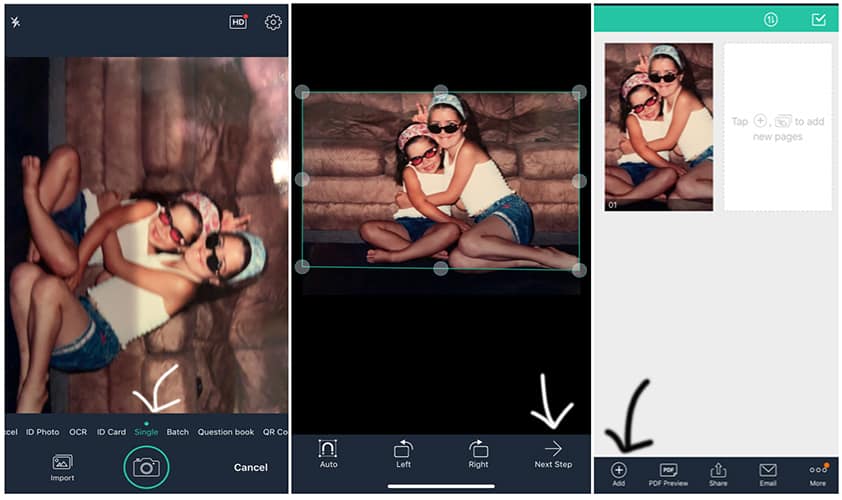
Next, click more on the lower right, then choose “upload” and select your google drive. Choose the JPEG option and original size on the next screens. Then you will see a list of your google drive folders. Choose the folder you want the photos uploaded to and then click upload here in the top right corner.
I took a few screenshots to help give you a visual.
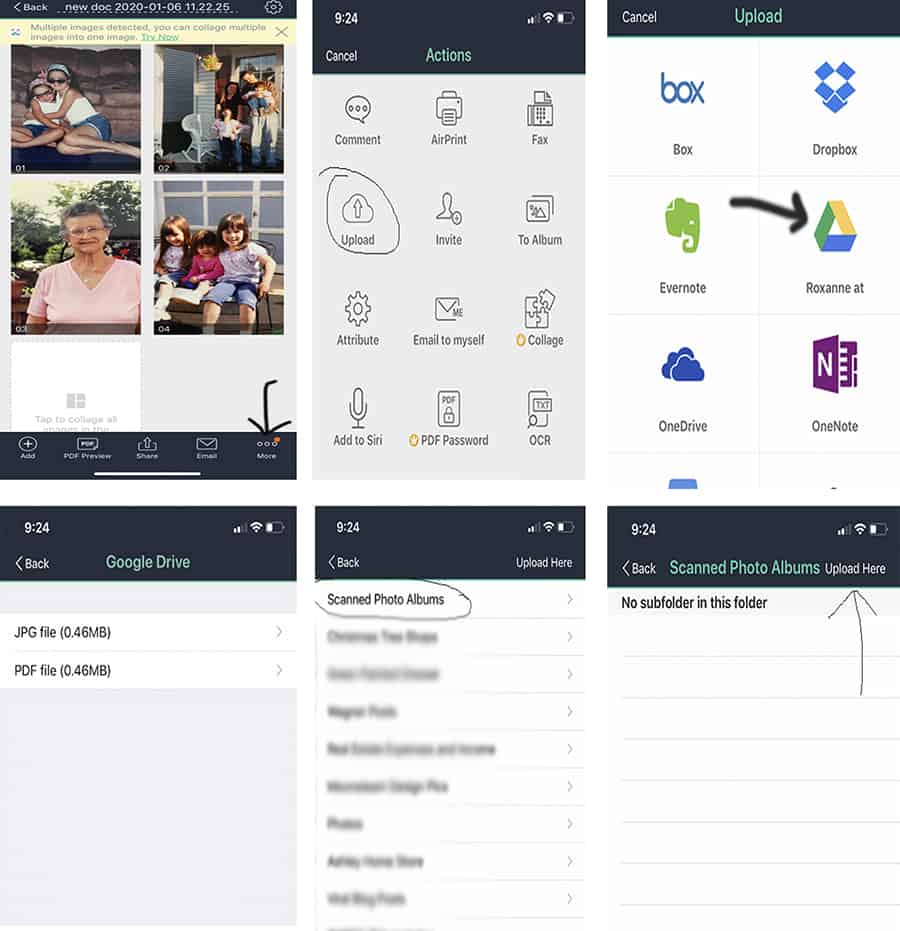
After that, you will see a screen that says uploading complete.
Now that the photos are all in your Google Drive, it’s time to move to the computer.
Transferring Photos From Computer to A USB
Open your google drive and then minimize it. Insert your USB and open that. Then I enlarged the Google drive screen and positioned them side by side so I could see them both.
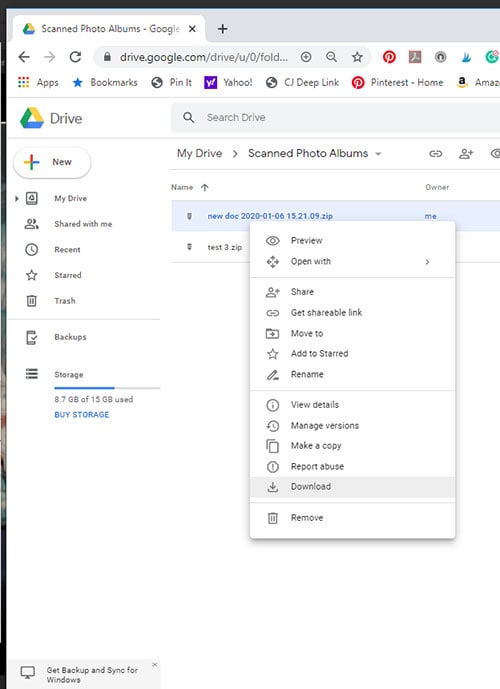
In your google drive, find the folder with your imports and open that up. Then right-click on the photo folder to download the pictures.
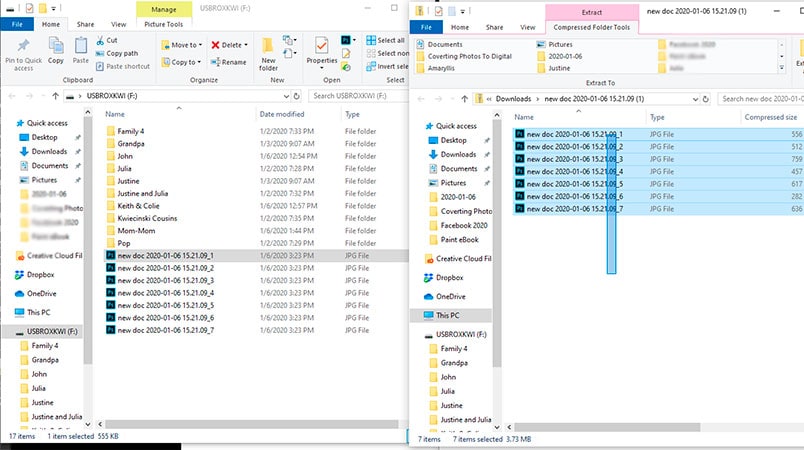
When it’s done, a new window will pop up and say extract, listing all the photos. Click and hold the mouse (in the white area under the files) and drag it up over all the files until they’re all highlighted and let go.
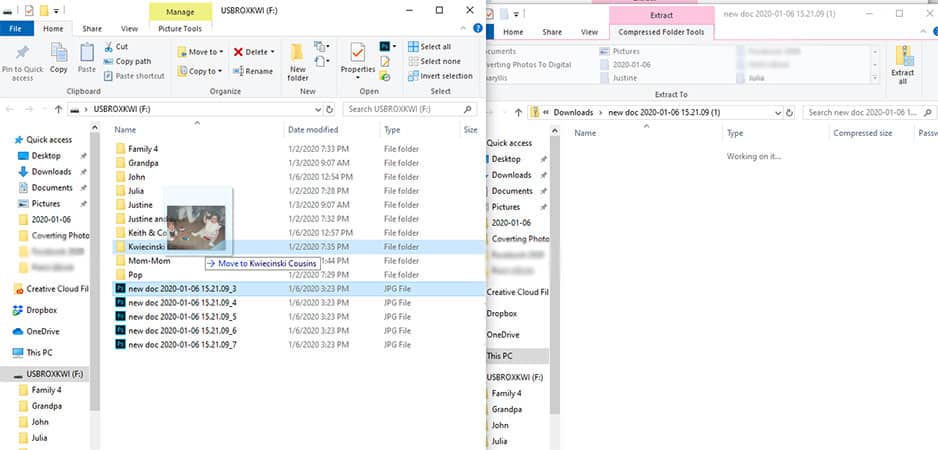
Then click and hold on the same highlighted photos and drag them over to your USB screen and let go. Now that they’re in your USB screen you can organize them. I wanted to organize them by members of my family, so I created folders for each of our family members (and friends). Then as I add more photos later on, I can just drop them into the appropriate folder.
To create a new folder, right-click in the white area of your USB screen and choose “new” and then “new folder”.
You can click on each photo file in the USB screen to view it. You can also rename it by clicking on it once. Then just highlight it and drag it to its main folder.
Once the photos are in your USB folders, you can delete them from Google Drive to save space. I did this as I uploaded each batch because I have so many more to go through.
When you’re done organizing photos for the day, click on the highlighted USB tab and choose eject. You should see a pop up saying “safe to remove hardware” and then you can remove your USB.
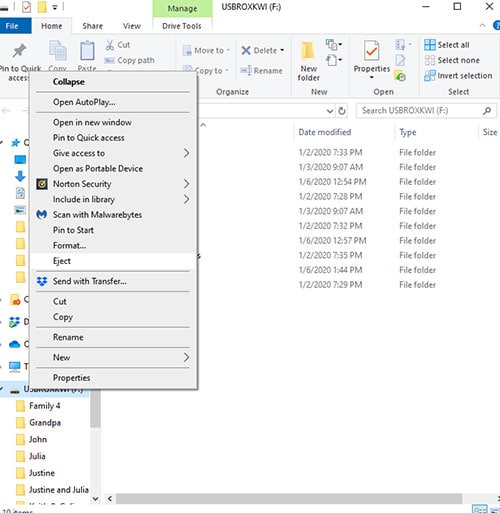
Incidentally, you can also rename your USB folder by clicking on it.
More Ways to Organize Photos
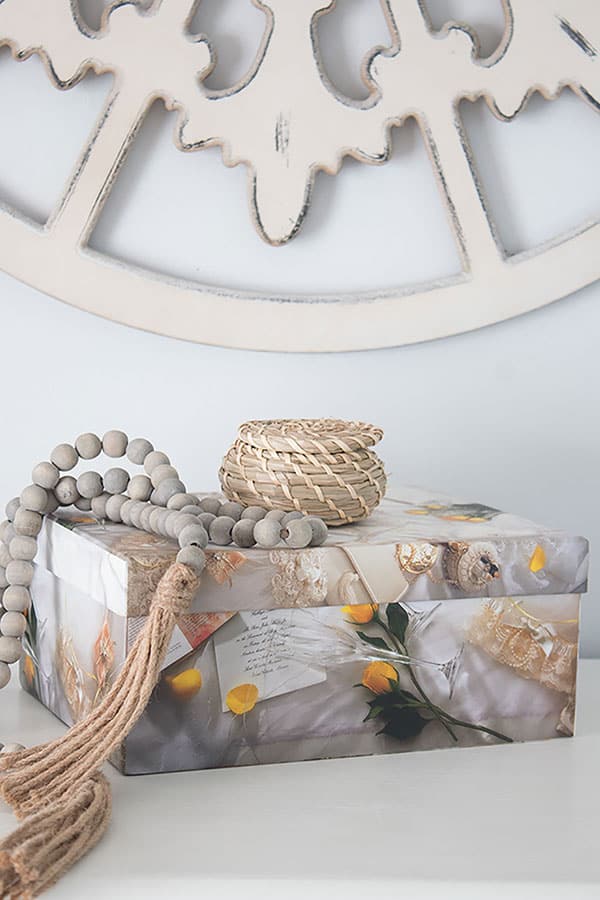
I packed some of our more sentimental photos into a pretty box, which is another nice idea for organizing your photos. The rest are all on the tiny USB which fits into this little basket. It looks so much better than the unorganized chest, don’t you think?
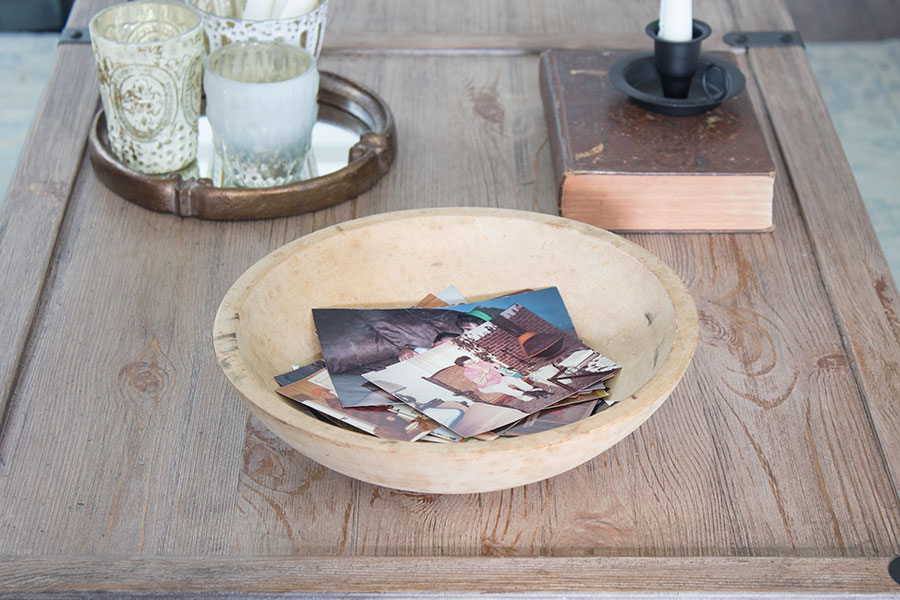
With some of the other sentimental photos I found, I put them in a bowl to display on my coffee table. It’s much nicer than having them packed away where no one will ever look at them.
This is the best way to organize photos that I have found so far.
If you have an enormous amount of pictures like I do, this will take a good bit of time to get done. I plan to do a little each week until I get them all done. It’s a process but it’ll save so much storage space (and so much money) doing it myself that it’ll be worth it.
And it’s so satisfying to see it neat and organized.
It will also be nice to locate old photos quickly rather than digging through a chest of hundreds and hundreds of photos, which I wouldn’t do anyway!
Here are some items that may help get you started organizing your photos. Click on any photo to view the details.
Please Pin:
*This post may contain affiliate links, you can read my full disclosure here. Linking up with BNOTP.


Thanks for this post! I have thousands of pictures in boxes and you’ve made the steps to do this so simple! Question: What did you do with the pictures you didn’t keep in a keepsake box? Throw them away?
You’re welcome, Sandi! And yes, I’ve thrown many of them away. That’s the hard part! I’ll definitely be buying some more of the keepsake boxes for the pictures I can’t part with.