Hanging Plates On Wall: My Antique Dining Room Plate Gallery
CREATE A CHARMING GALLERY WALL WITH DISHES USING THIS STEP-BY-STEP GUIDE TO HANGING PLATES ON THE WALL!

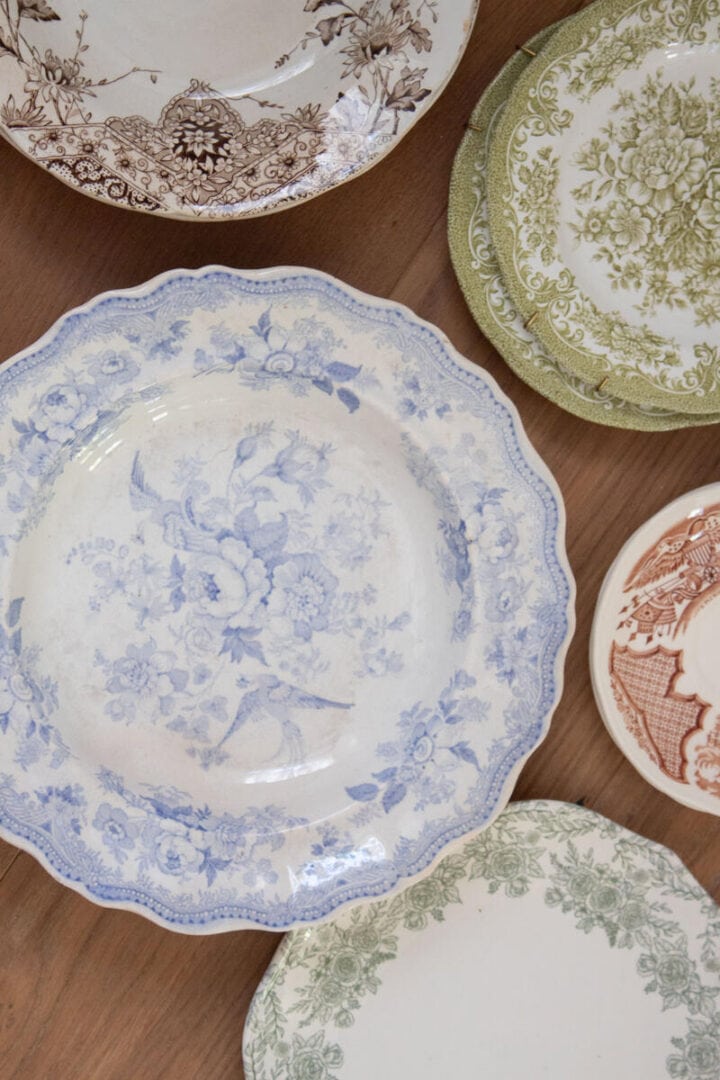
I’ve always had a soft spot for old dishes, the kind with hairline cracks and faded florals. So instead of keeping them tucked away in a cabinet, I decided to give them their moment by hanging the plates on the wall in our dining room.
It’s one of those projects that looks fancy but is surprisingly simple once you get the hang of it (pun intended). A few plate hangers, a bit of planning, and suddenly you’ve got instant vintage cottage charm!
Today, I’m sharing exactly how I created my antique dining room plate wall, from planning the layout to the easiest way to hang each piece securely. So if you have china tucked away, wondering what to do with it, this might give you some ideas.
The Charm of Hanging Plates on the Wall
I’ve always loved the timeless charm of hanging plates on the wall. Maybe it’s the mix of color and texture, or maybe it’s the way they instantly make a space feel collected and personal. Whatever it is, a plate wall adds that “lived-in” character that you just can’t buy at a store.
In the dining room, especially, plates make perfect sense. It’s where we gather, share meals, and linger over dessert. Turning your favorite dishes into wall art brings a little soul to the space and lets you enjoy pieces you might otherwise hide in a cupboard.
And the best part? It doesn’t take a designer’s eye or a big budget to pull it off. With a little planning and a few simple tools, you can create your own dining room plate wall that looks effortlessly curated, even if you’re winging it between loads of laundry.
Why Hanging Plates on the Wall Makes Beautiful, Budget-Friendly Decor
If you’ve ever priced out large-scale wall art, you know it can get expensive fast. That’s where hanging plates on the wall comes in, it’s one of the easiest ways to fill a blank space without spending much (or anything at all if you raid your own cupboards).
Plates are surprisingly versatile as wall decor. You can mix antique finds with newer pieces, play with color, or stick to a simple theme like blue and white, and the result always feels intentional and unique. There’s no wrong combination; somehow it all just works.
Plus, plates add beautiful dimension to a wall. The slight curve, the patterns, even the way light hits the edges it all give your space that cozy, collected feel that flat artwork can’t quite match.
So whether you’ve got a stack of thrifted treasures or a few heirloom dishes you’ve been meaning to display, a dining room plate wall is one of those projects that’s affordable, meaningful, and charmingly personal.
Planning Your Plate Wall Layout
Before you start putting nails into the wall, it helps to plan out your plate wall first. Especially if you’re hanging a big plate wall display like I did here. A little prep goes a long way in making sure everything feels balanced and intentional, even if you’re going for that casual, “collected over time” look.
Here’s how I planned mine:
1. Start on The Floor
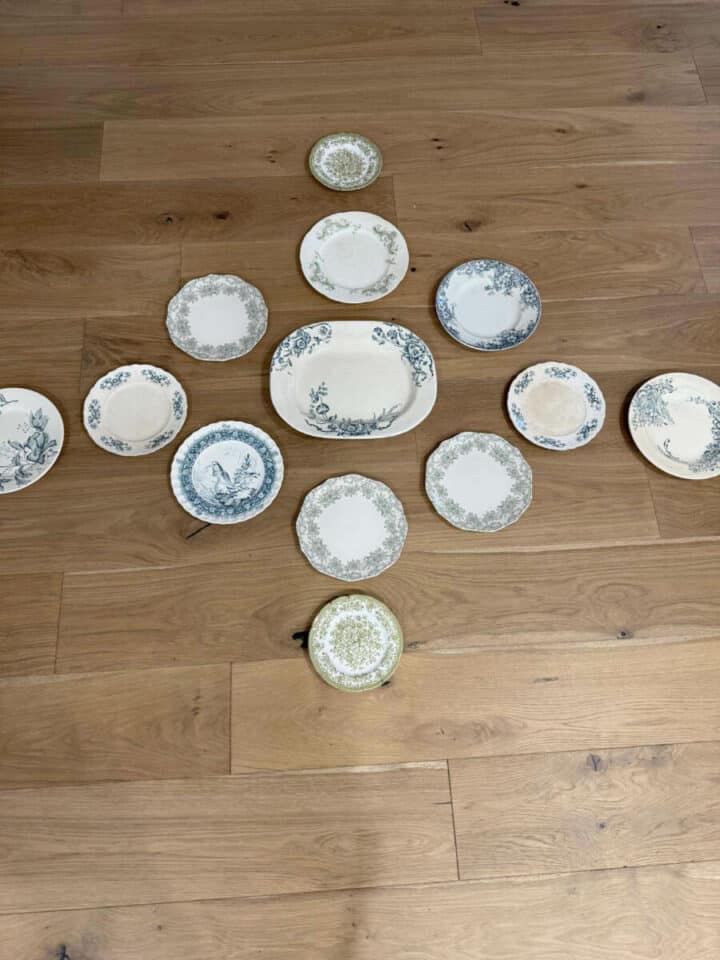
The best way to begin is to lay out all your plates on the floor or a big table so you can see what you’re working with. Try different arrangements until one feels right, maybe symmetrical, with straight lines, or maybe more free form. I like to start with the largest plate in the center and build outward, mixing shapes and patterns as I go.
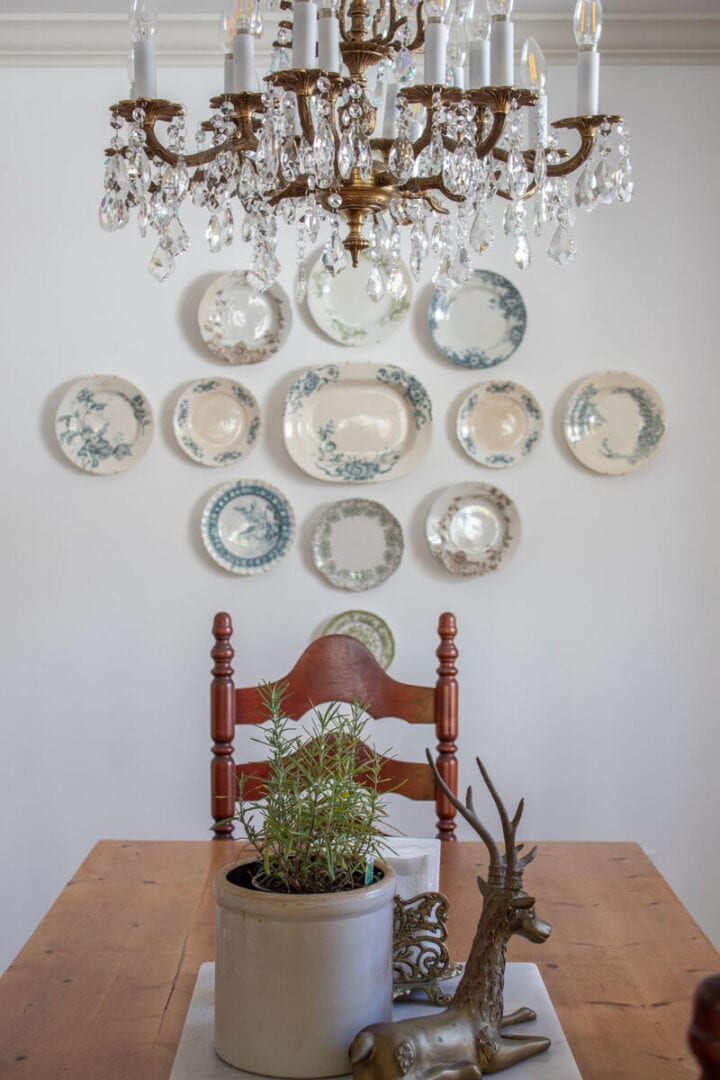
As you can see, I used a platter in the center as my focal point. I started with two straight lines in a cross pattern as the base and worked out from there.
2. Snap A Photo Of Your Layout
Once you have a layout you love, take a quick photo on your phone. You’ll use this as your guide when you start hanging plates on the wall, so you don’t forget which placement looked best.
3. Mark your wall
There are a couple of ways you can go about hanging dishes on the wall so that you don’t make a million nail holes. A popular option is to trace the plates onto kraft paper (or any paper you have), and hang those on the wall with tape first, as paper templates. I used this method for my plate display wall at our last house.
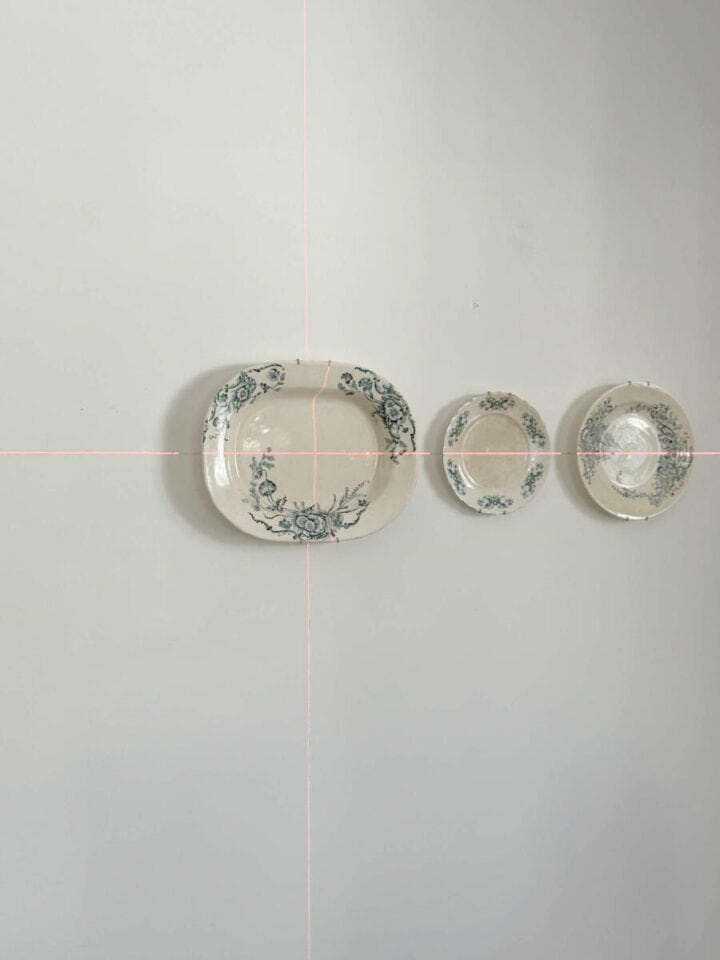
The second option is to use a laser level and mark the wall in pencil. This is how I did it this time, since I was hanging a large number of plates. I wanted to be sure the two main rows were lined up straight and centered. From there, I worked more free-form.
3. Measure and tape it out
Next, an optional step is to measure your wall space and use painter’s tape to tape off the perimeter of the area. This helps you visualize how your arrangement will fit in real life.
I didn’t do this. Instead, I used the chandelier and my kitchen table as a visual reference and created a center point for my first plate from there.
4. Mix and Match
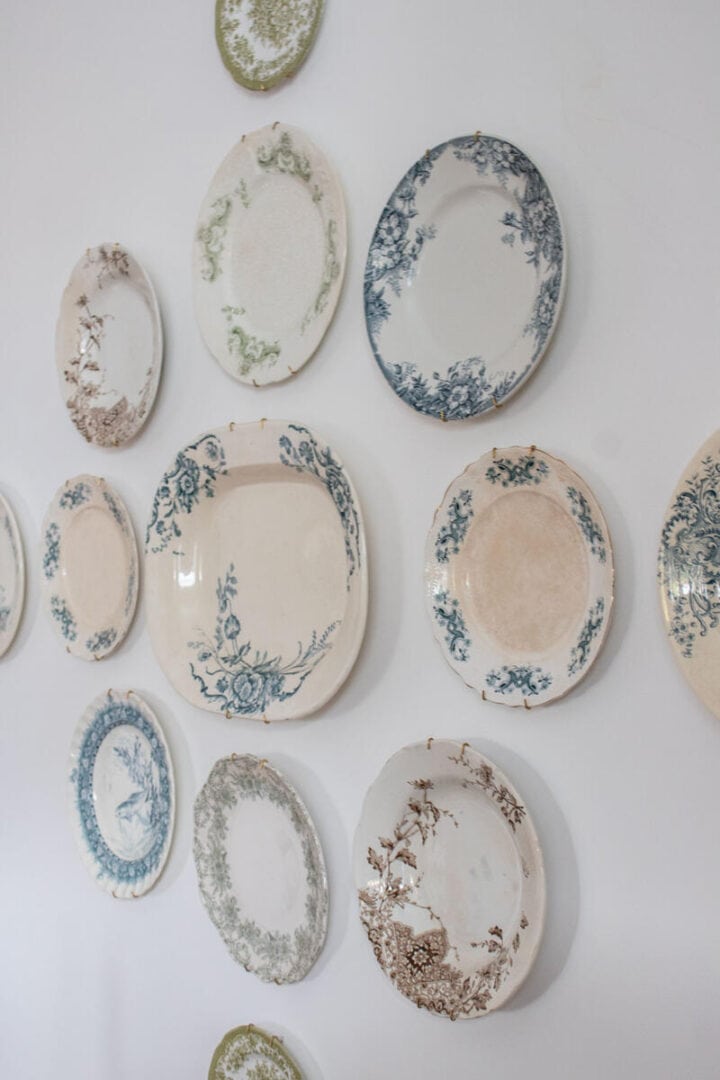
Don’t be afraid to mix colors, patterns, plated designs, and especially plate sizes. The most interesting plate walls usually have a mix of old and new pieces in different sizes. Think of it like styling a gallery wall, just with dishes rather than art.
Mixing sizes and shapes for interest is a must, especially for a large grouping like this. I used platters, dinner plates, and salad plates for my arrangement. Eventually, I also plan to expand it a little further with teacup saucers.
This is a great way to use dishes that you don’t have a complete set of. Or keep an eye out at thrift stores for decorative wall plates, they are usually easy to find and very affordable!
Once you’ve got a grouping that you like, you’re ready to hang your plates.
Choose a Focal Point
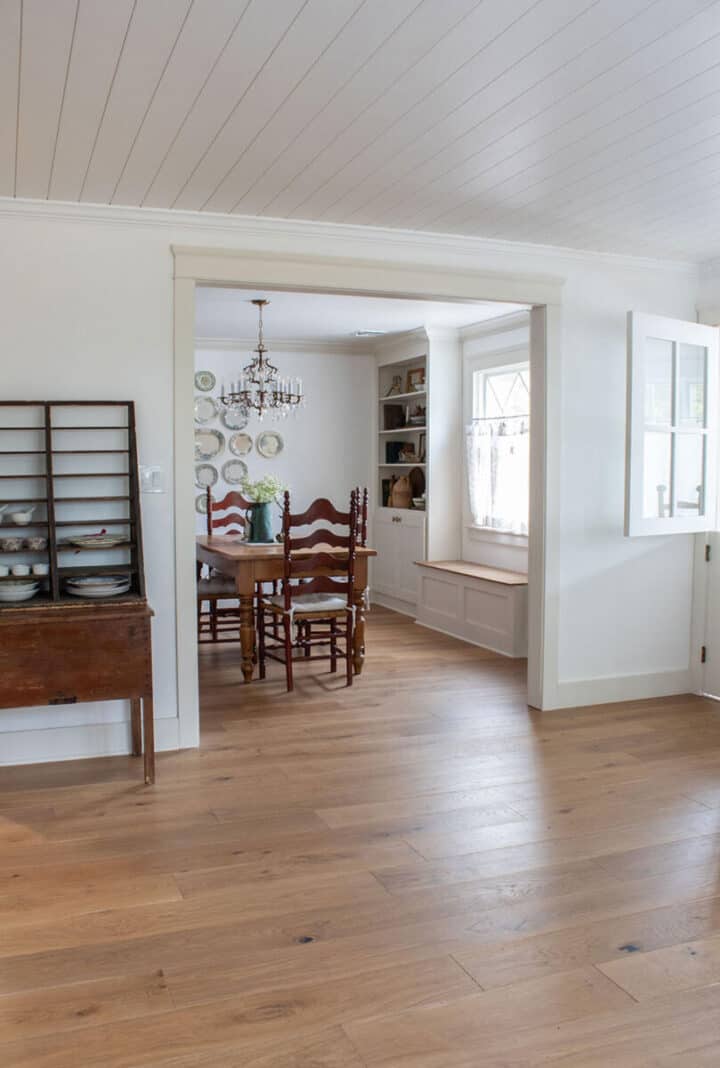
As I mentioned, I wanted our plate wall to be the focal point of the back wall. For this, I had to consider the sight lines when looking in from the kitchen. My intent was to have the middle plate centered between the table and chandelier and work out from there.
How to Hang Plates on the Wall (Step-by-Step Guide)
You can have a gorgeous gallery wall of plates up in no time with a few simple tools (and maybe a little patience).
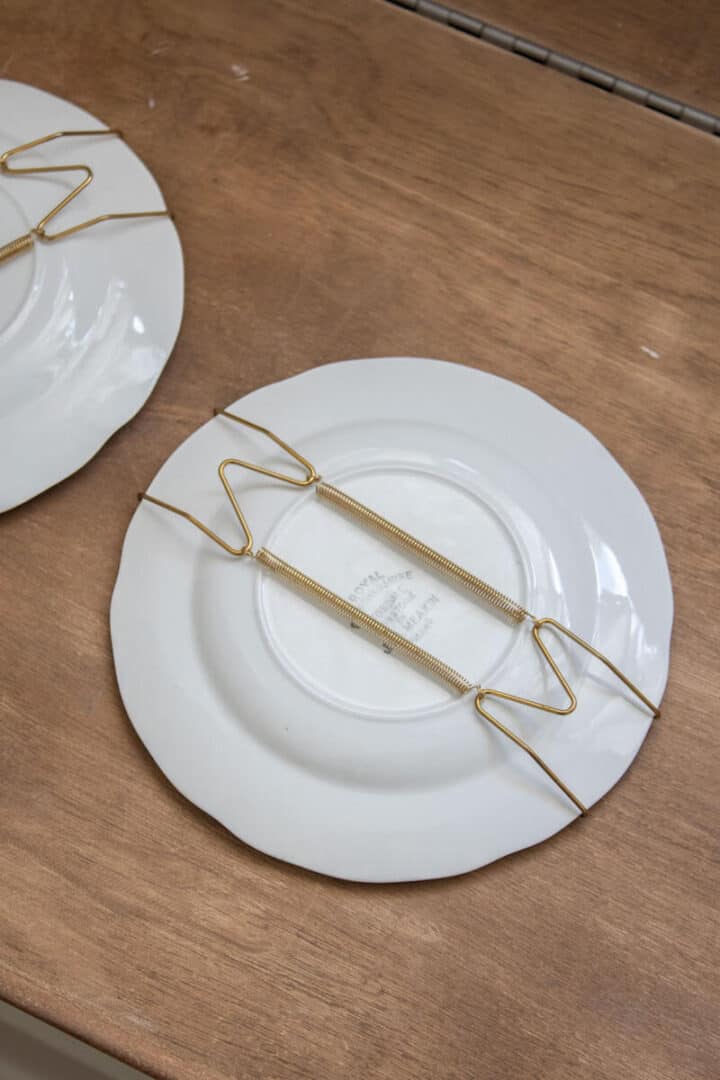
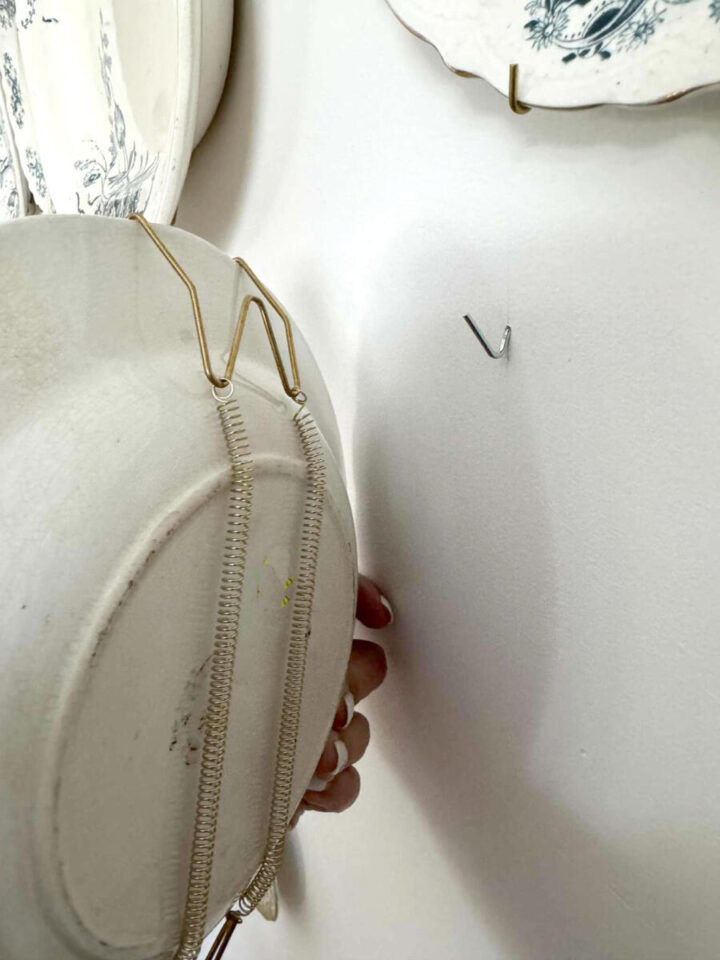
For hanging my plates, I used these spring-loaded wire hangers and these wall hooks. Those two items make it so easy, and those hangers only leave small holes in the walls. So if you make a mistake, it’s not terrible. Those wall hooks are the easiest way to hang anything on the wall.
Supplies needed for hanging plates on the wall
You don’t need much for this project, but having the right tools from the start makes a big difference. Here’s what I used:
- Vintage plates in assorted sizes, colors, and patterns
- Plate Hangers
- Wall Hooks
- Level (we used a laser level)
- Measuring tape
- Pencil
- Roll of paper (optional for template)
adhesive disc hangers vs wire hangers for hanging plates
There are two types of plate hangers that I’m aware of: the adhesive discs and the wire hangers. I’ve never used the adhesive disc hangers because I’ve heard from other people that they occasionally fall off the wall. Not a chance I am willing to take, especially when most of mine are antique plates.
I’ve used the spring-loaded wire hangers multiple times, and I’ve never had an issue. Some people may not like them due to the fact that the hooks are visible on the front. That doesn’t bother me; you can barely see them. Also, with vintage plates, you want to be careful when putting these hangers on or off the plates so you don’t chip the plate. I’ve never had that happen to me, but it’s worth noting.
Step 1: Prep your plates
Give each plate a quick wipe-down (especially if using the adhesive disc so it sticks well). For older, delicate dishes, double-check for any cracks or chips you don’t want to risk hanging something that might not handle the pressure.
Step 2: Mark your wall
Use the photo you took earlier as a guide. I like to mark the center point first and work outward, one plate at a time. If you’re nervous about placement, you can trace each plate onto paper, cut out the shapes, and tape them to the wall as templates. It’s basically like playing a giant game of Tetris before committing.
I used a laser level to mark my wall. This gave me a center line across and up and down. If you don’t have a laser level, you can use a regular level and mark it out with a pencil.
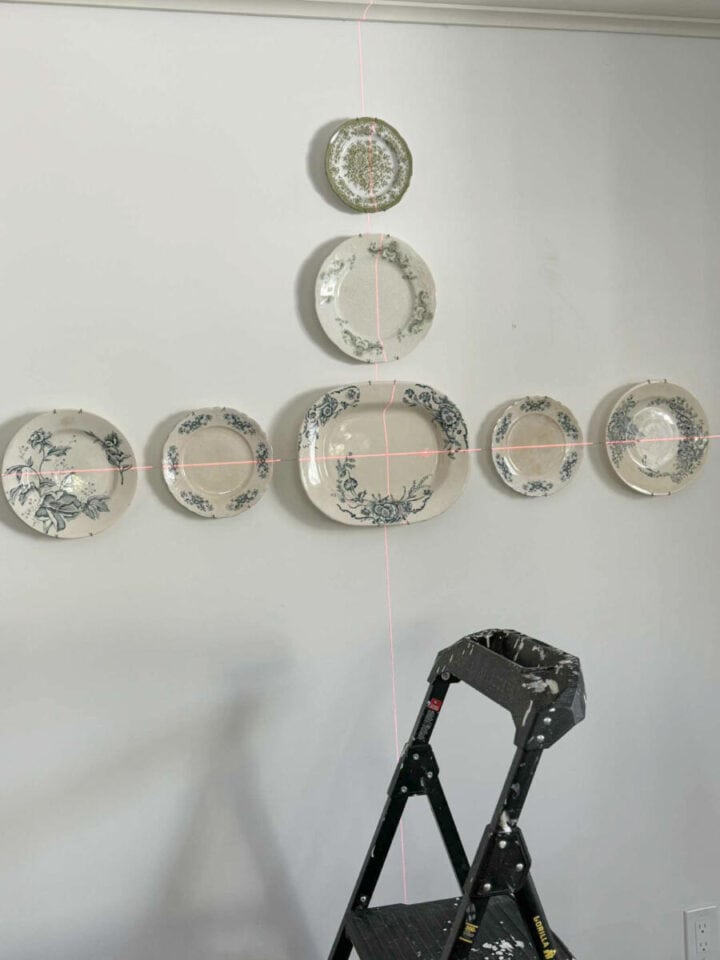
This also helped me to line up the center of each plate since I was using several different-sized dishes.
Step 3: Hanging the Plates – One mistake to avoid!
Start with your middle or largest plate; it’ll help anchor your layout visually. From there, add the smaller ones around it, checking spacing as you go.
One mistake to avoid is spacing them too far apart. I would not leave more than 2″ inches between the plates. That doesn’t look right to me. If you look up photos of plate walls, you will see what I mean. I spaced mine about 1.5″ apart.

Another thing to note is getting the plates to sit flush. They will do so easily; however, I did switch out two of my plates for antique transferware bowls. Those can be harder to get flush. The great thing about the wall hooks I suggested is that you can easily pull them out a little bit from the wall. Doing so will allow bowls (or platters) to sit flush. It doesn’t take away from their sturdiness.
Step 4: Step back and adjust
Once everything’s up, take a few steps back and look at it from different angles. You might decide one plate needs to move an inch higher, or that a small one would look better swapped out for a different color or shape. Trust your eye.
Since hanging my plate wall, I’ve already swapped out two of the plates for a different pattern or color. I wanted to add some brown transferware for more visual interest.
Styling Tips for a Cohesive Plate Gallery Wall
The fun part about using plates as wall art is that they are easy to mix and match or keep cohesive, whichever look you prefer! Once the plates are hung up, it’s quick and easy to change them out. You could even swap them out seasonally. There’s no wrong way to do it!
Choose a color story
My initial intent was to do an antique blue and white plate wall, but I changed my mind and opted to include plates in other colors as well. Though I have a blue and white backsplash in my kitchen, I didn’t want to go too far with that theme.
In our last house, I used all green plates, but in different shades and styles for interest.
In this house, I initially didn’t have enough antique plates to create this wall, so I filled in with some good knock-offs from Home Goods. I was tired of staring at that big blank space in our dining room. I can always replace those when I find more antique plates later.
If you love a calm, coordinated look, choose a color palette that ties everything together like all blue-and-white dishes or all florals with a touch of gold. But if you’re drawn to more eclectic charm, mix away. Somehow, when you’re hanging plates on the wall, even mismatched pieces manage to look charmingly cohesive.
play with scale
Mixing different sizes of dishes and plates keeps the arrangement interesting. Try grouping one oversized platter with a few smaller saucers or dessert plates; it adds movement and makes your gallery wall feel dynamic. I plan to add some very small saucers to mine eventually.
balance pattern and simplicity
If some of your plates have bold patterns, balance them with a few solid or simple designs. It gives the eye a place to rest and keeps the overall display from feeling too busy. Even a grouping of plain white dishes looks beautiful (especially if you have color on your walls).
mix plates with other wall decor
You can add even more interest by incorporating other vintage wall elements with your decorative plates, like a small mirror or framed artwork.
perfectly imperfect
Another great thing about plate walls is that they don’t have to be perfect. A slightly uneven arrangement often looks charming.
Don’t stress over making every plate perfectly spaced or lined up. The best dining room plate walls look like they’ve evolved over time; collected, rearranged, and loved. A few quirks make your plate wall feel more personal and less “staged.”
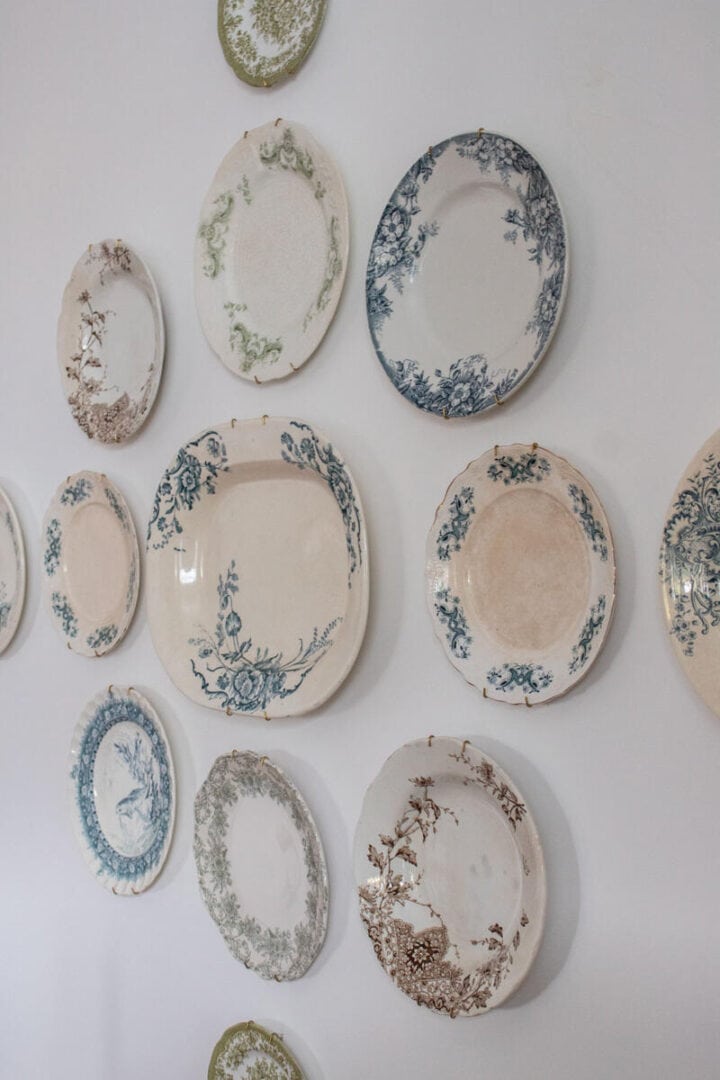
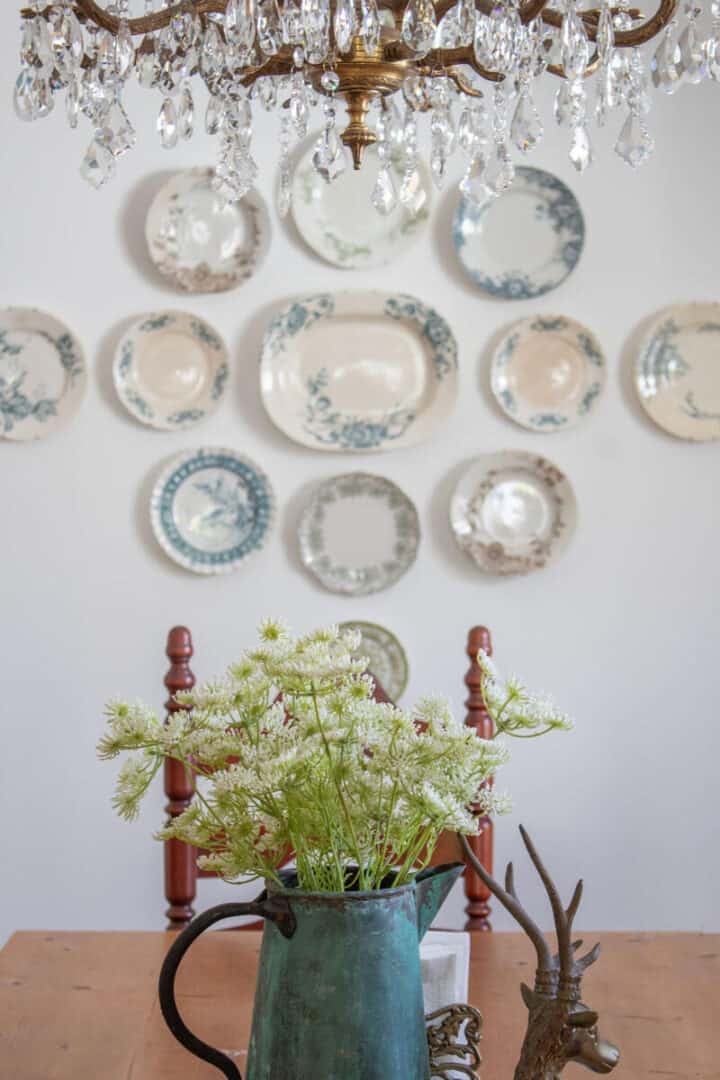
My Antique Plate Wall

I love how my gallery wall turned out; it’s like a piece of art. The antique plates bring so much warmth and character to the dining room. And it’s a major improvement over the big, bare wall I was staring at before. It’s proof that even simple pieces can become beautiful decor.
If you’ve been thinking about hanging plates on the wall, this is your sign to go for it. Start small, play around with your layout, and don’t overthink it. The beauty of a plate wall is that it doesn’t have to be perfect; it just has to feel like you.
I’m already planning another, smaller version, for a wall in our kitchen.

Don’t limit yourself to only kitchen and dining room walls; plates can be hung in living rooms, bedrooms, or almost anywhere.
More Inspiration: plate templates
If you need a few more ideas for your own plate display layout, I have those for you, too! Here are several ideas for creating your own plate wall display.
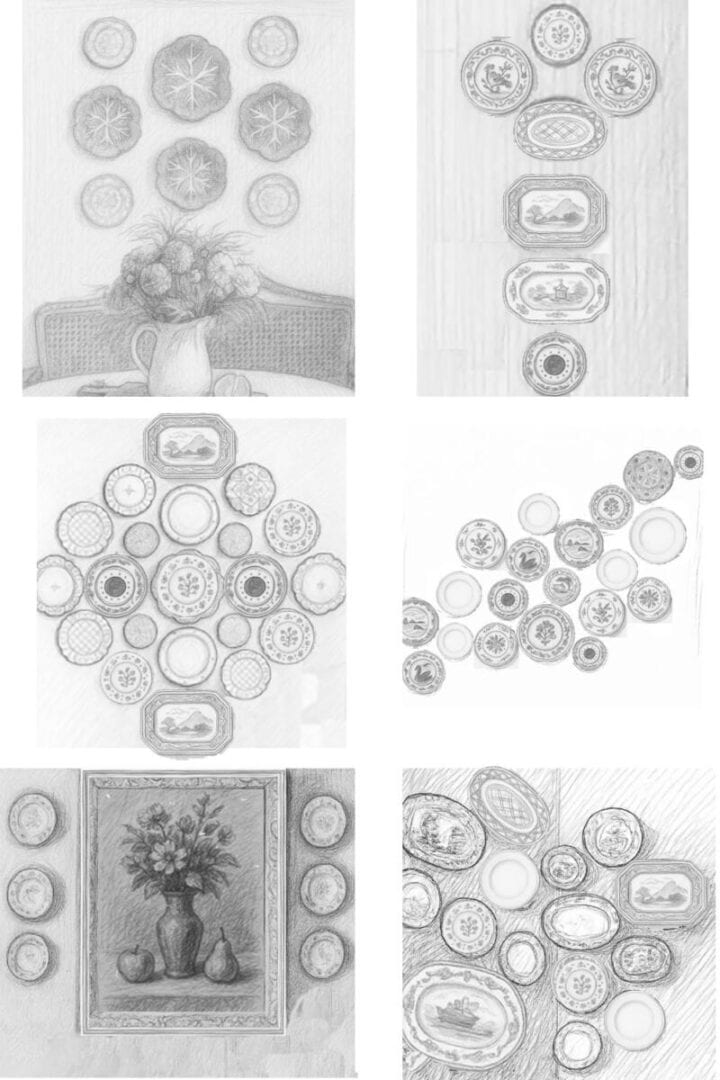
Here you can see layout ideas for plate walls, large and small, a corner wall pattern, and even plates mixed with art.
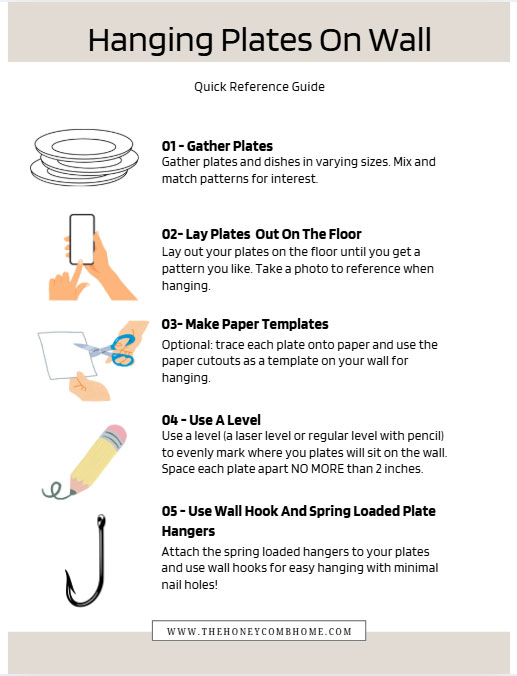
And because this is a long post with a lot of information, I made a quick reference guide to simplify it if you prefer!
Traditional gallery walls are great, but there’s something extra charming about decorating with dishes instead! Wouldn’t you agree?
Your plate wall is so pretty. I love your home.
Thank you so much!
Gorgeous! Adds so much character and charm.
Thank you!
This is the best plate wall I have seen. It is large and impressive. I am going to take a second look at my older dishes so this makes sense to do.
Thank you!