Our Small Ranch Exterior Makeover
HOW WE UPDATED OUR RAISED RANCH HOUSE EXTERIOR DURING RENOVATIONS – BEFORE AND AFTER SMALL RANCH EXTERIOR MAKEOVER!

You know that feeling when you finally get to stand back and see all your hard work pay off? That’s exactly how I feel looking at our little ranch house after its exterior makeover.
What started as a dated, plain façade has turned into something that feels like us – simple, welcoming, but with a bit of charm. From new siding and fresh trim to those small details that make a big difference, our humble ranch has had quite the refresh. Let me show you how we brought new life (and a little personality) to this small but mighty home.
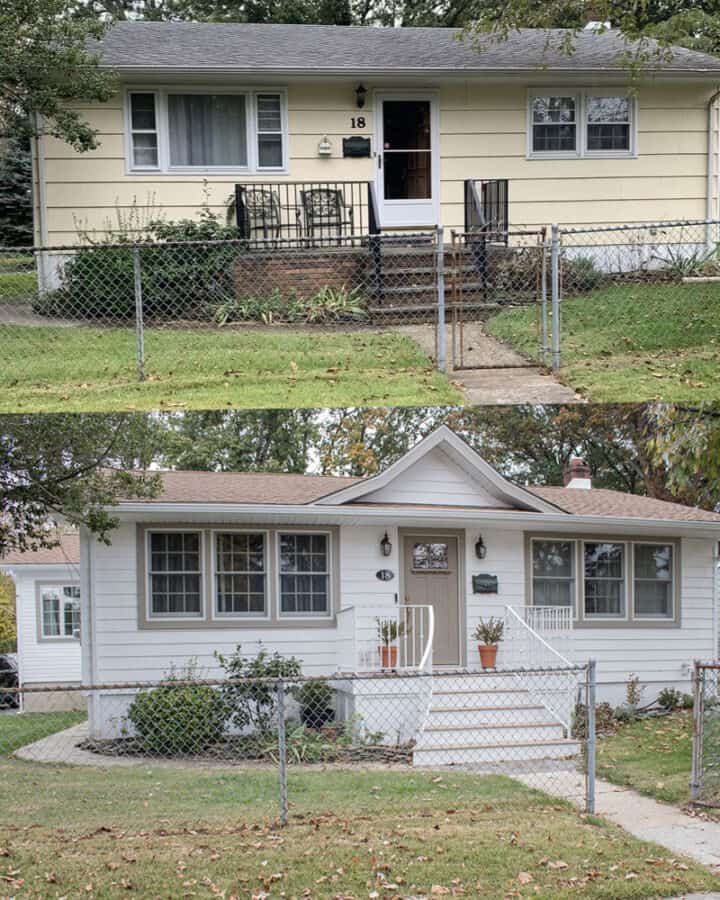
small ranch house makeover – the before
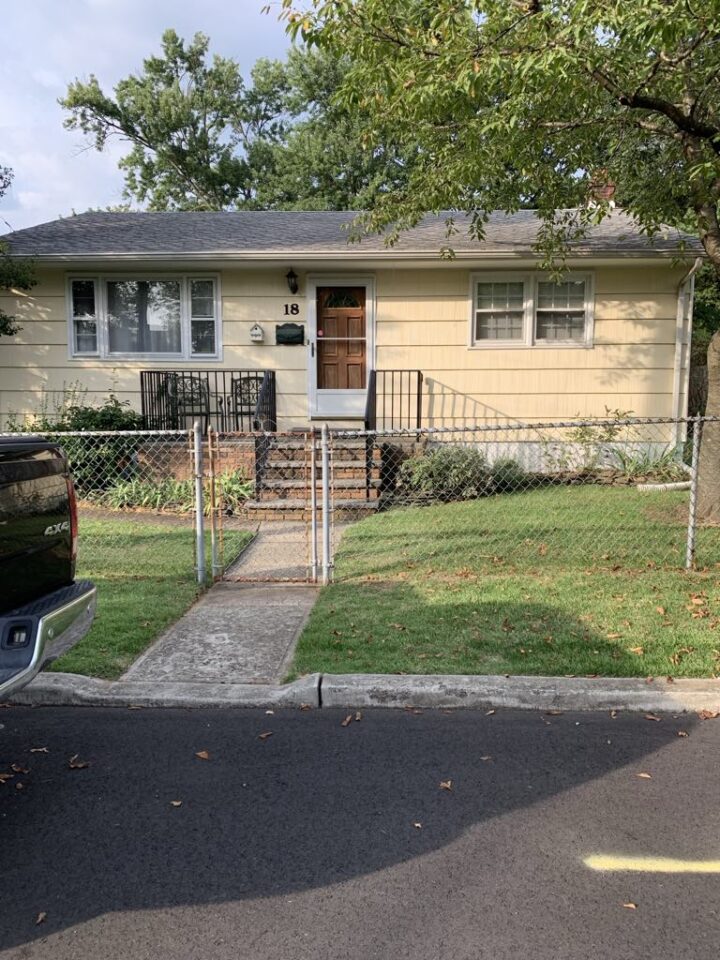
Though we loved this sweet little house (my husband grew up in this home), it was a bit outdated. Since our renovations, inside and out, were pretty major, I tried to balance things out with as many simple changes as I could.
The one thing I realized early on is that because we were not adding a second story (I was talked out of that), I was limited in what I could do with this exterior. I cannot tell you the number of hours (days and weeks) trying to figure out how to incorporate architectural details to make this existing frame super charming.
Additionally, this is a raised ranch, with a low roofline, which made things more complicated (from an aesthetic standpoint). My husband definitely vetoed raising the roof (I tried lol), which made my options very limited for the front of the home. I was constantly brainstorming to come up with some creative ideas.
It’s worth noting that when it comes to interior and exterior design, it’s always much harder to work with existing elements than to start from scratch. It’s easy to forget that most of those picture-perfect homes you see online or on TV were built or styled from the ground up, so don’t be too hard on yourself if your home doesn’t look like that.
ranch house inspiration
While searching raised ranch homes for inspiration, I came across one house in a similar style that was beyond charming. It even reminded me of this house – or what this house could be. It’s a simple design with traditional elements that we both loved. Small homes can be as charming (if not more so) than large homes!
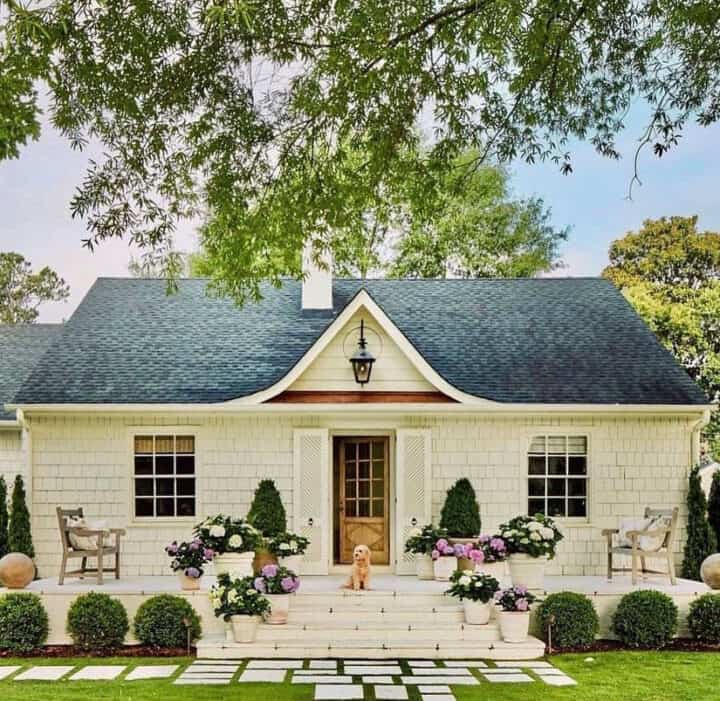
The open front porch wasn’t an option because obviously, you have to have railings. However, the peak over the front door was something simple that I thought could add enough visual interest without changing the roofline.
A few small changes, such as this, to our home’s exterior could have a big impact without adjusting the structure or the interior floor plan any further.
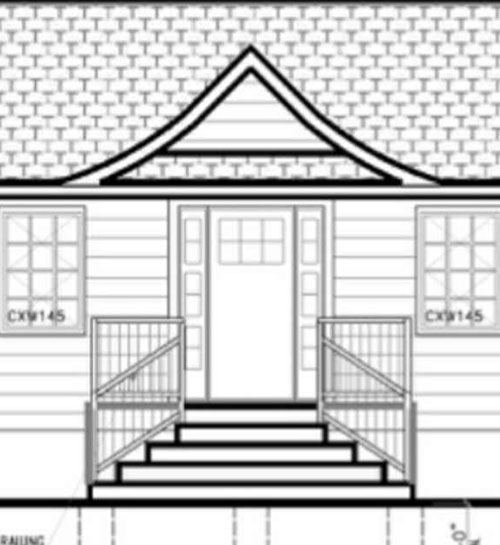
We gave this photo to our architect for the exterior design. Initially, he added a porch across the entire front exterior with railings. That didn’t look right to me, so we removed that.
Our Small Ranch Exterior Makeover: the vision
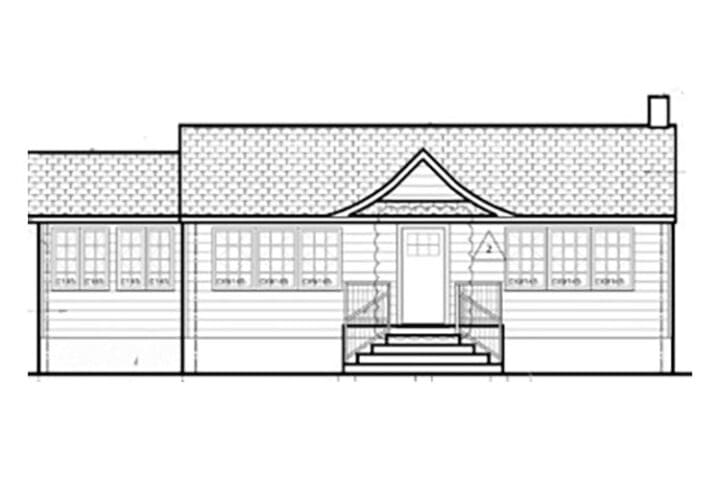
This was the architectural rendering we decided on after some tweaking. Simple but charming. The plan was to create this with shingle siding to up the cottage charm. From there, I could add window boxes and landscaping to further enhance the curb appeal.
We did add lots of large windows. I wanted as much natural light throughout this house as possible. That may be because I felt our last house was severely lacking in that.
Initially, the architect had casement windows on our plans throughout the house. Our builder said those were far more expensive than double hung, so we changed most back to double hung to save money. The only exceptions were the kitchen and sunroom, which we kept as casements.
I had my heart set on windows with exterior wood panes, like the ones you see on old historic homes, so I could paint the trim in a contrasting color. I mentioned that to the builder, but somehow we ended up with the wood panes on the inside instead. I’m still not sure if those exterior-style panes just aren’t made anymore or if there was a mix-up along the way. More on that in a bit.
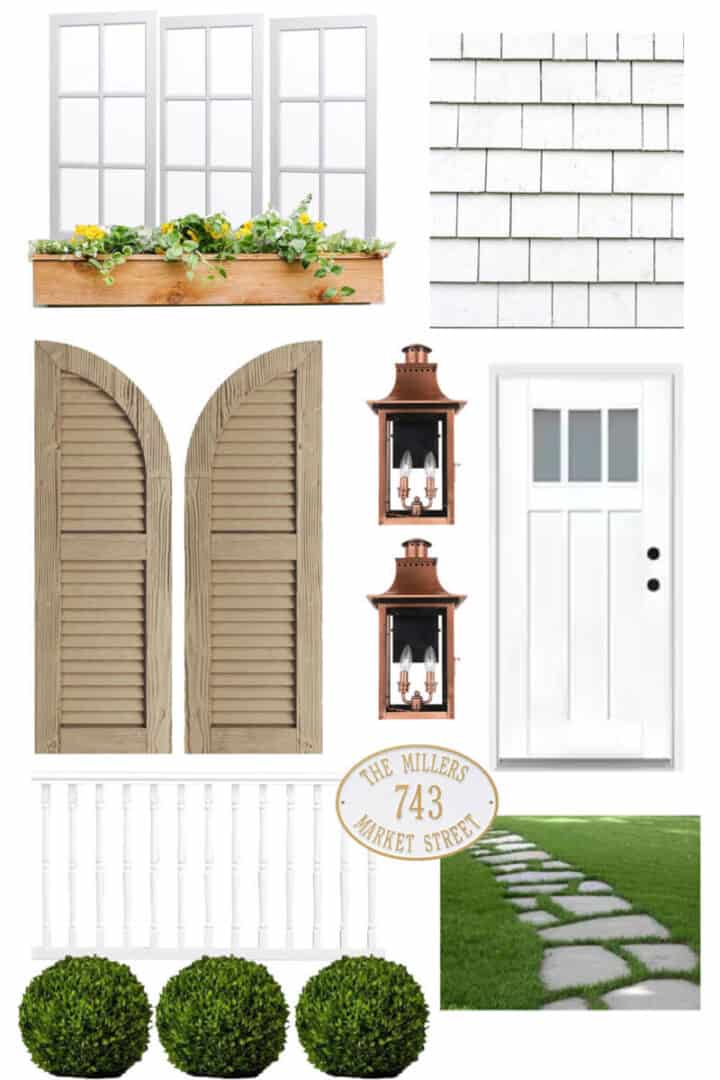
Here was a design board I made early on for our front exterior mood board.
Small Ranch Exterior Makeover Details: Changes We Made
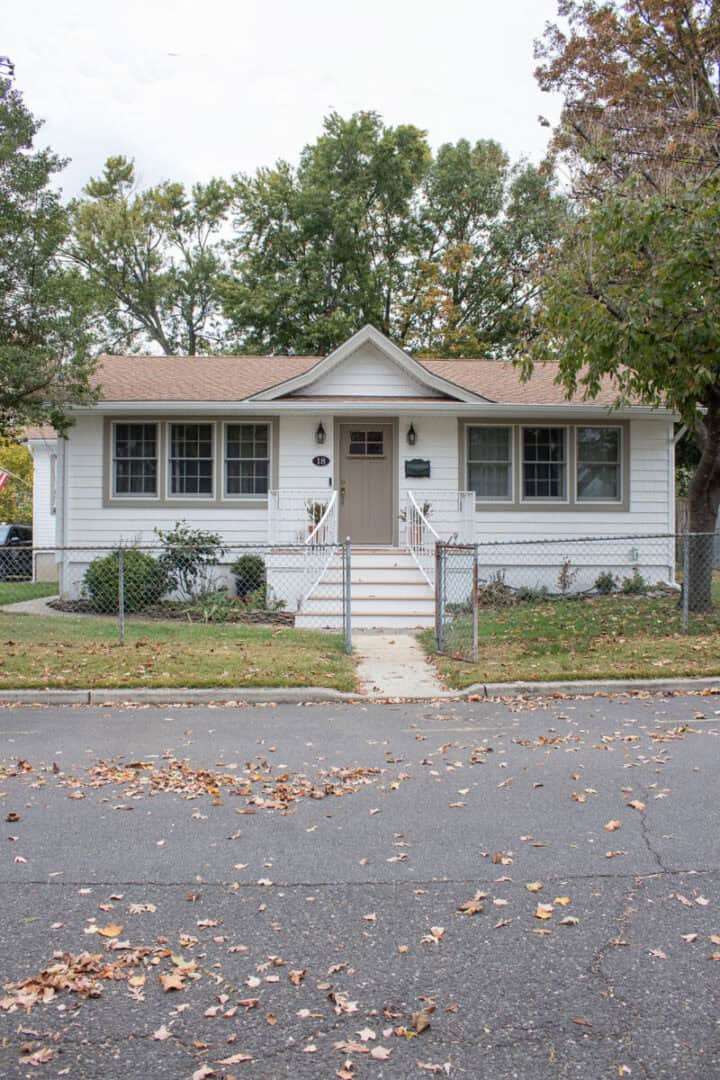
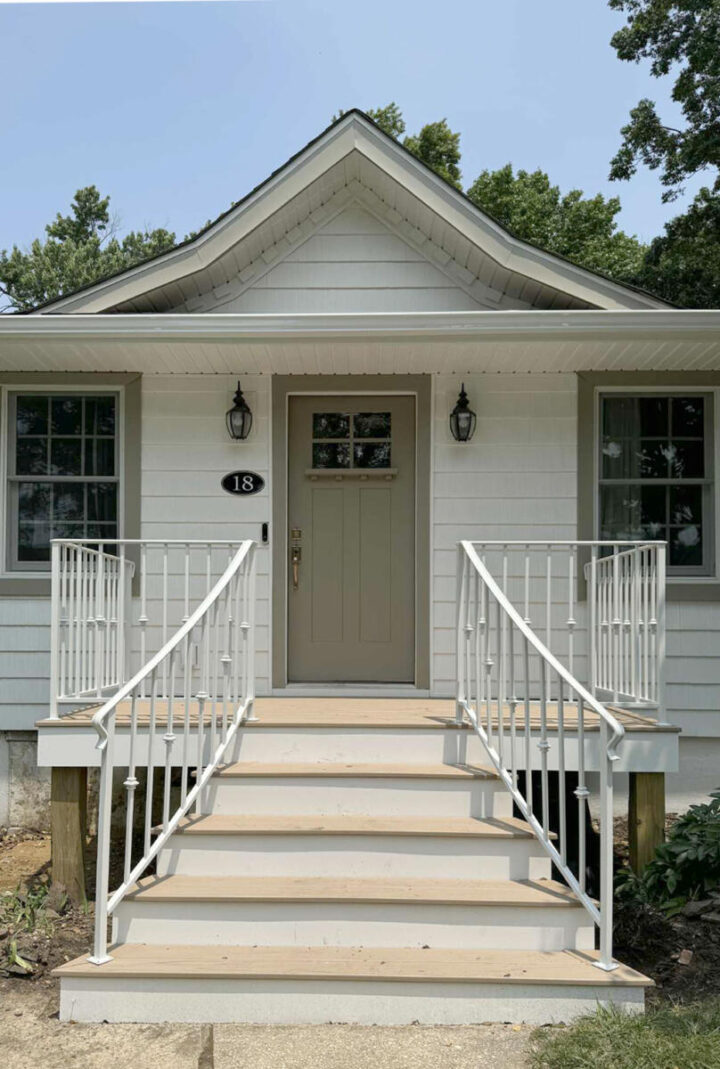
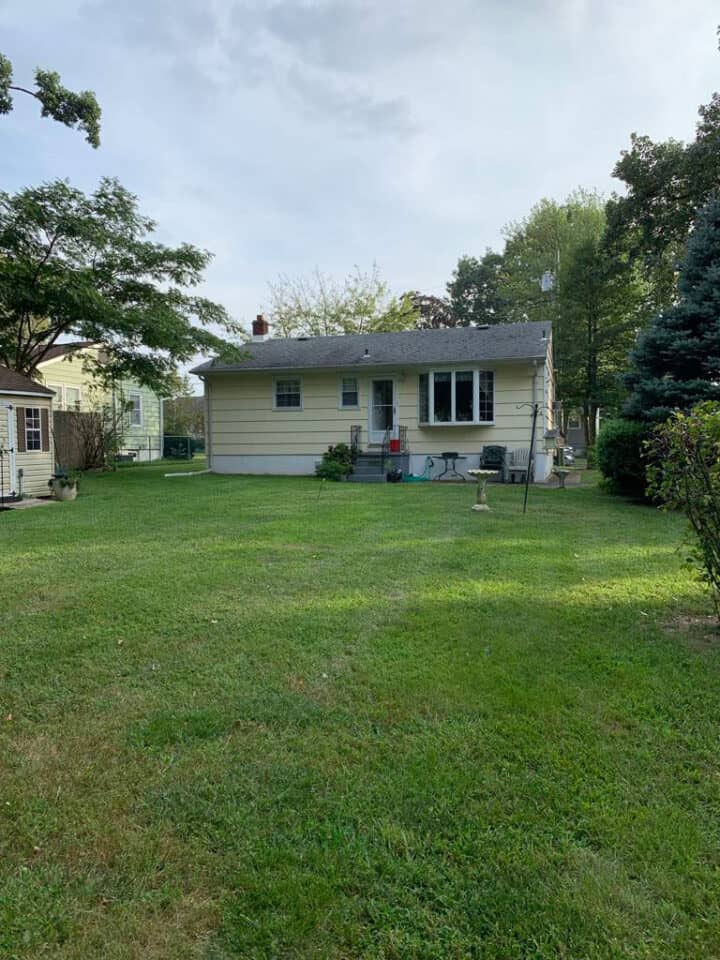
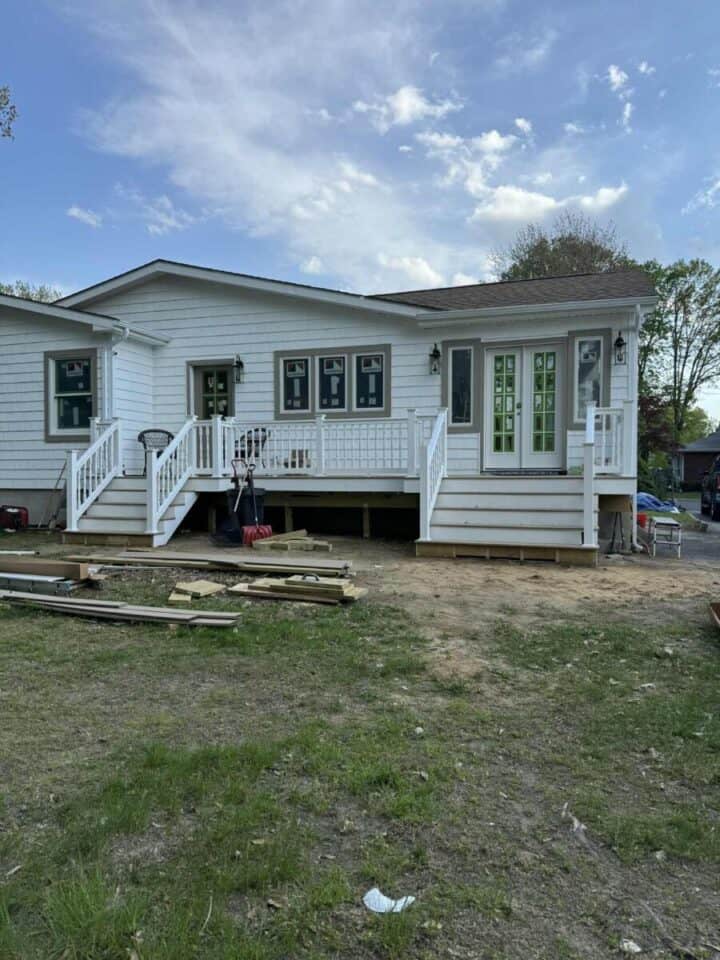
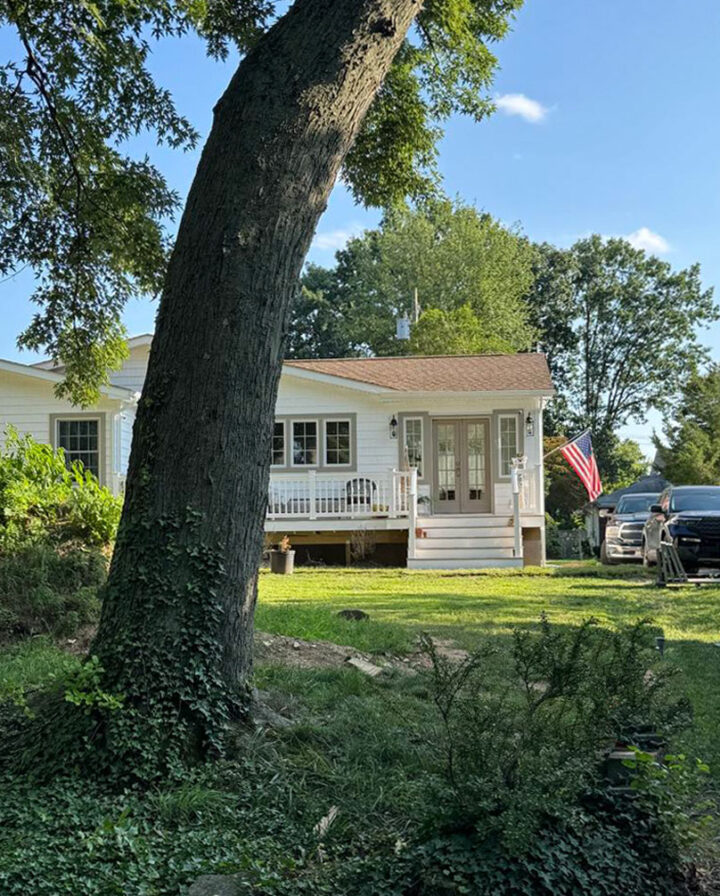
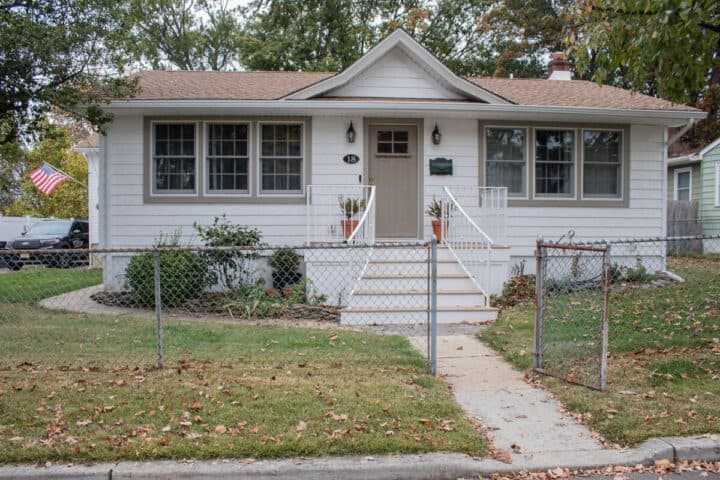
Here is our small ranch house after renovations. I hesitated to share this because our landscaping is still a mess, the old fence needs to go, and we have a few more details to add. But I wanted to show you the overall before and after.
structural changes
As I mentioned, I couldn’t make big structural changes to our front exterior. We added that peak over the door for impact; it was a smaller detail with big impact!
The front windows were all changed out with new double-hung windows. Having the same-sized windows on each side of the door is more pleasing to the eye.
Lastly, new front steps were added in a graduated design with curved railings.
Curved railings and a new porch, Updates to enhance A Ranch House Curb Appeal
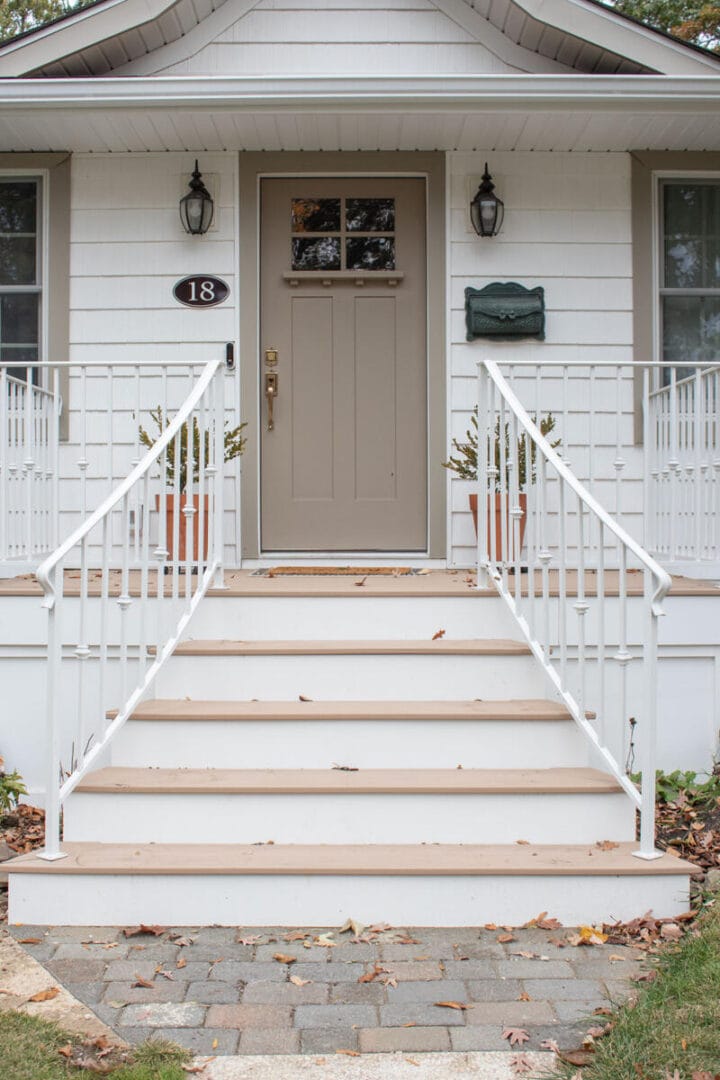
On the old house, the front porch was off-center. That really bothered me because I do love symmetry. I did love that the steps were brick, and I was hoping to be able to reuse that, but that didn’t happen. I think it was easier for the builder to demolish the old and start (mostly) fresh with new materials.
I’ve never been a big fan of the plastic decking and railings (I prefer natural elements like brick and stone), so this was a battle I lost on the exterior. However, I did get metal front railings rather than plastic. That was a risk because I wasn’t sure how metal would look with the Trex – I couldn’t find any houses with that combination for inspiration.
Fortunately, that was a risk that paid off.
front steps on a raised ranch house
On the architect’s drawing, he had graduated front steps with the front railings all straight, but I didn’t love the visual sharp edges on those. My idea to soften that was to have curved front railings. It’s a unique idea that you don’t see often, and it would add to the charm.
And wow, was that a conversation with the builder! I’m pretty sure they thought I’d lost it with some of my ideas. After our chat, he came back saying those railings would cost over $30K, which made no sense. Turns out, he thought I was asking for curved plastic railings (definitely not what I had in mind).
At this point, I took matters into my own hands, did a little research, and found a local metal company that makes custom railings. Their quote was surprisingly reasonable, and I was able to get my curved railings, just as I envisioned.
When renovating on a budget, it’s hard to get everything you know will look amazing, so compromises have to be made. There were a few things throughout that I really stood my ground on, and those railings were one.
skirting on front steps
For the skirting on the front steps, we went with board and batten. The builder added lattice to the sides of the steps because they said ventilation was needed.
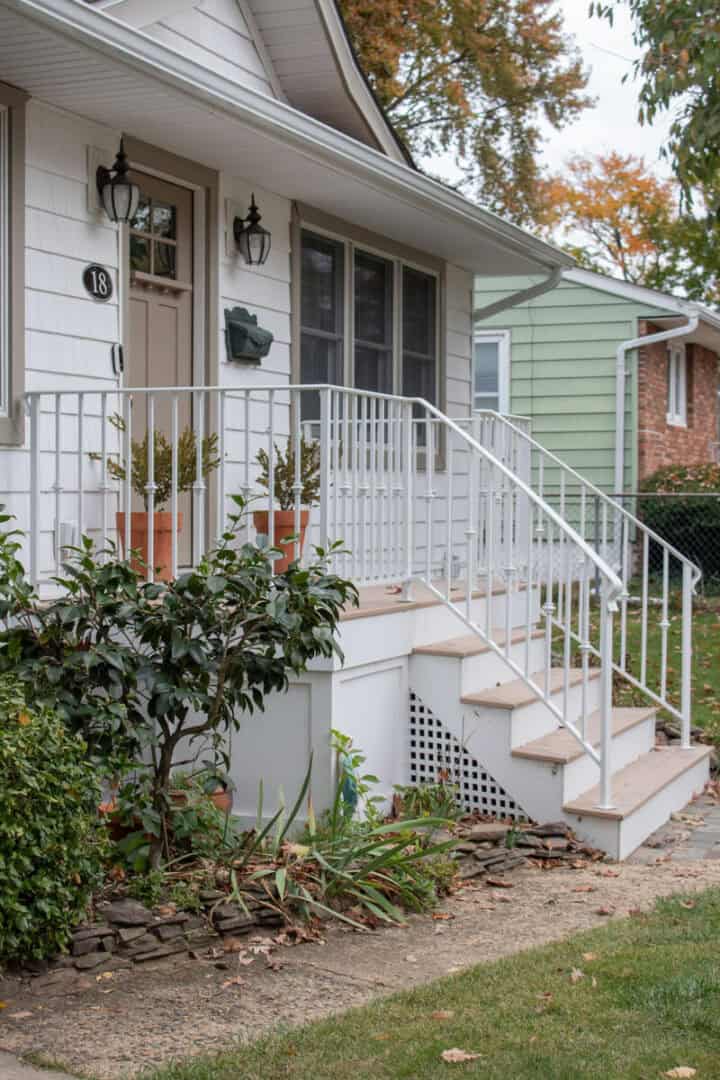
As for the peak, I had wanted some kind of small detail or decorative trim on that, such as corbels or, ideally, rafter tails. I was admittedly very undecided on that, and the builder thought corbels may look too big on a small peak.
They talked me into trying a decorative dentil molding on the peak to match the front door. When this was done, I really hated it and asked for it to be removed. That is why you might see it in some of these progress photos.
They removed it for me, and I decided to leave it plain for now. That is something I would like to revisit in the future. I feel one small tweak there could really go a long way.
exterior trim & Windows
As I mentioned, for the new windows, I really wanted wooden window panes like you see in older homes. My vision was a white house with contrasting trim to give it that classic, charming look, something a little more special than the usual all white trim.
However, that didn’t happen, so the builder suggested we use metal contrasting trim to get the look I had envisioned. There were several different colors to pick from, and I was back and forth between color schemes – the green taupe color we went with and an off white shade.
You can see the sample of the off white color next to the window below. It’s very similar to the color I used on the interior trim.

Ultimately, the green taupe color won out because I realized we ordered a white front door. If I had gone with off white trim, I would’ve preferred a wood front door.
The trim colors we were choosing from were from the James Hardie brand. The green taupe color we used is called Montgomery Taupe and is one of their options for siding colors.
Front Door & Hardware Upgrades for Instant Curb Appeal
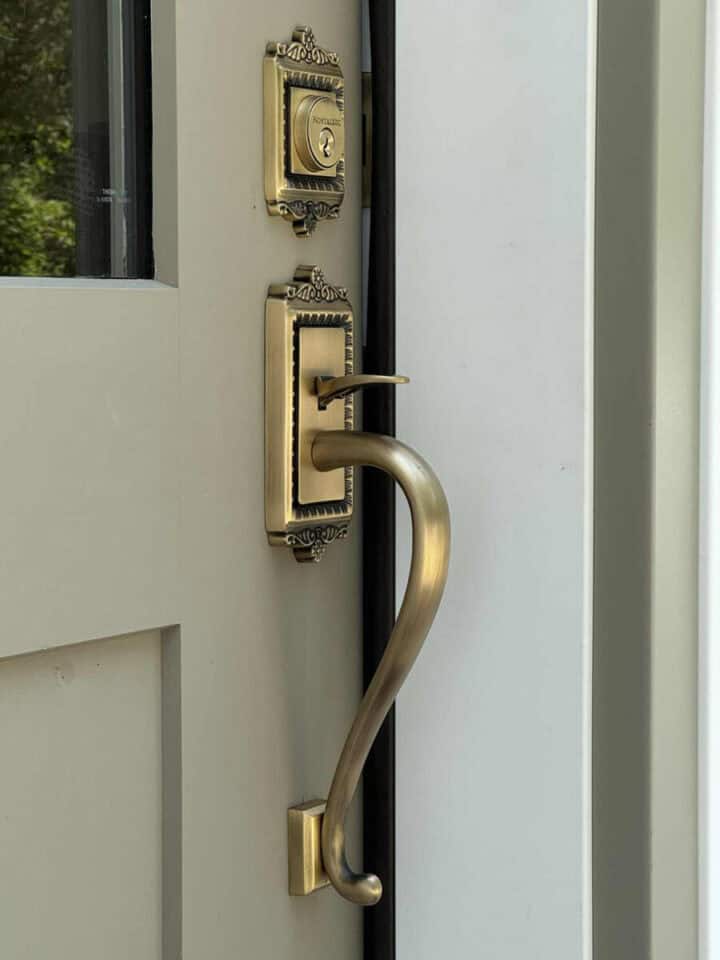
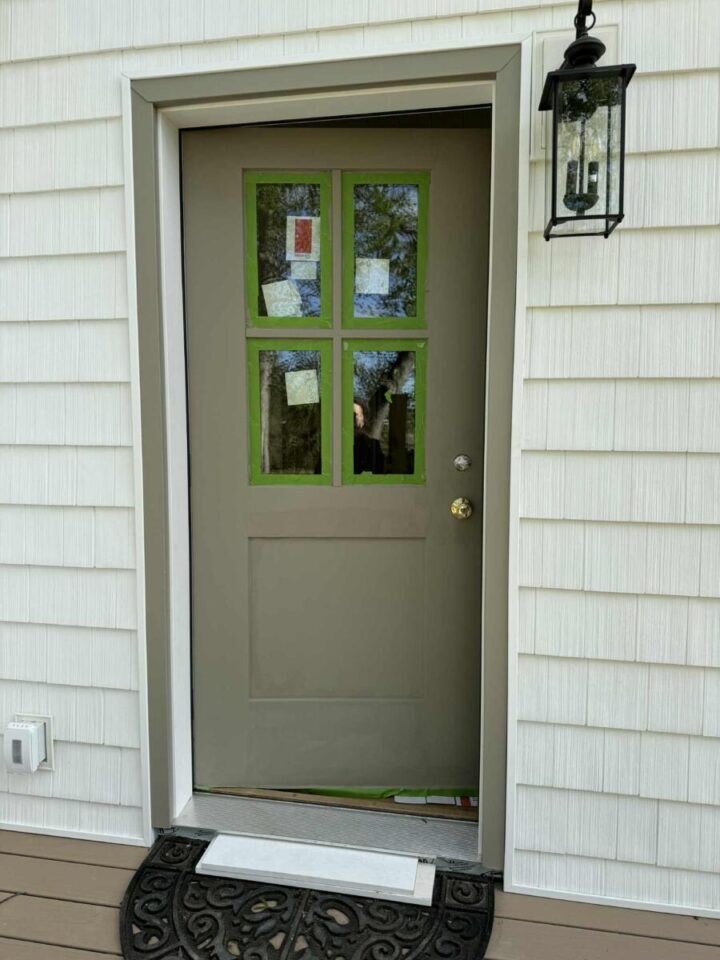
We had ordered a craftsman-style front door for this house. It was similar to the door on our last house, which we both liked. It was ordered in white, so I decided to get a paint color matched to the trim color on the windows. Painting the entry door to match that trim gave it a fresh look and made a huge difference!
I loved it so much, I also did the back doors as well.
I’ve already shared all about our antique brass style doorknobs; those are another small detail that made a huge difference.
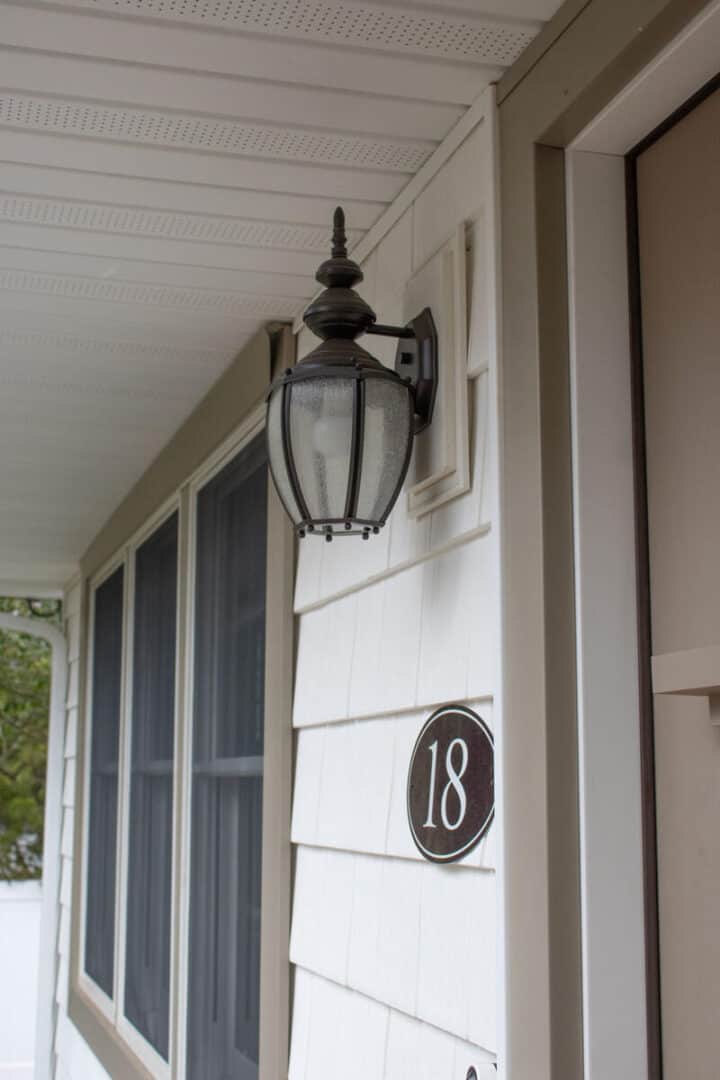
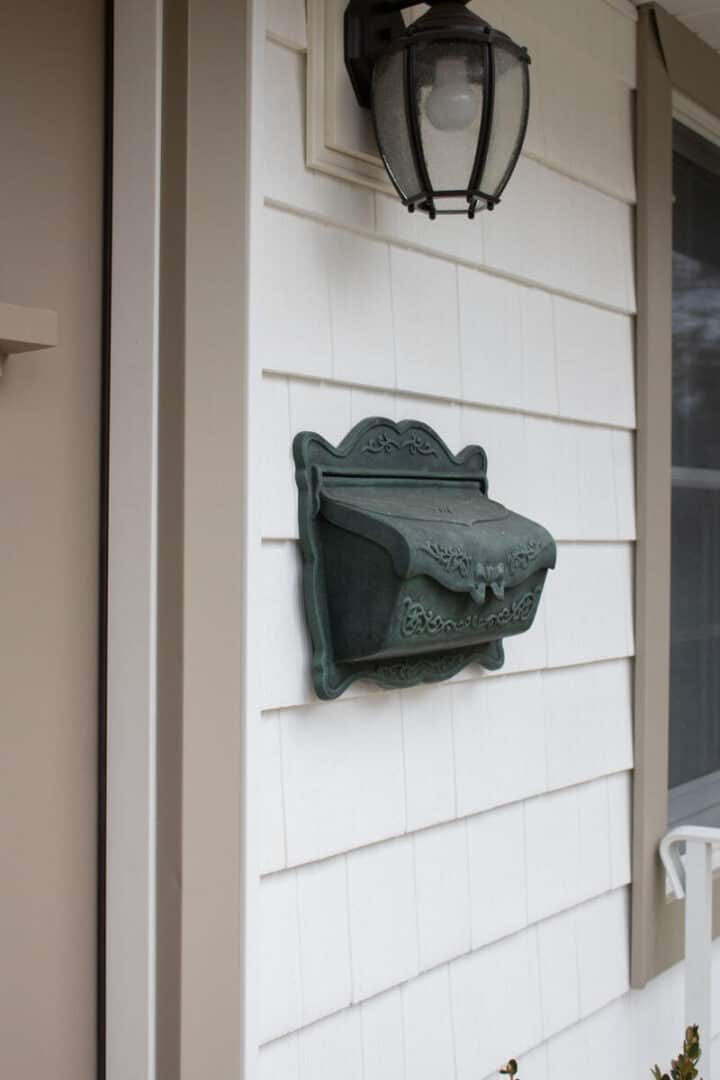
Ranch House Lighting and House Numbers: Small Details, Big Difference
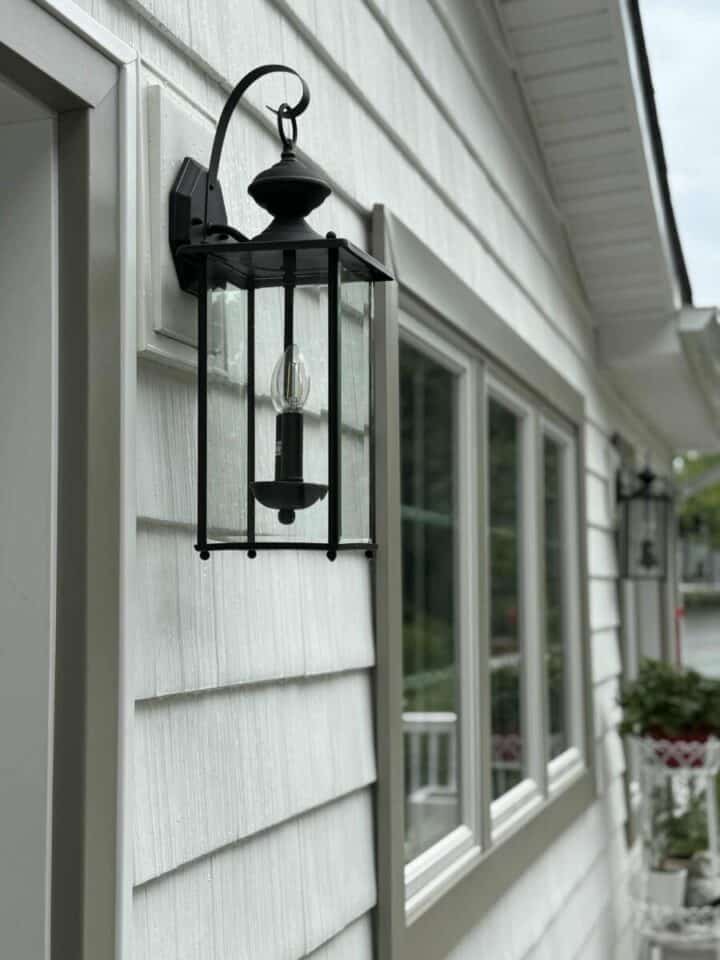
Choosing exterior lighting was another element I spent far too much time on! But I do love these lantern-style light fixtures we chose in antique bronze. They’re just unique enough to add a little more subtle charm. Charming cottage was the vision I was trying to go for all along, both inside and out.
We kept the existing mailbox because it worked well with the new look. I love the green verdigris finish on it. You can find a similar style mailbox here and a more rustic green mailbox here.
For the house number, I ordered this round house number from an Etsy shop.
ranch house shingle siding
One upgrade I really wanted was shingle siding rather than standard siding. Having shingles was another way to get a cottage look on a small ranch house; regular siding would not have had the same impact. We went with shingles on the front and back exterior and standard white siding on the sides to save money.
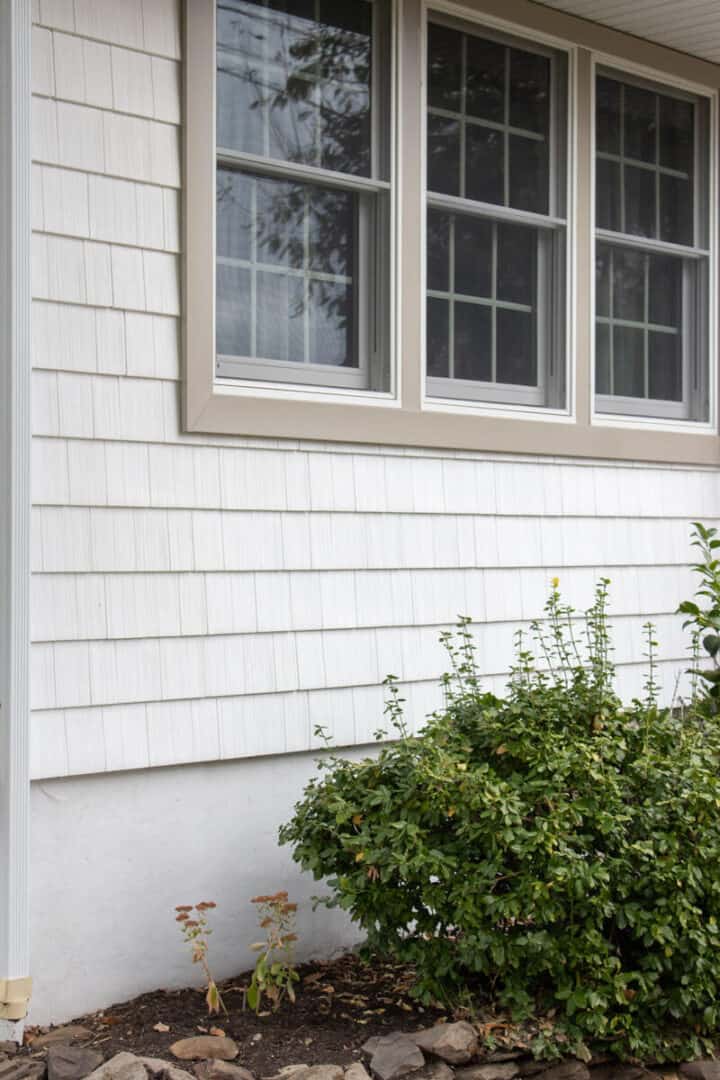
Rather than real wood siding or shingles, we went with prefab. It costs much less and is less time-consuming to install. I did visit several retailers to see these shingles in person; they are not all created equal. Some look obviously fake in person, but this one was a great option. You’d have to touch it to tell it isn’t the real thing.
This was a simple upgrade that enhanced the overall look.
back of the house: exterior ranch makeover
The back of the house got a lot of attention as well. We did put an addition onto the back, so it looks completely different from what it did.
I didn’t give as much thought to this area initially because there were so many interior details to worry about. But once construction was rolling, I realized I didn’t love how the architect designed the back deck and stairs.
One day, I popped his drawing into Photoshop and experimented with a few other versions. I realized moving the steps from facing out to the side, as he had it, to the back instead would look much more aesthetically pleasing.
Here is his back rendering (top) and my changes (bottom),
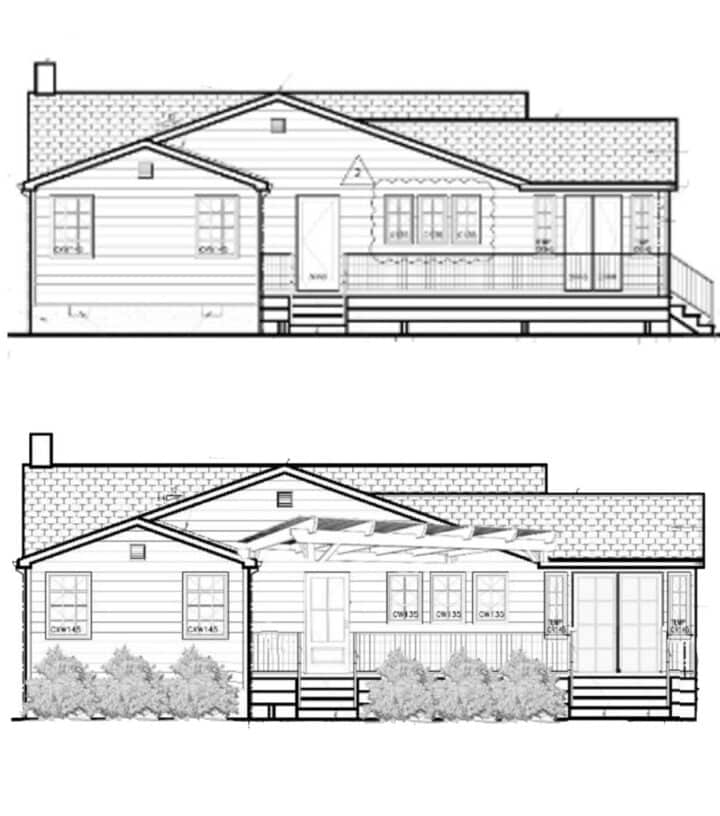
Our builder was very agreeable to that change, and I’m so happy we did it because it obviously looks much better this way. We also widened the stairs on the left a bit, too.
We still need landscaping back here, deck skirting, and to create a patio area, but that will all come with time.
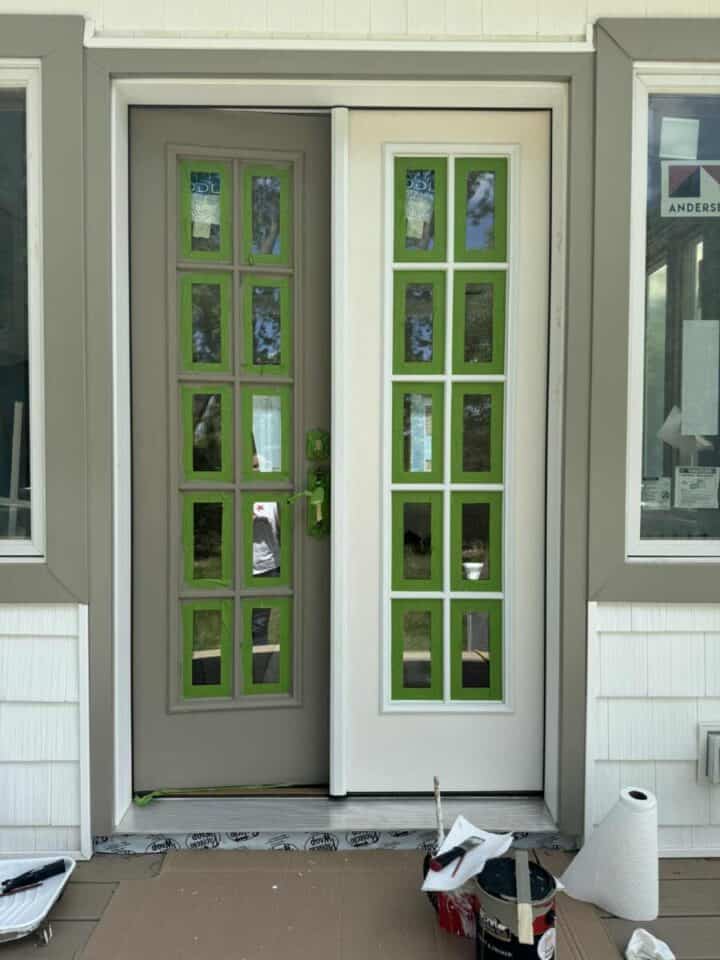
Rear exterior doors and light fixtures
Originally, the exterior back doors were all white, the same as the front door.
I painted them with color-matched paint so they’d blend seamlessly with the trim, as I did out front.
For this set of French doors, I specifically asked for them to be the skinnier French doors. Each door measures 24″ x 80″. The reason for this is that they’re a little unique, and I had seen a set of these in an older home years ago. I felt the size made them special. Still classic, but a little more interesting.
For the back deck lighting, I went with these simple lantern-style exterior fixtures in antique bronze. We ordered three of these new light fixtures for the back.
The backyard of our house is very peaceful, so we spend tons of time on the back deck. This is a big reason why we opted for no front porch; we knew all our time would be spent out back.
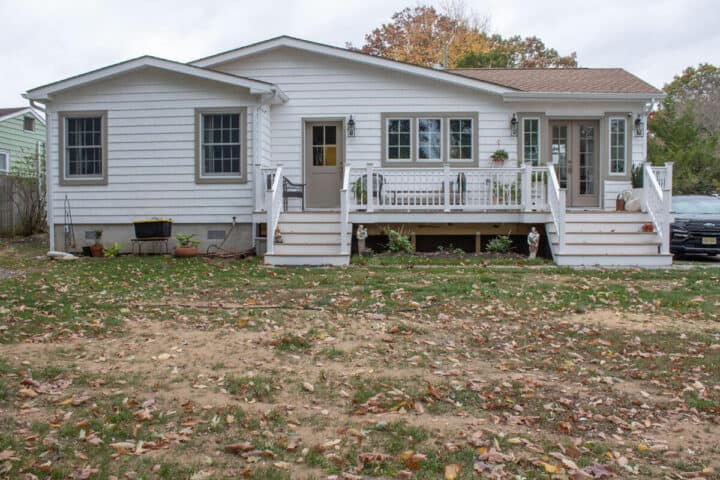
The Finished Look: Our Ranch Home Before and After
And here are the before and after photos!
Believe it or not, there are still lots of projects that need to be done at our new house.
For the front exterior, I’d still like to add window boxes. We also need to fix the landscaping in the front yard and do something about the mismatched sidewalks, and possibly remove the ugly chain link fence. I’d love to see a white picket fence here, but not sure my husband is agreeable on that one.
Those additional details will really make a huge difference.
But this is real life, so all these things will take time. That is why I opted to share this small ranch house exterior makeover now and not wait for perfection!
Budget-Friendly Curb Appeal Tips for Ranch Homes
While a ranch-style house was not what I originally had in mind for aesthetics, it did make the most sense for us, considering my husband’s disabilities. And now that we live here, I do appreciate how much easier a ranch house is.
If you are looking to do an exterior makeover or add aesthetic appeal, here are a few more ideas for ranch-style homes that won’t break the bank.
- Update House numbers
- Paint the front door
- Add shutters for charm
- Install window boxes
- Refresh exterior lighting
- Edge and mulch flower beds
- Add planters near the entryway
- Upgrade your mailbox
- Power wash everything
- Add evergreen shrubs such as boxwoods
- Paint or stain front steps
You don’t need a full-blown renovation to give your ranch home a fresh, welcoming look. A few budget-friendly exterior updates can go a long way. Such as a few coats of paint, some greenery, and small but thoughtful details – these can make all the difference.
The beauty of a ranch-style home is in its simplicity; you just have to highlight what’s already there.
Start small, tackle one project at a time, and before you know it, you’ll have a home that makes you smile every time you pull into the driveway.
What do you think of our small ranch exterior makeover?
What a labor of love – it looks so charming & welcoming! Absolutely love the back deck & yard. Enjoy every minute in your new home!
Thank you, Susan!
You are doing an absolutely beautiful job on your home. I look forward to the next phase of your updates.
Thank you, Christine!
What an amazing job!! It was so interesting to read about all the steps involved, from vision to renderings to finished product. I have never worked with a builder before, so it was surprising as well, when some things they wouldn’t agree to or couldn’t do. Your home is so beautiful & your vision & hard work has paid off!!
Thanks, Holly! I had never worked with a builder before so I really didn’t know what to expect or what normal procedure is – lots of things caught me off guard!
You made a great decision with the curved rails and gable it enhanced the whole look. The back porch is a home run. You laid it out perfectly.
Thank you, Diana!
Wow that was/is a lot of hard but has great rewards. It’s so very charming. Love the piece you put over the front door. You really gave that cute little place bags of charm.
Thanks so much, Pamela!
It looks beautiful. The curved steps and peak really give it personality. I can’t wait to see what your green thumb does to the yard.
Thank you, Laurie! I can’t wait to get to the garden!
Everything detail is perfect, inside and out. Great job. I especially like the curved railings.
Thank you 🙂
It looks absolutely perfect! You have done an amazing job. I hope that your long term plan includes replacing the chain link fence. All these things take time and money in the real world.
Thanks, Bonnie! And yes, the chain link fence is something we haven’t gotten to yet!
I love, love, love this. It’s so refreshing to see an updated ranch home. We also live in an older ranch-style house (the exterior is a bit different from yours), and sometimes I grow weary of the typical homes featured on home and design blogs. This, however, gives me some great ideas, and also gives me hope that we can continue to zhush up our modest (but cozy) house. It helps that I love cottage style!
Thank you, Kris!!
Everything looks stunning!
I’m renovating the exterior of my house right now and your ideas are such an inspiration!
So, thank you!
Thank you, I’m glad it was helpful!! Good luck with your renovations!